BeatBots!

Update: Video Link! https://goo.gl/photos/qU17V29jDkocHKya6

Description:

Our instrument is a group of five robots that each have their own percussive abilities. They are 1.) a four armed tap-bot that has four servos that tap tap tap on things, 2.) a two-armed spinning bot that hits things with it’s metal hands to make noise, 3.) a rolling pinecone that makes a rumbling noise on it’s surface, 4.) a shepard with a tap-tapping staff, and 5.) a scraper-bot that uses a bristly brush to scrape things and make noise.

We mounted 4/5 of them on a turning lazy susan, with the intention of making customization possible by changing the things on which the robots are tapping. (We could rotate the lazy susan to change what object each robot was tapping on.)

Our robots are controlled by a control board with 5 pots. They control: 1.) the tempo of the music that our bots make, 2.) the pattern with which the pine cone rolls, 3.) the pattern with which the scraper scrapes, 4.) the pattern with which the shepard taps, and 5.) the speed with which the spinny bot spins.

Challenges included: 1.) Getting the robots to tap with similar patterns // with some semblance of coherent synchrony, 2.) getting the different settings of the pots to have noticeably different sounds.

Materials Used:
– 2 Arduinos
– 4 Micro-servos
– 3 normal servos
– 3D printed plastic
– lots! of jumper wires
– machine screws / nuts
– beer bottle
– 3 soda cans
– pine cone
– chopsticks
– 5 pots
– laser cut control board, pinecone eyes, lazy susan parts
– construction paper
– foam ball
– clay
– DC motor
– metal wire
– metal bolts/nuts from Dan’s bed
– wire brush
– metal marbles
– chipotle tin
– cardboard scrapey surface w/ packaging material
– diode
– resistors
– breadboard
– 3 battery packs
– rubber bands

Code:

#include <Servo.h> 

Servo myservoR;
Servo myservoRp;
Servo myservoL;
Servo myservoLp;
Servo servoLeah;
Servo servoAndrew;
Servo servoJake;
 
int deltaPot = 0;

int leahPot = 1; 
int leahBeat = 0;

int andrewPot = 2; 
int andrewBeat = 0;
 
int danielPot = 3;
int danielBeat = 0;

int jakePot = 4;
int jakeBeat = 0;

int pos = 0; // variable to store servo position 


void setup() 
{ 
 Serial.begin(9600); // setup serial
 myservoR.attach(4); //Rightmost arm from point of view of the crab
 myservoRp.attach(5); //Right-sub-prime (right arm of the left crab)
 myservoL.attach(6); //Leftmost arm from point of view of the crab
 myservoLp.attach(7);// "Left-sub-prime" (left arm of the right crab)
 servoLeah.attach(8);
 servoAndrew.attach(9);
 servoJake.attach(10);
}
 
void loop() {

 int delta = potCipher(analogRead(deltaPot))*2; //speed of the hammering
 Serial.print("delta: ");
 Serial.println(delta);

 servoAndrew.write(80); //ARMS UP!!!
 servoJake.write(80);
 servoLeah.write(80); 
 myservoR.write(80); 
 myservoL.write(100); 
 myservoLp.write(100);
 myservoRp.write(80);

 delay(1000);
 //PLAY! 
 andrewBeat = potCipher(analogRead(andrewPot));
 Serial.print("andrewBeat: ");
 Serial.println(andrewBeat);

 danielBeat = potCipher(analogRead(danielPot));
 Serial.print("danielBeat: ");
 Serial.println(danielBeat);
 
 jakeBeat = potCipher(analogRead(jakePot));
 Serial.print("jakeBeat: ");
 Serial.println(jakeBeat);

 leahBeat = potCipher(analogRead(leahPot));
 Serial.print("leahBeat: ");
 Serial.println(leahBeat);
 
 for (int i=0; i <= 400; i++){
 servoAndrew.write(getArmLoc(pos, andrewBeat)); 
 servoLeah.write(getArmLoc(pos, leahBeat)); 
 servoJake.write(getArmLoc(pos, jakeBeat));
 myservoR.write(abs(abs(80-pos)-80)); //This series SHOULD do 16th-notes, approximately... but it sounds a bit off, so my math might be wrong
 myservoL.write(abs(abs(80-(abs(pos-60)))+100)); 
 myservoLp.write(abs(abs(80-(abs(pos-80)))+100));
 myservoRp.write(abs(abs(40-pos)-80)); 
 pos += delta;

 if (pos >= 160) pos=0;
 delay(35);
 }
 delay(0);

}

int getArmLoc(int pos, int beatType) {
 if (beatType == 1) {
 return abs(abs(80-pos)-80);
 }
 else if (beatType == 2) {
 return abs(abs(40-pos)-80);
 }
 else if (beatType == 3) {
 return abs(abs(80-(abs(pos-60)))+100);
 }
 else if (beatType == 4) {
 return abs(abs(80-(abs(pos-80)))+100);
 }
}


// returns a potSection value based on the position of the pot
int potCipher(int potVal) {
 int potSection;
 if (potVal >= 0 && potVal <= 205) {
 potSection = 0; 
 }
 else if (potVal >= 206 && potVal <= 410) {
 potSection = 1;
 }
 else if (potVal >= 411 && potVal <= 615) {
 potSection = 2;
 }
 else if (potVal >= 615 && potVal <= 820) {
 potSection = 3;
 }
 else {
 potSection = 4;
 }
 return potSection;
}

Lab 4 FSR, Bouncy Balls, Music, and Color

Description

Video

I made a bouncy balls animation where the FSR can control the gravity of the bouncy balls. I’ve attached a youtube video. Music is accompanied with the bouncy ball experienced. Also I added features that will let users control the color of the balls through mouse and control the color of backgrounds through keyboards. The user can also control the spring of the balls through up and down keys.

I didn’t focus as much on the mechanical part of the lab because I spent too much time playing with the animation and digging into the tutorial. Right now, I’m just controlling the force through my hands. But I definitely had a lot of fun playing with this lab and am looking forward to apply some mechanical concepts in the future.

Processing Code

import processing.serial.*;
import processing.sound.*;
SoundFile file;

// Change this to the portname your Arduino board
String portname = "/dev/cu.usbmodem1421"; // or "COM5"
Serial port;
String buf="";
int cr = 13; // ASCII return == 13
int lf = 10; // ASCII linefeed == 10
int SerialVal = 0;
float r = 0;
float g = 0;
float b = 0;

int numBalls = 40;
float spring = 0.05;
float gravity = 0.03;
float friction = -0.9;
Ball[] balls = new Ball[numBalls];

int barWidth = 5;
int lastBar = -1;

void setup() {
size(800, 800);
for (int i = 0; i < numBalls; i++) { balls[i] = new Ball(random(width), random(height), random(30, 70), i, balls); } noStroke(); file = new SoundFile(this, "spaceBeat.wav"); file.play(); port = new Serial(this, portname, 9600); } void draw() { background(r, g ,b); for (Ball ball : balls) { ball.collide(); ball.move(); ball.display(); } if (keyPressed == true && keyCode == UP) { spring += 0.01; } else if (keyPressed == true && keyCode == DOWN) { spring -= 0.01; } else if (keyPressed == true && key == 'r') { r += 10; } else if (keyPressed == true && key == 'R') { r -= 10; } else if (keyPressed == true && key == 'g') { g += 10; } else if (keyPressed == true && key == 'G') { g -= 10; } else if (keyPressed == true && key == 'b') { b += 10; } else if (keyPressed == true && key == 'B') { b -= 10; } else if (keyPressed == true && key == 'S' || key == 's') { friction = -0.9; spring = 0.05; r=0; g=0; b=0; } int whichBar = mouseX / barWidth; if (whichBar != lastBar) { int barX = whichBar * barWidth; fill(barX, mouseY, 66); rect(barX, 0, barWidth, height); lastBar = whichBar; } } class Ball { float x, y; float diameter; float vx = 0; float vy = 0; int id; Ball[] others; Ball(float xin, float yin, float din, int idin, Ball[] oin) { x = xin; y = yin; diameter = din; id = idin; others = oin; } void collide() { for (int i = id + 1; i < numBalls; i++) { float dx = others[i].x - x; float dy = others[i].y - y; float distance = sqrt(dx*dx + dy*dy); float minDist = others[i].diameter/2 + diameter/2; if (distance < minDist) { float angle = atan2(dy, dx); float targetX = x + cos(angle) * minDist; float targetY = y + sin(angle) * minDist; float ax = (targetX - others[i].x) * spring; float ay = (targetY - others[i].y) * spring; vx -= ax; vy -= ay; others[i].vx += ax; others[i].vy += ay; } } } void move() { vy += gravity; x += vx; y += vy; if (x + diameter/2 > width) {
x = width - diameter/2;
vx *= friction;
}
else if (x - diameter/2 < 0) { x = diameter/2; vx *= friction; } if (y + diameter/2 > height) {
y = height - diameter/2;
vy *= friction;
}
else if (y - diameter/2 < 0) { y = diameter/2; vy *= friction; } } void display() { ellipse(x, y, diameter, diameter); } } // called whenever serial data arrives void serialEvent(Serial p) { int c = port.read(); if (c != lf && c != cr) { buf += char(c); } if (c == lf) { SerialVal = int(buf); println("val="+SerialVal); gravity = SerialVal/1000; println("gravity="+gravity); buf = ""; } }

Arduino Code

/* Photocell simple testing sketch.

Connect one end of the photocell to 5V, the other end to Analog 0.
Then connect one end of a 10K resistor from Analog 0 to ground
Connect LED from pin 11 through a resistor to ground
For more information see http://learn.adafruit.com/photocells */

int photocellPin = 0; // the cell and 10K pulldown are connected to a0
int photocellReading; // the analog reading from the sensor divider
int LEDpin = 11; // connect Red LED to pin 11 (PWM pin)
int LEDbrightness; //
void setup(void) {
// We'll send debugging information via the Serial monitor
Serial.begin(9600);
}

void loop(void) {
photocellReading = analogRead(photocellPin);

// LED gets brighter the darker it is at the sensor
// that means we have to -invert- the reading from 0-1023 back to 1023-0
photocellReading = 1023 - photocellReading;
//now we have to map 0-1023 to 0-255 since thats the range analogWrite uses
LEDbrightness = map(photocellReading, 0, 1023, 255, 0);
analogWrite(LEDpin, LEDbrightness);

Serial.println(photocellReading);

delay(100);
}

Lab 2 – Tree, LED, and Arduino

For this assignment, I used a miniature tree as the diffuser. I place all three LEDs onto the miniature tree while using leaves as background. I’ve taken the cross-fading code and added some personal flavor to it. By allowing the user to control the blue color while alternating the speed of fading through out the loops. There are a total of three different fading stages with varying speed. The outcome is not as ideal as some other types of diffuser that will actually allow you to see the fading and the mixing of colors. But I wanted to see how the LED lights would look on a miniature tree and see if it can resemble a christmas tree.

Components:

  • Arduino Uno
  • Breadboard
  • 3 LEDs (rgb)
  • 3 220Ω Resistors
  • jumper wires
  • USB cable
  • laptop


Code:

/*
* Code for cross-fading 3 LEDs, red, green and blue, or one tri-color LED, using PWM
* The program cross-fades slowly from red to green, green to blue, and blue to red
* The debugging code assumes Arduino 0004, as it uses the new Serial.begin()-style functions
* Clay Shirky
*/

char b_input[100];
int b_value = 0;

// Output
int redPin = 11; // Red LED, connected to digital pin 11
int greenPin = 9; // Green LED, connected to digital pin 9
int bluePin = 10; // Blue LED, connected to digital pin 10

// Program variables
int redVal = 255; // Variables to store the values to send to the pins
int greenVal = 255; // Initial values are Red full, Green and Blue off
int blueVal = 120;

int i = 0; // Loop counter
int wait = 50; // 50ms (.05 second) delay; shorten for faster fades
int DEBUG = 1; // DEBUG counter; if set to 1, will write values back via serial

void setup()
{
pinMode(redPin, OUTPUT); // sets the pins as output
pinMode(greenPin, OUTPUT);
pinMode(bluePin, OUTPUT); // If we want to see the pin values for debugging...
Serial.begin(9600); // ...set up the serial ouput on 0004 style
Serial.println("just continue to send me b");

}

// Main program
void loop()
{
i += 20; // Increment counter
if (i < 255) // First phase of fades { greenVal += 1; // Green up redVal = 1; // Red low blueVal += 1; // Blue up } else if (i < 509) // Second phase of fades { greenVal -= 5; // Green down redVal += 5; // red up blueVal -= 5; // Blue up } else if (i < 763) // Third phase of fades { greenVal = 10; // Green low redVal -= 10; // Red down blueVal += 10; // Blue up } else // Re-set the counter, and start the fades again { i = 1; } memset(b_input, 0, 100); readSerialString(b_input); if(b_input[0] == 'b'){ b_value = b_value + 1; Serial.println(b_value); } if (b_value == 13) { b_value = 0; } analogWrite(redPin, redVal); // Write current values to LED pins analogWrite(greenPin, greenVal); analogWrite(bluePin, blueVal + b_value*20); // if (DEBUG) { // If we want to read the output // DEBUG += 1; // Increment the DEBUG counter // if (DEBUG > 10) // Print every 10 loops
// {
// DEBUG = 1; // Reset the counter
//
// Serial.print(i); // Serial commands in 0004 style
// Serial.print("\t"); // Print a tab
// Serial.print("R:"); // Indicate that output is red value
// Serial.print(redVal); // Print red value
// Serial.print("\t"); // Print a tab
// Serial.print("G:"); // Repeat for green and blue...
// Serial.print(greenVal);
// Serial.print("\t");
// Serial.print("B:");
// Serial.println(blueVal); // println, to end with a carriage return
// }
// }
delay(wait); // Pause for 'wait' milliseconds before resuming the loop
}

void readSerialString (char *strArray) {
int i = 0;
if(!Serial.available()) {
return;
}
while (Serial.available()) {
strArray[i] = Serial.read();
//Serial.print(strArray);
i++;
}
}

Video:

Tree & LED

The Shift Towards Natural Body Movement

McCullough’s argument that computers are made for the mind and not for the hands is accurate enough to apply to most of computing devices today. However, increasing awareness and improvement have also happened in the past 10 years to make computers more adaptable and friendly to different parts of human organs. Let’s take iPhone as an example, Steve Jobs’s insistence that iPhone should be used easily with our fingers is a huge step forward to force software designers to develop their applications according to how users physically interact with them. Old palmtop computers are considered as failures because human are not used to holding a pen when they interact with computers. So the claim that computers are made just for the mind should be considered as rather outdated since physical interaction with computer is quite different now thanks to touchscreen technology.
On the other hand, there has also been movement of shifting the focus of making computers just for the mind in the past decade as well. Take google glass, virtual reality, and self-driving cars as example. These technologies are created so our hands can do less labor. The interaction is shifted away from the hands to the voice or to other bodily movement. Even though these movements have yet to be widely adopted, the focus of computers right now is leaning towards being a tool for human’s most natural movement. For example, if a task can be completed the most easily with our mouth, then the designer should strive forward to design the interaction with the mouth. Hands are definitely very subtle and sensitive, but the affordance of hands should also be considered because not all tasks should rely on hands. It’s interesting to note the creation of iPad pro has actually bring back the pen just because our hands aren’t precise enough for certain art creation process. So McCullough’s point of view on the relationship of hands are art is also being constantly challenged as technology develops. 

Lab1 – LED Lights & Arduino

Description
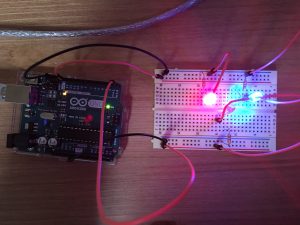
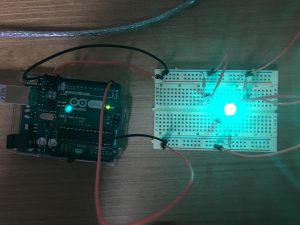
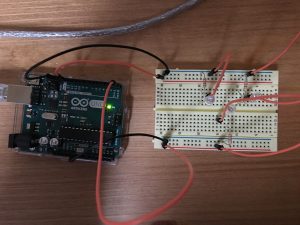
I used Arduino with three LED lights. I have used the red, the blue and the green LED lights. I have placed the blue and red on the left side of the breadboard and placed the green on the right side of the breadboard. To achieve this, I have used two grounds and two different pins (pin 13 and pin 0). The blue and red lights will turn on for one second and turn off for .5 second, then the green LED will turn on for 2 seconds and turn off for .5 seconds. The loop will restart after green LED turns off. I have uploaded the code to ensure the timing is right. Use the black wires for grounds and the orange wires for the rest of the pins. I have also used three resistors, each LED light uses one.
Components
  • 1 Arduino
  • 3  LED (Red, Blue, Green)
  • 3 Resistor (220Ω)
  • 1 Breadboard
  • 2 black wires for ground
  • 5 orange wires for the inputs

Code

int pin = 13;
int pin0 = 0;
void setup() {
  // setting up the two pins
  pinMode(pin, OUTPUT);
  pinMode(pin0, OUTPUT);
}
void loop() {
  // light up for 1 sec
  digitalWrite(pin, HIGH); //0 VOLTS OR 5
  delay(1000);
  digitalWrite(pin, LOW);
  // turn off for .5 sec
  delay(500);
  digitalWrite(pin0, HIGH); //0 VOLTS OR 5
  // light up for 2 sec
  delay(2000);
  digitalWrite(pin0, LOW);
  // turn off for .5 sec
  delay(500);
}
Photo
Both Red and Blue lights turning on

Both Red and Blue lights turning on

Green LED lights on

Green LED lights on

All lights off

All lights off