BeatBots!

Update: Video Link! https://goo.gl/photos/qU17V29jDkocHKya6

Description:

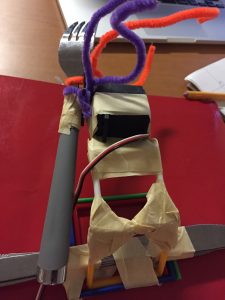
Our instrument is a group of five robots that each have their own percussive abilities. They are 1.) a four armed tap-bot that has four servos that tap tap tap on things, 2.) a two-armed spinning bot that hits things with it’s metal hands to make noise, 3.) a rolling pinecone that makes a rumbling noise on it’s surface, 4.) a shepard with a tap-tapping staff, and 5.) a scraper-bot that uses a bristly brush to scrape things and make noise.

We mounted 4/5 of them on a turning lazy susan, with the intention of making customization possible by changing the things on which the robots are tapping. (We could rotate the lazy susan to change what object each robot was tapping on.)

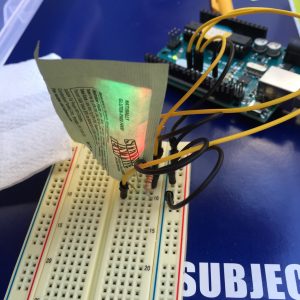
Our robots are controlled by a control board with 5 pots. They control: 1.) the tempo of the music that our bots make, 2.) the pattern with which the pine cone rolls, 3.) the pattern with which the scraper scrapes, 4.) the pattern with which the shepard taps, and 5.) the speed with which the spinny bot spins.

Challenges included: 1.) Getting the robots to tap with similar patterns // with some semblance of coherent synchrony, 2.) getting the different settings of the pots to have noticeably different sounds.

Materials Used:
– 2 Arduinos
– 4 Micro-servos
– 3 normal servos
– 3D printed plastic
– lots! of jumper wires
– machine screws / nuts
– beer bottle
– 3 soda cans
– pine cone
– chopsticks
– 5 pots
– laser cut control board, pinecone eyes, lazy susan parts
– construction paper
– foam ball
– clay
– DC motor
– metal wire
– metal bolts/nuts from Dan’s bed
– wire brush
– metal marbles
– chipotle tin
– cardboard scrapey surface w/ packaging material
– diode
– resistors
– breadboard
– 3 battery packs
– rubber bands

Code:

#include <Servo.h> 

Servo myservoR;
Servo myservoRp;
Servo myservoL;
Servo myservoLp;
Servo servoLeah;
Servo servoAndrew;
Servo servoJake;
 
int deltaPot = 0;

int leahPot = 1; 
int leahBeat = 0;

int andrewPot = 2; 
int andrewBeat = 0;
 
int danielPot = 3;
int danielBeat = 0;

int jakePot = 4;
int jakeBeat = 0;

int pos = 0; // variable to store servo position 


void setup() 
{ 
 Serial.begin(9600); // setup serial
 myservoR.attach(4); //Rightmost arm from point of view of the crab
 myservoRp.attach(5); //Right-sub-prime (right arm of the left crab)
 myservoL.attach(6); //Leftmost arm from point of view of the crab
 myservoLp.attach(7);// "Left-sub-prime" (left arm of the right crab)
 servoLeah.attach(8);
 servoAndrew.attach(9);
 servoJake.attach(10);
}
 
void loop() {

 int delta = potCipher(analogRead(deltaPot))*2; //speed of the hammering
 Serial.print("delta: ");
 Serial.println(delta);

 servoAndrew.write(80); //ARMS UP!!!
 servoJake.write(80);
 servoLeah.write(80); 
 myservoR.write(80); 
 myservoL.write(100); 
 myservoLp.write(100);
 myservoRp.write(80);

 delay(1000);
 //PLAY! 
 andrewBeat = potCipher(analogRead(andrewPot));
 Serial.print("andrewBeat: ");
 Serial.println(andrewBeat);

 danielBeat = potCipher(analogRead(danielPot));
 Serial.print("danielBeat: ");
 Serial.println(danielBeat);
 
 jakeBeat = potCipher(analogRead(jakePot));
 Serial.print("jakeBeat: ");
 Serial.println(jakeBeat);

 leahBeat = potCipher(analogRead(leahPot));
 Serial.print("leahBeat: ");
 Serial.println(leahBeat);
 
 for (int i=0; i <= 400; i++){
 servoAndrew.write(getArmLoc(pos, andrewBeat)); 
 servoLeah.write(getArmLoc(pos, leahBeat)); 
 servoJake.write(getArmLoc(pos, jakeBeat));
 myservoR.write(abs(abs(80-pos)-80)); //This series SHOULD do 16th-notes, approximately... but it sounds a bit off, so my math might be wrong
 myservoL.write(abs(abs(80-(abs(pos-60)))+100)); 
 myservoLp.write(abs(abs(80-(abs(pos-80)))+100));
 myservoRp.write(abs(abs(40-pos)-80)); 
 pos += delta;

 if (pos >= 160) pos=0;
 delay(35);
 }
 delay(0);

}

int getArmLoc(int pos, int beatType) {
 if (beatType == 1) {
 return abs(abs(80-pos)-80);
 }
 else if (beatType == 2) {
 return abs(abs(40-pos)-80);
 }
 else if (beatType == 3) {
 return abs(abs(80-(abs(pos-60)))+100);
 }
 else if (beatType == 4) {
 return abs(abs(80-(abs(pos-80)))+100);
 }
}


// returns a potSection value based on the position of the pot
int potCipher(int potVal) {
 int potSection;
 if (potVal >= 0 && potVal <= 205) {
 potSection = 0; 
 }
 else if (potVal >= 206 && potVal <= 410) {
 potSection = 1;
 }
 else if (potVal >= 411 && potVal <= 615) {
 potSection = 2;
 }
 else if (potVal >= 615 && potVal <= 820) {
 potSection = 3;
 }
 else {
 potSection = 4;
 }
 return potSection;
}

HTC Vive!

This was my very first chance to experience VR!! It was great!

I think the best parts of my VR experience were fairly obvious. I loved the immersiveness. The whale experience and the mountain with the caterpillar/dog fetching thing were great introductions to the interactions that are possible with the Vive.

I liked the explorative nature of this experience (akin to the explorative nature of Vivian, Andrew, and Owen’s project), where I was able to little by little uncover features. It started with basic stuff, like realizing that I was able to walk around the virtual space, crouch to see things at different angles, and lean in to see something closer up. Then I started figuring out other abilities, like the ability to teleport myself (It was great to see how naturally a desire to climb upwards arose, just like on real mountains!!) or the ability to throw a stick for the caterpillardog. Even in these scenes that didn’t have as many usage possibilities (like Tiltbrush), they were enjoyable, and even a little surreal.

I think that the biggest thing that was suboptimal about my first VR experience was the fact that I couldn’t see that well. I wore glasses that didn’t fit properly in the headset, and had to remove them. In an exit interview with Dina, I found myself repeatedly circling back to the frustration of not being able to see clearly. Next time I will definitely wear contact lenses! It would be nice as well if the lens in the headset could have a “focus” on it like a pair of binoculars or a camera, so that glasses wearers could fix their vision, although I’m not sure whether this really would work, or would be simple, or is simply portraying my total lack of understanding of how lenses work…

Lab07: Cutlery Crawling

Description:

A few choices that I made:
– I used a bundle of knives to counterbalance the weight of the fork and the motor. At first I was worried that they would make it too heavy altogether, but it ended up being okay.
– I used tape to fix the joints of the frame thingy (which was just a novelty item that my roommate brought home from his IBM museum visit).
– I chose a fork as an arm, first because I thought that the pointier side of the fork would stick in the carpet and effectively move it, while the other side (with the tine points facing up) would slide along the floor. Instead, when the tines were facing down, they kind of skipped along the floor and didn’t effective move the crawler, so it ended up crawling in the other direction.

I left the code unchanged from the example, and just used the pot to manually control it.


Components Used:

  • 1 Arduino
  • 1 Servomotor
  • 1 Breadboard
  • 1 pot
  • 2 pipe cleaners (to lash the fork to the motor)
  • lots of masking tape
  • 4 knives
  • 1 fork

Code:

/*
 * Servo Control Serial
 * modified for TUI October 2007
 * Servo Serial Better
 * -------------------
 *
 * Created 18 October 2006
 * copyleft 2006 Tod E. Kurt <tod@todbot.com>
 * http://todbot.com/
 *
 * adapted from "http://itp.nyu.edu/physcomp/Labs/Servo"
 */

int servoPin = 7; // Control pin for servo motor

int pulseWidth = 0; // Amount to pulse the servo
long lastPulse = 0; // the time in millisecs of the last pulse
int refreshTime = 20; // the time in millisecs needed in between pulses
int val; // variable used to store data from serial port

int minPulse = 500; // minimum pulse width
int maxPulse = 2250; // maximum pulse width

void setup() {
 pinMode(servoPin, OUTPUT); // Set servo pin as an output pin
 pulseWidth = minPulse; // Set the motor position to the minimum
 Serial.begin(9600); // connect to the serial port
 Serial.println("Servo control program ready");
}

void loop() {
 val = Serial.read(); // read the serial port
 if (val >= '1' && val <= '9' ) {
 val = val - '0'; // convert val from character variable to number variable
 val = val - 1; // make val go from 0-8
 pulseWidth = (val * (maxPulse-minPulse) / 8) + minPulse; // convert val to microseconds
 Serial.print("Moving servo to position ");
 Serial.println(pulseWidth,DEC);
 }
 updateServo(); // update servo position
}

// called every loop(). 
// uses global variables servoPi, pulsewidth, lastPulse, & refreshTime
void updateServo() {
 // pulse the servo again if rhe refresh time (20 ms) have passed:
 if (millis() - lastPulse >= refreshTime) {
 digitalWrite(servoPin, HIGH); // Turn the motor on
 delayMicroseconds(pulseWidth); // Length of the pulse sets the motor position
 digitalWrite(servoPin, LOW); // Turn the motor off
 lastPulse = millis(); // save the time of the last pulse
 }
}

lab07pic


VIDEO: lab07

Thoughtless Acts: improving the couch

I got this couch for free on craigslist and have not yet gotten bed bugs from it. Hooray!

Below you can see my roommate laying on the couch sideways. To make this comfortable (and to not have her head and neck on the rigid and uncushioned armrest), she has removed one of the pillows from its intended position, and put it between her and the armrest.

I’ve tried this setup as well, and interestingly it is a far more comfortable position than the traditional and originally intended position. A drawback of this approach is that it makes it harder to share the couch. Only one person can use the couch this way at a time, versus when used normally, the couch has a capacity of at least two people.

Perhaps Nicole’s (and my) use of the couch in this way indicates a need for a couch experience that involves a large amount of back and neck cushioning, a deep angle of recline, and elevation for the feet and legs. I think that I would absolutely sit in this sort of chair/couch.


img_6785

Egg Diffuser – Lab 2

Description: For lab 2, I made my RGB LEDs have the following control mechanism:

“R” -> increase red brightness by 10%

“r” -> decrease red brightness by 10%

Similar pattern for capital and lowercase b and g for blue and green.

I experimented with a few things with the setup of my wiring and diffuser. First I had laid out the LEDs in a way where they were too far from each other to mix well, then I realized that it would be good to move them farther away from the resistors so that they had more space for the diffuser, so I did that by adding a few extra wires.

For the diffuser, I tried a few different things including a sugar packet, a coffee filter, a napkin, a disposable coffee cup top…

Then I tried half of an eggshell, which worked alright, but similarly to some of the other things that I tried, the color was coming through as three dots, rather than mixing nicer together. What worked best was a piece of napkin placed between the LEDs and the eggshell.

Components:

  1. Adruino board
  2. Breadboard
  3. 3 LEDs (red, green, blue)
  4. 3 220 ohm resistors
  5. 7 wires
  6. 0.5 eggshell
  7. 1 small piece of napkin

IMG_6639 IMG_6670 IMG_6673

Code:

/* 
Jake Petterson
Lab 2 -- Info 262
9/9/16

Below is the program that I wrote to control the RGB LED setup.
Users can use capital R,G,B to increase the brightness of each
LED, and lowercase r,g,b to decrease the brightness.
 */

char colorCommand; // char that will be the commmand from the user

int redPin = 9; // Red LED, connected to digital pin 9
int greenPin = 10; // Green LED, connected to digital pin 10
int bluePin = 11; // Blue LED, connected to digital pin 11

double redVal = 0;
double greenVal = 0;
double blueVal = 0;

void setup() {
 pinMode(redPin, OUTPUT); // sets the pins as output
 pinMode(greenPin, OUTPUT); 
 pinMode(bluePin, OUTPUT);
 Serial.begin(9600);
 
 analogWrite(redPin, 0); // set them all to zero brightness
 analogWrite(greenPin, 0);
 analogWrite(bluePin, 0);
 
 Serial.println("Press R to increase the red brightness by 10%.\nPress"
 " G to increase the green brightness by 10%. \nPress B to increase"
 " the blue brightness by 10%.\n\nPress r, g, or b to decrease the brightness "
 "by 10%.");
 Serial.println("\nType the single letter, then press enter."); 
 
}

void loop () {
 // set the colorCommand to a space as a placeholder.
 colorCommand = ' ';
 
 // send data only when you receive data:
 while (Serial.available() > 0) {
 // read the incoming byte:
 colorCommand = Serial.read();

 Serial.println("colorCommand: ");
 Serial.println(colorCommand);
 
 // use the adjustBrightness function' 
 adjustBrightness(colorCommand, redVal, greenVal, blueVal);


 Serial.println("red: ");
 Serial.println(redVal);
 Serial.println("green: ");
 Serial.println(greenVal);
 Serial.println("blue: ");
 Serial.println(blueVal);
 
 colorCommand = ' ';
 }
}

// this function adjusts the brightness by 
// 10% depending on the command
void adjustBrightness(char colorCommand, double &redVal, double &greenVal, double &blueVal) {
 if(colorCommand == 'r' || colorCommand == 'R') {
 if(colorCommand == 'r' && redVal != 0) {
 redVal = redVal - 25.5;
 analogWrite(redPin, redVal);
 Serial.println("Red down 10%");
 }
 else if(colorCommand == 'R' && redVal != 255) {
 redVal = redVal + 25.5;
 Serial.println("Red up 10%");
 analogWrite(redPin, redVal);
 }
 }
 if(colorCommand == 'g' || colorCommand == 'G') {
 if(colorCommand == 'g' && greenVal != 0) {
 greenVal = greenVal - 25.5;
 analogWrite(greenPin, greenVal);
 Serial.println("Green down 10%");
 }
 else if(colorCommand == 'G' && greenVal != 255) {
 greenVal = greenVal + 25.5;
 analogWrite(greenPin, greenVal);
 Serial.println("Green up 10%");
 }
 }
 if(colorCommand == 'b' || colorCommand == 'B') {
 if(colorCommand == 'b' && blueVal != 0) {
 blueVal = blueVal - 25.5;
 analogWrite(bluePin, blueVal);
 Serial.println("Blue down 10%");
 }
 else if(colorCommand == 'B' && blueVal != 255) {
 blueVal = blueVal + 25.5;
 analogWrite(bluePin, blueVal);
 Serial.println("Blue up 10%");
 }
 }
}

Deconstructing the lines between skills and GUI interaction?

McCullough brings a challenging and thought-provoking discussion of the line (be it defined or rather blurry) between 1.) skills, connected strongly to the hands, sharpened only by practice, and 2.) the simplified, “spoonfed” use of computers and their mice, keyboards and screens. To me, the most interesting complications with McCullough’s efforts to explain fundamental differences between the two lie in the ambiguities. Where does the line between manual skills and mind-driven computer interaction become less relevant, or less obvious?

In the example of the “computer graphics artisan,” the fact that this person’s eye is not on their hand, as it makes small and fast movements with the mouse or the keyboard, but instead on the screen, is the distinguishing factor. Sure, it is clear that the graphical and two dimensional feedback delivered by a computer screen is different than the textural feedback and sensual expertise developed by a sculptor or a painter. But what about the times when the graphical and sensual feedbacks are integrated in a symbiotic fashion?

A skill (that is most definitely a skill of both the hands and the body in the ways that McCullough has defined) that is near and dear to me is that of rowing a scull. Just as much an endeavor in art as in sport, my rowing experience (both coaching and as an athlete) came to mind. The rower, similarly to the piano player, cannot have the luxury of using his or her mind in full to complete the actions of the stroke (or the keystrokes). Over the course of a stroke, there are simply too many fine details in the movements, pressures and feelings in the fingertips and the soles of the feet, to be conscious of every action at once. As a result, much of the stroke must be committed to muscle memory, and based on sensation rather than cognition.

The art and skill of crew begins to creep across the line that McCullough drew when we add some of the newer technologies in the sport. For instance, modern rowing machines have instant feedback via GUI that provide graphs of the rower’s “power curve” over the course of a stroke. The shape, size, and duration of this curve can be used as a graphical representation of the feel-based skills of the rower. Even more recently, technologies like Rowing in Motion https://www.rowinginmotion.com/ have begun to bring this sort of graphical instant feedback from the machine to the water. The RiM app, for Android and iOS, uses a rower’s phone in the boat with them and diagnoses not just a power curve, but also other quantifications like check factor (a measure of how quickly the rower changes direction from moving their body toward the stern, away from the finish line, to beginning to apply force to the bladeface), and an acceleration curve, all delivered to the phone screen in real time.

In this case, the mind-oriented and the skill-based work together to improve each other. The rower can more effectively self-diagnose ways to improve his or her skills, and also use the digital feedback to better distinguish the sensations of habits that add to boat speed from those that would take away from it.

Lab 1: J-A-K-E

Description


I used an Arduino with a green light. I rewrote my code to spell out my name, J-A-K-E in morse code, then to pause for a couple seconds, then repeat.

I wrote individual functions for a “dot” and for a “dash,” then used those functions to construct a function for each of the four letters that I needed.

When I tested it out, it appeared to work well, although I’m not a fluent morse-code-ist, so I cannot say for sure. Today’s class was so hecking cool! I could make blinky patterns all night.

Components


  • 1 Arduino
  • 1 LED
  • 1 Resistor (220Ω)
  • 1 Breadboard

Code

[[code]]czoxODgzOlwiLyoNCiAqIExhYiAxOiBMRUQgQmxpbmtlcg0KICogSmFrZSBQZXR0ZXJzb24NCiAqIFByb2YuIFJ5b2thaSAtLSBJbmZ7WyYqJl19byAyNjINCiAqIFdlZG5lc2RheSwgQXVndXN0IDMxDQogKiANCiAqIFRoZSBmb2xsb3dpbmcgcHJvZ3JhbSB1c2VzIGFuIEFyZHVpbntbJiomXX1vLCBhIExFRCwgYW5kIGEgMjIwIE9obQ0KICogcmVzaXN0b3IgaW4gc2VyaWVzLCBhbmQgc3BlbGxzIG91dCBteSBuYW1lLCBcIkotQXtbJiomXX0tSy1FXCIgaW4NCiAqIG1vcnNlIGNvZGUuDQogKi8NCg0KLy8gdGhlIHNldHVwIGZ1bmN0aW9uIHJ1bnMgb25jZSB3aGVuIHlvdSBwcntbJiomXX1lc3MgcmVzZXQgb3IgcG93ZXIgdGhlIGJvYXJkDQp2b2lkIHNldHVwKCkgew0KIC8vIGluaXRpYWxpemUgZGlnaXRhbCBwaW4gMTMge1smKiZdfWFzIGFuIG91dHB1dC4NCiBwaW5Nb2RlKDEzLCBPVVRQVVQpOw0KfQ0KDQovLyB0aGlzIGZ1bmN0aW9uIG91dHB1dHMgYSBkb3QsIGZ7WyYqJl19b2xsb3dlZCBieSBhIDAuMiBzZWNvbmQgcGF1c2UNCnZvaWQgZG90KCkgew0KIGRpZ2l0YWxXcml0ZSgxMywgSElHSCk7IC8vIHR1cntbJiomXX1uIHRoZSBMRUQgb24NCiBkZWxheSgyMDApOyAvLyBsZWF2ZSBpdCBvbiBmb3IgMC4yIHNlY29uZHMNCiBkaWdpdGFsV3JpdGUoMTMse1smKiZdfSBMT1cpOyAvLyB0dXJuIHRoZSBMRUQgb2ZmDQogZGVsYXkoMjAwKTsgLy8gbGVhdmUgaXQgb2ZmIGZvciAwLjIgc2Vjb25kcw0KfQ17WyYqJl19Cg0KDQovLyB0aGlzIGZ1bmN0aW9uIG91dHB1dHMgYSBkYXNoLCBmb2xsb3dlZCBieSBhIDAuMiBzZWNvbmQgcGF1c2UNCnZvaWQgZHtbJiomXX1hc2goKSB7DQogZGlnaXRhbFdyaXRlKDEzLCBISUdIKTsgLy8gdHVybiB0aGUgTEVEIG9uDQogZGVsYXkoNjAwKTsgLy8gbGVhdmUge1smKiZdfWl0IG9uIGZvciAwLjYgc2Vjb25kcw0KIGRpZ2l0YWxXcml0ZSgxMywgTE9XKTsgLy8gdHVybiB0aGUgTEVEIG9mZg0KIGRlbGF5KDJ7WyYqJl19MDApOyAvLyBsZWF2ZSBpdCBvZmYgZm9yIDAuMiBzZWNvbmRzDQp9DQoNCi8vIHRoaXMgZnVuY3Rpb24gaXMgYSBzaW1wbGUgMC4zc3tbJiomXX0gcGF1c2UsIHRvIGJlIHBsYWNlZCBmb2xsb3dpbmcNCi8vIGVhY2ggbGV0dGVyDQp2b2lkIGxldHRlclBhdXNlKCkgew0KIGRlbGF5e1smKiZdfSg2MDApOw0KfQ0KDQovLyB0aGlzIGZ1bmN0aW9uIGlzIGEgc2ltcGxlIDEuNCBzZWNvbmQgcGF1c2UsIHRvIGJlIHBsYWNlZA0KLy97WyYqJl19IGZvbGxvd2luZyBlYWNoIHdvcmQNCnZvaWQgd29yZFBhdXNlKCkgew0KIGRlbGF5KDE0MDApOw0KfQ0KDQovLyB0aGlzIGZ1bmN0aXtbJiomXX1vbiBvdXRwdXRzIHRoZSBsZXR0ZXIgSg0KLy8gLi0tLQ0Kdm9pZCBsZXR0ZXJKKCkgew0KIGRvdCgpOw0KIGRhc2goKTsNCiBkYXNoe1smKiZdfSgpOw0KIGRhc2goKTsNCiBsZXR0ZXJQYXVzZSgpOw0KfQ0KDQovLyB0aGlzIGZ1bmN0aW9uIG91dHB1dHMgdGhlIGxldHRlciBBDQp7WyYqJl19Ly8gLi0NCnZvaWQgbGV0dGVyQSgpIHsNCiBkb3QoKTsNCiBkYXNoKCk7DQogbGV0dGVyUGF1c2UoKTsNCn0NCg0KLy8gdGhpcyBmdXtbJiomXX1uY3Rpb24gb3V0cHV0cyB0aGUgbGV0dGVyIEsNCi8vIC0uLQ0Kdm9pZCBsZXR0ZXJLKCkgew0KIGRhc2goKTsNCiBkb3QoKTsNCiBke1smKiZdfWFzaCgpOw0KIGxldHRlclBhdXNlKCk7DQp9DQoNCi8vIHRoaXMgZnVuY3Rpb24gb3V0cHV0cyB0aGUgbGV0dGVyIEUNCi8vIC4NCnZ7WyYqJl19b2lkIGxldHRlckUoKSB7DQogZG90KCk7DQogbGV0dGVyUGF1c2UoKTsNCn0NCg0KLy8gdGhpcyBmdW5jdGlvbiB3aWxsIG91dHB1dHtbJiomXX0gbXkgbmFtZSBpbiBtb3JzZSBjb2RlLCBcIkotQS1LLUUsXCINCi8vIGZvbGxvd2VkIGJ5IGFuIGFkZGl0aW9uYWwgMyBzZWNvbmQgcGF7WyYqJl19dXNlLCBhZnRlciB3aGljaCBpdA0KLy8gd2lsbCBiZWdpbiBzcGVsbGluZyBKQUtFIGFnYWluLg0Kdm9pZCBsb29wKCkgew0KIGxldHtbJiomXX10ZXJKKCk7DQogbGV0dGVyQSgpOw0KIGxldHRlcksoKTsNCiBsZXR0ZXJFKCk7DQogZGVsYXkoMzAwMCk7DQp9DQogXCI7e1smKiZdfQ==[[/code]]

Gestures on my MacBook Trackpad

A UI that I would consider a favorite is the trackpad on my MacBook, most specifically the gestures functionality of it. I love the smooth tactile experience of using the trackpad. It’s literally smooth, and also smooth in its integration with my use of my computer. Most importantly, the trackpad makes actions (objects) that I need to perform on my computer over and over again faster and easier. Before these improvements to the trackpad it was easier to do certain things with a desktop computer, which would have a mouse to use. But with the improvements to the trackpad’s capabilities, I don’t miss the mouse whatsoever when I use my laptop.

One example of a “gesture” that I use very often with my trackpad’s Multi-touch abilities is “Mission Control.” In the past, arranging windows in a way that made them easy to switch between was a chore. In today’s computer use, the subject often multi-tasks, having several windows open at a time, each related to different trains of thought, different work activities, even different times of day or different moods. With gestures, I now am able to swipe four fingers upwards, and suddenly all of my windows are displayed side by side, ready for me to seamlessly switch between them.

That is just one example of the several time-saving possibilities of the trackpad.

It is worth noting that there is an element of skills needed on my part to take full advantage of the trackpad. There was a learning process to my trackpad use; I didn’t instantly know to use the gestures when I pulled my MacBook out of the box. That said, after a small amount of use, gestures became second nature, and as a user I was able to use them to navigate without added thought or effort. They became a part of my subconscious. This speaks to Activity Theory’s notion of progress, and “the gradual incorporation of a wider range of human skills and abilities.” Perhaps ten years ago, the “Mission Control” gestures would have been too abstract or outlandish to be learned by users easily, and they would have missed out on its potential for time savings.

Much like the driver learning to change lanes, when I was new to the trackpad’s gestures, I needed to be conscious of my fingers’ actions in the moment (total concentration). But as I became more skilled, “this action [became] more and more automatic,” and I was able to switch windows without stopping the task at hand to think about the fact that I was switching windows.