Frightened Computing

Description:
Chapter two of Acting With Technology begins by offering that “…recent trends in interaction design include emotion in design, extending usability to include the “pleasurability” of interactive products (Norman 2004) . . . affective computing (Picard 1997), affective design (Aboulafia and Bannon 2004), [and] autonomous characters (Tomlinson 2005) (Dourish 25). Using two LEDs instead of one introduces affective possibility into an otherwise inanimate series of wires and boards by alluding to a pair of eyes; and by coding the lights to temporarily turn off when the circuit is yelled at one creates perhaps the most basic relationship possible—but a relationship nonetheless, and one that a user should probably find emotionally moving. Relationships between humans and computers are often filled with hostility—a computer appears to not be behaving, and so we express our frustration at it. But what if computers responded to yelling with exhibits of fear, meekness, and regret?
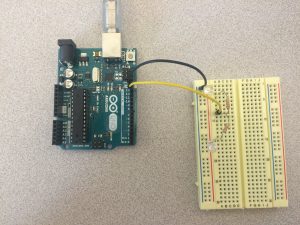
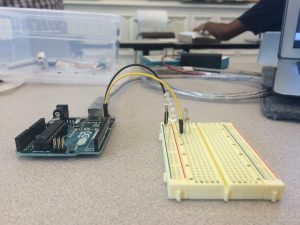
 

Components:
• 1 Arduino Uno
• 1 Breadboard
• 2 LEDs
• Jumper Wires
• 1 Battery pack (4 AA)
• 1 SparkFun Electret Microphone Breakout


Code:
const int sampleWindow = 250; //250 MS sample width
unsigned int loudNoise;

void setup()
{
pinMode(12, OUTPUT); //these control the LED eyes
pinMode(2, OUTPUT);
Serial.begin(9600);
}

void loop()
{

{
digitalWrite(12, HIGH); //these make the eyes “on” by default
digitalWrite(2, HIGH);
delay(0);
}

unsigned long start= millis(); // start of sample window
unsigned int peakToPeak = 0; // peak-to-peak level

unsigned int signalMax = 0;
unsigned int signalMin = 1024;

while (millis() – start < sampleWindow) // collecting data for 250 MS (can be changed)
{
loudNoise = analogRead(0);
if (loudNoise < 1024) // { if (loudNoise > signalMax) // if there’s a loud noise, save the loud value
{
signalMax = loudNoise;
}
else if (loudNoise < signalMin) // if there’s not a loud noise, don’t save the loud value { signalMin = loudNoise; } } } peakToPeak = signalMax – signalMin; // max – min = peak-peak amplitude double volts = (peakToPeak * 3.3) / 1024; // convert to volts Serial.println(volts); // to know if the mic is working if (volts >=1.0)
{
digitalWrite(2, LOW);
digitalWrite(12, LOW); //eyes shut off
delay(2000); // for a certain amount of time (though this could be modified for more expressive behavior)
Serial.println(“YELLING AT ME”);
}
else
{
digitalWrite(12, LOW);
digitalWrite(2, LOW); //not yetlling at me
}
}

Sing happy birthday with LEDs

Description

Learning about blinking LED using Arduino, I wanted to create something that could deliver value/benefit to an observer. A thought came to my mind: sing a song for him/her! By varying the tempo, I was able to make the LEDs blink along with the song, Happy Birthday.  One obstacle I found was that the LED bulbs were too bright to a naked eye and, thus, are in need of appropriate/decorative cover.


Components

  • 1 Arduino Uno
  • 1 Breadboard
  • 2 LEDs
  • Jumper wires
  • 1 USB cable
  • 1 220 ohm resistor

Code

// the setup function runs once when you press reset or power the board
void setup() {
// initialize digital pin 13 as an output.
pinMode(13, OUTPUT);
}

// the loop function runs over and over again forever
void loop() {
digitalWrite(13, HIGH); // Happy birthday to you
delay(375);
digitalWrite(13, LOW);
delay(50);
digitalWrite(13, HIGH); //turn the LED on (HIGH is the voltage level)
delay(125); // wait for a second
digitalWrite(13, LOW); // turn the LED off by making the voltage LOW
delay(50); // wait for a second
digitalWrite(13, HIGH);
delay(500);
digitalWrite(13, LOW);
delay(50);
digitalWrite(13, HIGH);
delay(500);
digitalWrite(13, LOW);
delay(50);
digitalWrite(13, HIGH);
delay(1000);
digitalWrite(13, LOW);
delay(50);

digitalWrite(13, HIGH); // Happy birthday to you
delay(375);
digitalWrite(13, LOW);
delay(50);
digitalWrite(13, HIGH);
delay(125);
digitalWrite(13, LOW);
delay(50);
digitalWrite(13, HIGH);
delay(500);
digitalWrite(13, LOW);
delay(50);
digitalWrite(13, HIGH);
delay(500);
digitalWrite(13, LOW);
delay(50);
digitalWrite(13, HIGH);
delay(1000);
digitalWrite(13, LOW);
delay(50);

digitalWrite(13, HIGH); // Happy birthday dear my friend
delay(375);
digitalWrite(13, LOW);
delay(50);
digitalWrite(13, HIGH);
delay(125);
digitalWrite(13, LOW);
delay(50);
digitalWrite(13, HIGH);
delay(500);
digitalWrite(13, LOW);
delay(50);
digitalWrite(13, HIGH);
delay(500);
digitalWrite(13, LOW);
delay(50);
digitalWrite(13, HIGH);
delay(500);
digitalWrite(13, LOW);
delay(50);
delay(500);
digitalWrite(13, LOW);
delay(50);
digitalWrite(13, HIGH);
delay(500);
digitalWrite(13, LOW);
delay(50);

digitalWrite(13, HIGH); // Happy birthday to you
delay(375);
digitalWrite(13, LOW);
delay(50);
digitalWrite(13, HIGH);
delay(125);
digitalWrite(13, LOW);
delay(50);
digitalWrite(13, HIGH);
delay(500);
digitalWrite(13, LOW);
delay(50);
digitalWrite(13, HIGH);
delay(500);
digitalWrite(13, LOW);
delay(50);
digitalWrite(13, HIGH);
delay(1000);
digitalWrite(13, LOW);
delay(50);
}


image1 image2

Fading LED

Description

After having the LED blink in accordance with the preloaded program, I proceeded to write my own. I wanted the LED to glow at its maximum brightness, slowly fade to zero and then rise again. I used a for() loop for accomplishing this. Also, I used analogWrite instead of digitalWrite so I can have varying levels of brightness instead of a binary HIGH or LOW.

Components

  • 1 Arduino Uno
  • 1 Breadboard
  • 1 LED
  • Jumper wires
  • 1 USB cable
  • 1 220 ohm resistor

Code

int green = 11;

void setup() {
pinMode(green, OUTPUT); // initialize analog pin 11 as an output.
}

void loop() {
int x = 1;
for (int i = 0; i > -1; i = i + x)
{
analogWrite(green, i);
if (i == 255) // if the LED reaches maximum brightness,
x = -1; // start dimming it by 1 point every second
delay(100);
}
}


Lab 01 – Sandeep

Description

The lab was about the basic task of blinking an LED. I connected the output pin 13 and the ground pin to the breadboard. Next I placed a resistor (220 ohms) on the breadboard and connected it to the jumper cable connecting output pin 13. The long leg of the LED was connected to the resistor and the shorter was connected to the jumper cable connecting to the ground pin. I wrote a code to vary the duration of LED blinking using a for loop. This reminded me of the lights we have up at diwali (festival of lights) where a similar random repeating set of LEDs are lit.

Components

  • 1 Arduino Uno R3
  • 1 Breadboard
  • 1 LED
  • 5 jumper cables
  • 1 USB power cable

Code

/*
* Lab 01: LED Blink
* Sandeep Pal
* Prof : Kimiko Ryokai
* TA : Noura Howell
*
* Description:
*
* The following code is a modification of the basic example of LED blinking using and Arduino
* I have made the LEDs blink at a varying rate over time by using a for loop
*
* Materials:
*
* 1 Arduino Uno R3
* 1 Breadboard
* 1 LED
* 5 jumper cables
* 1 USB power cable
*
*
*/

/*
* Defining output pin
*/
int ledPin = 13;

/*
* Writing the setup function to initialize the output pin to 13
*/
void setup() {
pinMode( ledPin, OUTPUT);
}

void loop() {
// writing a for loop to vary the duration for which the LED should blink
for(int j =0; j<5;j++){ int jVal = j*200; //writing high voltage to the digital output : 13 digitalWrite(ledPin, HIGH); //modifying the delay based on the loop variable delay(1000-jVal); //writing low voltage to the digital output : 13 digitalWrite(ledPin, LOW); delay(jVal); } }