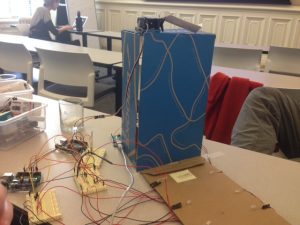
Description
We were inspired by the music of people going caroling from house to house where the visitor is the one that does the singing. But, what if we reverse who does the singing and instead have the house and person’s home do the caroling? Furthermore, what if the person who visits starts a song and then the person who’s home it is (who is answering the door) adds to that song in a duet or collaborative way? That’s what our caroling house does.
How it works:
- A visitor walks up to the beginning of the path
- The christmas lights light up the path
- The visitor steps on the welcome mat
- A song begins playing
- The visitor presses the door bell
- Snow falls from the gutter to create a wintery environment
- The person who lives at the house answers the door. When they turn the doorknob, the song changes to a different octave adding to the duet.
Inputs used:
- FSR (x3)
- Potentiometer
Outputs used:
- 6 LEDs
- piezo speaker
- servo motor to dump snow from the gutter
Materials used
- FSR (x3)
- Potentiometer
- 6 LEDs
- Piezo speaker
- Servo motor
- 3 Arduinos
- 4 breadboards
- 6 220k ohm resistors
- 4 10k ohm resistor
Doorknob and Welcome Mat Code
// TONES ========================================== // Start by defining the relationship between
 // note, period, & frequency.
 #define C 523
 #define Db 554
 #define D 587
 #define Eb 622
 #define E 659
 #define f 698 // Does not seem to like capital F
 #define Gb 740
 #define G 783
 #define Ab 830
 #define A 880
 #define Bb 932
 #define B 988
 #define c_ 1046
 #define dd 1109
 #define d 1175
 #define eb 1244
 #define e 1318
 #define ff 1397
 #define gb 1480
 #define g 1568
 // Define a special note, 'R', to represent a rest
 #define R 0
 // SETUP ============================================
 // Set up speaker on a PWM pin (digital 9, 10 or 11)
 int speakerOut = 9;
 int FSRPin = A0;
 int potPin = A1;
 int valFSR = 0;
 int valPot = 0;
 int i = 0;
 // Do we want debugging on serial out? 1 for yes, 0 for no
 int DEBUG = 1;
 void setup() {
 pinMode(speakerOut, OUTPUT);
 if (DEBUG) {
 Serial.begin(9600); // Set serial out if we want debugging
 }
 }
 // MELODY and TIMING =======================================
 // melody[] is an array of notes, accompanied by beats[],
 // which sets each note's relative length (higher #, longer note)
 int melody1a[] = {E, E, E,R,
 E, E, E,R,
 E, G, C, D, E, R,
 f, f, f,f, f, E, E,E, E, D ,D,E, D, R, G ,R,
 E, E, E,R,
 E, E, E,R,
 E, G, C, D, E, R,
 f, f, f,f, f, E, E, E, G,G, f, D, C,R, G, R };

 int melody1b[] = {B, B, B,R,
 B, B, B,R,
 B, D, G, A, B, R,
 C, C, C,C, C, B, B,B, B, D ,D,C, A, R, G ,R,
 B, B, B,R,
 B, B, B,R,
 B, D, G, A, B, R,
 C, C, C,C, C, B, B,B, B, D ,D,C, A, R, G ,R };

 //put melody 2a and 2b here
 int melody2a[] = {E,R, R, R,
 f, E, Eb, E,
 f, R, R, R,
 Gb, G, R, R,
 R, A, B, c_,
 d, c_, B, A,
 G,R, R, R,
 E,R, R, R,
 f, E, Eb, E,
 f, R, R, R,
 Gb, G, R, R,
 R, A, B, c_,
 d, c_, B, A,
 G,R, R, R};

 int melody2b[] = {A, R, R, R,
 B, A, Ab, A,
 Bb, R, R, R,
 B, c_, R, R,
 R, d, e, f,
 g, f, e, d,
 c_, R, R, R,
 A, R, R, R,
 B, A, Ab, A,
 Bb, R, R, R,
 B, c_, R, R,
 R, d, e, ff,
 g, ff, e, d,
 c_, R, R, R};

// int MAX_COUNT1 = sizeof(melody1) / 2; // Melody length, for looping.
// int MAX_COUNT2 = sizeof(melody2) / 2;
 // Set overall tempo
 long tempo = 10000;
 // Set length of pause between notes
 int pause = 1000;
 // Loop variable to increase Rest length
 int rest_count = 100; //<-BLETCHEROUS HACK; See NOTES
 // Initialize core variables
 int tone_ = 0;
 int beat = 0;
 long duration = 0;
 // PLAY TONE ==============================================
 // Pulse the speaker to play a tone for a particular duration
 void playTone() {
 long elapsed_time = 0;
 if (tone_ > 0) { // if this isn't a Rest beat, while the tone has
 // played less long than 'duration', pulse speaker HIGH and LOW
 while (elapsed_time < duration) {
 digitalWrite(speakerOut,HIGH);
 delayMicroseconds(tone_ / 2);
 // DOWN
 digitalWrite(speakerOut, LOW);
 delayMicroseconds(tone_ / 2);
 // Keep track of how long we pulsed
 elapsed_time += (tone_);
 }
 }
 else { // Rest beat; loop times delay
 for (int j = 0; j < rest_count; j++) { // See NOTE on rest_count
 delayMicroseconds(duration);
 }
 }
 }

 void playNote(int melody[]) {
 tone_ = melody[i];
 beat = 50;
 duration = beat * tempo;
 playTone();
 delayMicroseconds(pause);
 }

 // LET THE WILD RUMPUS BEGIN =============================

 void loop() {
 valFSR = analogRead(FSRPin); // read value from the sensor
 valPot = analogRead(potPin);
// int *melody = melody1; ///fix later
 if (valFSR >= 10 && valFSR < 500 ){
 Serial.println(valFSR);
 Serial.println(valPot);
 if (valPot < 10) {
 int *melody = melody1a;
 playNote(melody);
 } else {
 int *melody = melody1b; //move to duet
 playNote(melody);
 }
 }
 if (valFSR >= 500 ){
 Serial.println(valFSR);
 Serial.println(valPot);
 if (valPot < 10) {
 int *melody = melody2a;
 playNote(melody);
 } else {
 int *melody = melody2b; //move to duet
 playNote(melody);
 }
 }
// playNote(melody);
 i++;
}
// if (valFSR >= 500) { //second song
// Serial.println(valFSR);
// int *melody = melody1a;
// playNote(melody);
// i++;
// }
// if (i%60 == 0) {
// i = 0;
// }
//}

