Description
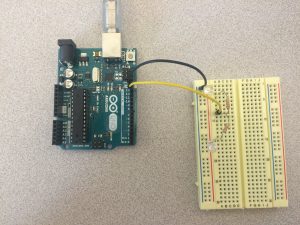
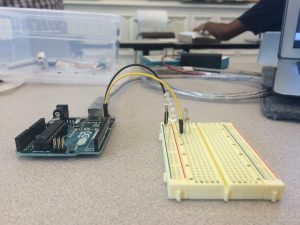
Learning about blinking LED using Arduino, I wanted to create something that could deliver value/benefit to an observer. A thought came to my mind: sing a song for him/her! By varying the tempo, I was able to make the LEDs blink along with the song, Happy Birthday. One obstacle I found was that the LED bulbs were too bright to a naked eye and, thus, are in need of appropriate/decorative cover.
Components
- 1 Arduino Uno
- 1 Breadboard
- 2 LEDs
- Jumper wires
- 1 USB cable
- 1 220 ohm resistor
Code
// the setup function runs once when you press reset or power the board
void setup() {
// initialize digital pin 13 as an output.
pinMode(13, OUTPUT);
}
// the loop function runs over and over again forever
void loop() {
digitalWrite(13, HIGH); // Happy birthday to you
delay(375);
digitalWrite(13, LOW);
delay(50);
digitalWrite(13, HIGH); //turn the LED on (HIGH is the voltage level)
delay(125); // wait for a second
digitalWrite(13, LOW); // turn the LED off by making the voltage LOW
delay(50); // wait for a second
digitalWrite(13, HIGH);
delay(500);
digitalWrite(13, LOW);
delay(50);
digitalWrite(13, HIGH);
delay(500);
digitalWrite(13, LOW);
delay(50);
digitalWrite(13, HIGH);
delay(1000);
digitalWrite(13, LOW);
delay(50);
digitalWrite(13, HIGH); // Happy birthday to you
delay(375);
digitalWrite(13, LOW);
delay(50);
digitalWrite(13, HIGH);
delay(125);
digitalWrite(13, LOW);
delay(50);
digitalWrite(13, HIGH);
delay(500);
digitalWrite(13, LOW);
delay(50);
digitalWrite(13, HIGH);
delay(500);
digitalWrite(13, LOW);
delay(50);
digitalWrite(13, HIGH);
delay(1000);
digitalWrite(13, LOW);
delay(50);
digitalWrite(13, HIGH); // Happy birthday dear my friend
delay(375);
digitalWrite(13, LOW);
delay(50);
digitalWrite(13, HIGH);
delay(125);
digitalWrite(13, LOW);
delay(50);
digitalWrite(13, HIGH);
delay(500);
digitalWrite(13, LOW);
delay(50);
digitalWrite(13, HIGH);
delay(500);
digitalWrite(13, LOW);
delay(50);
digitalWrite(13, HIGH);
delay(500);
digitalWrite(13, LOW);
delay(50);
delay(500);
digitalWrite(13, LOW);
delay(50);
digitalWrite(13, HIGH);
delay(500);
digitalWrite(13, LOW);
delay(50);
digitalWrite(13, HIGH); // Happy birthday to you
delay(375);
digitalWrite(13, LOW);
delay(50);
digitalWrite(13, HIGH);
delay(125);
digitalWrite(13, LOW);
delay(50);
digitalWrite(13, HIGH);
delay(500);
digitalWrite(13, LOW);
delay(50);
digitalWrite(13, HIGH);
delay(500);
digitalWrite(13, LOW);
delay(50);
digitalWrite(13, HIGH);
delay(1000);
digitalWrite(13, LOW);
delay(50);
}