Description:
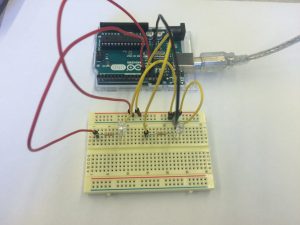
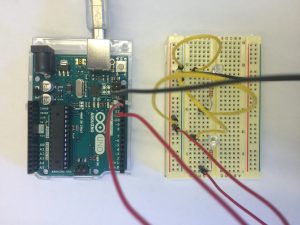
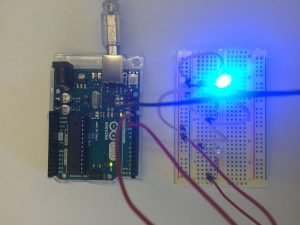
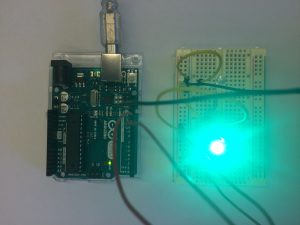
I used Arduino with a blue LED first, and customized its blinking rate. Based on that, I added another circuit loop for a green LED light. And for the coding part, I changed the code further to make the two LED lights blink in turns at a customized rate. A full loop will be like that LED A blinks once for 1 second, LED B blinks twice for 0.5 second each, and then LED B blinks once for 1 second, LED A blinks twice for 0.5 second each.
Components:
- 2 LED
- 2 Resistors (220Ω)
- 6 Jumper wires
- 1 Macbook Pro
- 1 Arduino
- 1 Breadboard
- 1 USB cable
Code:
void setup() {
// initialize digital pin 13 as an output.
pinMode(13, OUTPUT);
pinMode(12, OUTPUT);
}
// the loop function runs over and over again forever
void loop() {
digitalWrite(13, HIGH); // turn the LED on (HIGH is the voltage level)
delay(1000); // wait for a second
digitalWrite(13, LOW); // turn the LED off by making the voltage LOW
delay(1000); // wait for a second
digitalWrite(12, HIGH); // turn the LED off by making the voltage LOW
delay(500); // wait for 0.5 second
digitalWrite(12, LOW); // turn the LED off by making the voltage LOW
delay(500); // wait for 0.5 second
digitalWrite(12, HIGH); // turn the LED off by making the voltage LOW
delay(500); // wait for 0.5 second
digitalWrite(12, LOW); // turn the LED off by making the voltage LOW
delay(500); // wait for 0.5 second
digitalWrite(12, HIGH); // turn the LED on (HIGH is the voltage level)
delay(1000); // wait for a second
digitalWrite(12, LOW); // turn the LED off by making the voltage LOW
delay(1000); // wait for a second
digitalWrite(13, HIGH); // turn the LED off by making the voltage LOW
delay(500); // wait for 0.5 second
digitalWrite(13, LOW); // turn the LED off by making the voltage LOW
delay(500); // wait for 0.5 second
digitalWrite(13, HIGH); // turn the LED off by making the voltage LOW
delay(500); // wait for 0.5 second
digitalWrite(13, LOW); // turn the LED off by making the voltage LOW
delay(500); // wait for 0.5 second
}
Comment:
I love it! It’s fun to experiment with Arduino :p
Photos: