
We created a musical instrument that focuses on manipulating MIDI files.
The basic idea of the instrument is to enable users to play musical variations of songs in almost infinite combinations of tempo, attack, decay and release.
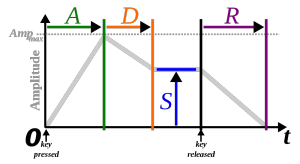
Three potentiometers correlate to three transformations based on ASDR, which stands for attack, sustain, decay and release. We altered the attack decay and release which allowed a person using the device to create the variations.
- Attack time is the time taken for initial run-up of level from nil to peak, beginning when the key is first pressed. We mapped 1024 values of the potentiometer to 0 – 1.5s.
- Decay time is the time taken for the subsequent run down from the attack level to the designated sustain level. We mapped 1024 values of the potentiometer to 0-1.5s.
- Sustain level is the level during the main sequence of the sound’s duration, until the key is released. We kept this constant at 1.5
- Release time is the time taken for the level to decay from the sustain level to zero after the key is released. We mapped 1024 values of the potentiometer to 0-1.5s.
- We hooked up arduino and processing using firmata and then used a minim library. The FSR correlated to a tempo transformation.With this setup, we are able to transform any musical file into a remixed, completely different song.
- Video – >
- https://drive.google.com/a/berkeley.edu/file/d/0ByHw8c_nutT2YzFRYV9YWUo4Tk0/view?usp=sharing
Code:
| /* | |
| Logic used: | |
| 1. Set a MIDI playback with set envelope | |
| 2. Store a recorded fragment and loop over the recorded fragment | |
| Original Authors: Multiple contributors to Minim | |
| New authors: Neera Grover, Vivian Liu, Sandeep Pal and Ganesh Iyer | |
| */ | |
| import ddf.minim.*; | |
| import ddf.minim.ugens.*; | |
| import javax.sound.midi.*; | |
| Minim minim; | |
| // Sequencer objects – one for base and one for loop | |
| Sequencer base; | |
| Sequencer loop; | |
| Sequence baseSequence; | |
| Sequence backingLoop; | |
| // For recording loops | |
| AudioInput loopIn; | |
| AudioRecorder loopRecorder; | |
| // For playback | |
| AudioOutput out; | |
| AudioPlayer player; | |
| import processing.serial.*; | |
| import cc.arduino.*; | |
| Arduino arduino; | |
| int ledPin = 13; | |
| int val; | |
| int val1; | |
| int val2; | |
| int val3; | |
| int val4; | |
| void setup(){ | |
| size(512, 200, P3D); | |
| minim = new Minim(this); | |
| /**Connecting arduino to Processing.*/ | |
| arduino = new Arduino(this, Arduino.list()[1], 57600); | |
| arduino.pinMode(ledPin, Arduino.OUTPUT); | |
| arduino.pinMode(0, Arduino.INPUT); //(A0=0) | |
| // need to set variable loopIn to something that records or reuses a sample | |
| // right now, the issue is that it always picks up what the microphone records | |
| loopIn = minim.getLineIn(); | |
| // getLineIn seems to be the biggest problem | |
| // How does one use the audio generated by the computer itself as a fragment to loop over? | |
| // enable monitoring seems to do absolutely nothing for this cause. causes feedback. some interesting sound though. | |
| loopIn.disableMonitoring(); | |
| loopRecorder = minim.createRecorder(loopIn, “currentLoop.wav“); | |
| // out is playing the minim object back to us | |
| out = minim.getLineOut(Minim.MONO); | |
| try | |
| { | |
| // get a disconnected sequencer. this should prevent | |
| // us from hearing the general midi sounds the | |
| // sequecer is automatically hooked up to. | |
| base = MidiSystem.getSequencer( false ); | |
| // have to open it | |
| base.open(); | |
| // load our sequence | |
| baseSequence = MidiSystem.getSequence( createInput( “bach.midi“ ) ); | |
| // put it in the sequencer | |
| base.setSequence( baseSequence); | |
| // hook up an instance of our Receiver to the Sequencer’s Transmitter | |
| base.getTransmitter().setReceiver( new MidiReceiver() ); | |
| base.setTickPosition(10000); | |
| base.setLoopEndPoint(20000); | |
| // just keep looping | |
| //base.setLoopCount( Sequencer.LOOP_CONTINUOUSLY ); | |
| // and away we go | |
| // Hello Vivian! | |
| base.start(); | |
| } | |
| catch( MidiUnavailableException ex ) // getSequencer can throw this | |
| { | |
| // oops there wasn’t one. | |
| println( “No default sequencer, sorry bud.“ ); | |
| } | |
| catch( InvalidMidiDataException ex ) // getSequence can throw this | |
| { | |
| // oops, the file was bad | |
| println( “The midi file was hosed or not a midi file, sorry bud.“ ); | |
| } | |
| catch( IOException ex ) // getSequence can throw this | |
| { | |
| println( “Had a problem accessing the midi file, sorry bud.“ ); | |
| } | |
| } | |
| class MidiReceiver implements Receiver | |
| { | |
| void close() {} | |
| void send( MidiMessage msg, long timeStamp ) | |
| { | |
| // we only care about NoteOn midi messages. | |
| // here’s how you check for that | |
| if ( msg instanceof ShortMessage ) | |
| { | |
| ShortMessage sm = (ShortMessage)msg; | |
| // if you want to handle messages other than NOTE_ON, you can refer to the constants defined in | |
| // ShortMessage: http://docs.oracle.com/javase/6/docs/api/javax/sound/midi/ShortMessage.html | |
| // And figure out what Data1 and Data2 will be, refer to the midi spec: http://www.midi.org/techspecs/midimessages.php | |
| if ( sm.getCommand() == ShortMessage.NOTE_ON ) | |
| { | |
| // note number, between 1 and 127 | |
| int note = sm.getData1(); | |
| // velocity, between 1 and 127 | |
| int vel = sm.getData2(); | |
| // we could also use sm.getChannel() to do something different depending on the channel of the message | |
| // see below the draw method for the definition of this sound generating Instrument | |
| out.playNote( 0, 0.1f, new Synth( note, vel ) ); | |
| } | |
| } | |
| } | |
| } | |
| class Synth implements ddf.minim.ugens.Instrument | |
| { | |
| Oscil wave; | |
| Damp env; | |
| int noteNumber; | |
| Synth( int note, int velocity ) | |
| { | |
| noteNumber = note; | |
| float freq = Frequency.ofMidiNote( noteNumber ).asHz(); | |
| float amp = (float)(velocity–1) / 126.0f; | |
| wave = new Oscil( freq, amp, Waves.QUARTERPULSE ); | |
| // Damp arguments are: attack time, damp time, and max amplitude | |
| env = new Damp( 0.01f, 0.5f, 1.0f ); | |
| // writing code for looping | |
| wave.patch( env ); | |
| } | |
| void noteOn( float dur ) | |
| { | |
| // make sound | |
| env.activate(); | |
| env.patch( out ); | |
| } | |
| void noteOff() | |
| { | |
| env.unpatchAfterDamp( out ); | |
| } | |
| } | |
| void draw(){ | |
| val = arduino.analogRead(0); | |
| val1 = arduino.analogRead(1); | |
| val2 = arduino.analogRead(2); | |
| val3 = arduino.analogRead(3); | |
| val4 = arduino.analogRead(4); | |
| // set the tempo | |
| if ((val/4) < 250)) { | |
| base.setTempoInBPM( val/4 ); | |
| } | |
| base.setLoopCount(val2 % 10); | |
| //set loops | |
| //base.startRecording(); | |
| println(base.getLoopCount()); | |
| println(base.getLoopEndPoint()); | |
| println(base.getLoopStartPoint()); | |
| println(val1 * 8); | |
| println(base.getTickPosition()); | |
| //loopcount isn’t working out | |
| //if we get above the tick position of 20000, go back to 10000 and play again | |
| if ((base.getTickPosition()) > 20000 – (val1 * 8)) { | |
| base.setTickPosition(10000); | |
| //base.stopRecording(); | |
| } | |
| // Code snippet to draw waves | |
| background(0); | |
| stroke(255); | |
| // draw the waveforms | |
| // the values returned by left.get() and right.get() will be between -1 and 1, | |
| // so we need to scale them up to see the waveform | |
| for(int i = 0; i < loopIn.left.size()–1; i++) | |
| { | |
| line(i, 50 + loopIn.left.get(i)*50, i+1, 50 + loopIn.left.get(i+1)*50); | |
| line(i, 150 + loopIn.right.get(i)*50, i+1, 150 + loopIn.right.get(i+1)*50); | |
| } | |
| // end code snippet to draw waves | |
| } |