Sprinting LED

Description:

I used an Arduino-Uno as a microprocessor to light an LED light at a decelerating pace.
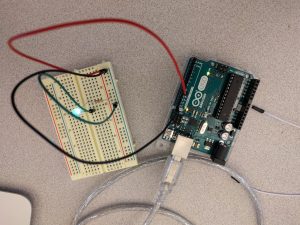
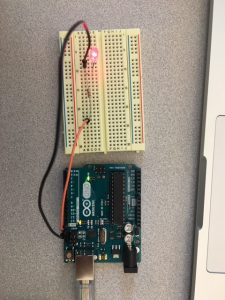
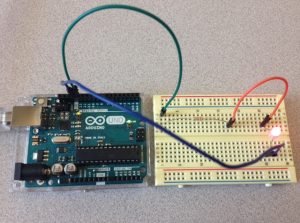
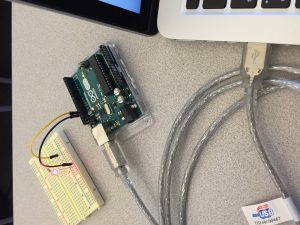
Components Used:

  • 1 Arduino
  • 1 LED
  • 1 Resistor (220Ω)
  • 1 Breadboard

Code:

/*
 * Blink
 * 
 */

int ledPin = 13;


int stepFunction(int x, int y){
 //the rate at which the LED will decelerate.
 int result;
 result = x + y;
 return result;
}

int pace = 0;

void setup() {
 // put your setup code here, to run once:
 pinMode(ledPin, OUTPUT);
 Serial.begin(9600);
}

void loop() {
 // set the running pace for the LED blinking
 int increment = 20; // first, set increment to 20ms. 
 digitalWrite(ledPin, HIGH); // turn the LED on (HIGH is the voltage level)
 pace = stepFunction(pace, increment);
 Serial.println(increment);
 delay(pace);
// delay(2000); // wait for a second
 digitalWrite(ledPin, LOW); // turn the LED off by making the voltage LOW
 delay(pace);
// delay(1000); // wait for a second
 increment = pace;
}

Lab 1 – Dim and Blink

Description:

I added a Dim effect from some code examples online. I had the LED blink once it reached its max brightness, before dimming back down to zero.

Components:

Arduino
Breadboard
Resistor (220 Ohms)
Red, Black, Green Jumper
Green LED

Code:

int ledPin = 9;
int delay_time = 50;
int brightness = 0;
int fadeAmount = 5;

void setup()
{
pinMode(ledPin, OUTPUT);
}

void loop()
{

if (brightness==255) {
analogWrite(ledPin, 0);
delay(1000);
analogWrite(ledPin, brightness);
}
else {
analogWrite(ledPin, brightness);
}

brightness = brightness + fadeAmount;

if (brightness <= 0 || brightness >= 255) {
fadeAmount = -fadeAmount;
}

delay(delay_time);

}

IMG_20160831_154050

Hello world! with Arduino Uno

Components

  • 1 Arduino Uno
  • 1 resistor (220 ohms)
  • 1 red LED
  • 1 breadboard
  • 1 USB cable
  • 2 small jumper wires
  • Laptop

Description

For this lab I used my brand new Arduino Uno board and a red LED. After having installed the arduino software, I tested the board by uploading one of the basic examples provided in the library of examples (i.e., “Blink”).

Finally, I changed the code to turn the LED on for 0.5 seconds and turn it off for 2 seconds. I uploaded the new code, and …. it worked! 🙂

Code

void setup() {
pinMode(13, OUTPUT);
}
void loop() {
digitalWrite(13, HIGH);
delay(500);
digitalWrite(13, LOW);
delay(2000);
}

Comment

I loved to help with this class!


Hi! (in Morse Code)

Description


I used an Arduino with a red LED. I changed the code to light up in a “hi” pattern using Morse Code (… ..). The lights would blink 4 times rapidly (1/5 second on, 1/5 a second off) with a second pause, followed by blinking twice rapidly (1/5 second on, 1/5 second off). I uploaded the code and made sure that it has changed.

Components


  • 1 Arduino
  • 1 LED
  • 1 Resistor (220Ω)
  • 1 Breadboard
  • 1 Macbook Pro
  • 2 jumper cables

Photo


FullSizeRender (1)

Code


modified 31 Aug 2016
 by Sasha Volkov
 */

// the setup function runs once when you press reset or power the board
 void setup() {
 // initialize digital pin 13 as an output.
 pinMode(13, OUTPUT);
 }

// the loop function runs over and over again forever to spell out "hi" in Morse Code
 void loop() {
 digitalWrite(13, HIGH); // turn the LED on (HIGH is the voltage level)
 delay(200);
 digitalWrite(13, LOW); // turn the LED off by making the voltage LOW
 delay(200);
 digitalWrite(13, HIGH); // turn the LED off by making the voltage LOW
 delay(200);
 digitalWrite(13, LOW); // turn the LED off by making the voltage LOW
 delay(200);
 digitalWrite(13, HIGH); // turn the LED off by making the voltage LOW
 delay(200);
 digitalWrite(13, LOW); // turn the LED off by making the voltage LOW
 delay(200);
 digitalWrite(13, HIGH); // turn the LED off by making the voltage LOW
 delay(200);
 digitalWrite(13, LOW); // turn the LED off by making the voltage LOW - long pause
 delay(1000);
 digitalWrite(13, HIGH); // turn the LED off by making the voltage LOW
 delay(200);
 digitalWrite(13, LOW); // turn the LED off by making the voltage LOW
 delay(200);
 digitalWrite(13, HIGH); // turn the LED off by making the voltage LOW
 delay(200);
 digitalWrite(13, LOW); // turn the LED off by making the voltage LOW - long pause
 delay(1000);

}

Blinking – doubled

Description

A blinking LED that starts at with a given number of blinks and then doubles the number of blinks progressively. Example: 1 blink, pause, 2 blinks, pause, 4 blinks, pause, 8 blinks, …, all the way to 100 blinks.

Components

1 Arduino

1 LED

1 220 Ohm Resistor

1 Breadboard

3 wires

Code

/*
 Blink
 Turns on an LED 1 time, pauses, turns on an LED 2 times quickly, pauses, 
 turns on an LED 4 times quickly, pauses, etc., doubling the number
 of quick blinks each time. 
 */

// the setup function runs once when you press reset or power the board
void setup() {
 // initialize digital pin 13 as an output.
 pinMode(13, OUTPUT);
}

// the loop function runs over and over again forever
void loop() {
 int blinkCount = 1; //initialize the first number of blinks in a series
 while (blinkCount < 100) { //max number of blinks in a series
 for (int i = 0; i < blinkCount; i++) {
 digitalWrite(13, HIGH); //turn on LED
 delay(100); //time LED is on
 digitalWrite(13, LOW); //turn off LED
 delay(100); //time LED is off
 }
 delay(2000); //delay between blinking series
 blinkCount = blinkCount + blinkCount; //double the length of the series
 }
}

Image

Arduino

Lab 1 – Blink

Description

I used Arduino with a red LED. I changed the code to lighting up for 0.1 seconds and then off for 0.1 seconds, and then lighting up for 0.5 seconds, and then off for 0.5 seconds.

Components

  • 1 Arduino
  • 1 LED
  • 1 Resistor (220Ω)
  • 3 Jumper wires
  • 1 USB cable
  • 1 Breadboard

Code

// the setup function runs once 
when you press reset or power the board
void setup() {
 pinMode(13, OUTPUT);
}

// the loop function runs over 
and over again forever
void loop() {
 digitalWrite(13, HIGH); 
 delay(100); 
 digitalWrite(13, LOW); 
 delay(100); 
 digitalWrite(13, HIGH); 
 delay(500); 
 digitalWrite(13, LOW); 
 delay(500); 
}

Lab 1: Blinking LEDs

Description


I used an Arduino UNO, a blue LED, a red LED, and two 220 ohm resistors. I changed the Arduino sample code to blink one LED twice, then blink the other LED once.

Components


  • Arduino UNO
  • 1 blue LED
  • 1 red LED
  • 2 220 ohm resistors
  • a breadboard

Code


/*
Blinks 2 LEDs, the 1st for 2 beats,
and the 2nd for 1 beat.
Code was modified from the Arduino sample code Blink_1_LEDs
*/
int ledPin1 = 4; //allow for variable output pin
int ledPin2 = 13; //allow for variable output pin
void setup()
{
pinMode(ledPin1, OUTPUT); // initialize output pins
pinMode(ledPin2, OUTPUT);
}
void loop() // the loop function runs repeatedly
{
digitalWrite(ledPin1, HIGH); // turn the LED1 on
delay(800); // wait
digitalWrite(ledPin1, LOW); // turn the LED1 off
delay(100);
digitalWrite(ledPin1, HIGH);
delay(800); 
digitalWrite(ledPin1, LOW);
digitalWrite(ledPin2, HIGH); // turn the LED2 on
delay(400);
digitalWrite(ledPin2, LOW); // turn the LED2 off
}

Lab 1 – Making Arduino LED light blink

Description:

For this lab, I used an Arduino to make a red LED light blink very fast (50 ms, or 0.05 seconds).

Tools:

  • 1 Arduino
  • 1 red LED
  • 1 resistor (220Ω)
  • 1 breadboard
  • 3 wires
  • 1 PC
  • USB – Arduino wire

Code:

void setup() {
// initialize digital pin 13 as an output.
pinMode(13, OUTPUT);
}

// the loop function runs over and over again forever
void loop() {
digitalWrite(13, HIGH); // turn the LED on (HIGH is the voltage level)
delay(50); // wait for 0.05 second
digitalWrite(13, LOW); // turn the LED off by making the voltage LOW
delay(50); // wait for 0.05 second
}


Lab 1: Blink Blink Blink

Components:

  • 1 Arduino
  • 1 Breadboard
  • 1 LED
  • 1 Resistor (220 ohm)
  • 2 Jumper wires
  • 1 USB cable
  • 1 Macbook pro

Description:

I changed the code of the Blink example so that the red LED lights up for 3 seconds and turn off for 2 seconds on a loop. I connected the Arduino to my laptop and uploaded the code to it. I attached the breadboard with the jumper wires along with the resistor and LED. I then checked that it worked and took a picture (below).

Code:

void setup() {
 // initialize digital pin 13 as an output.
 pinMode(13, OUTPUT);
}

// the loop function runs over and over again forever
void loop() {
 digitalWrite(13, HIGH); // turn the LED on (HIGH is the voltage level)
 delay(3000); // wait for 3 seconds
 digitalWrite(13, LOW); // turn the LED off by making the voltage LOW
 delay(2000); // wait for 2 seconds
}


TUI-lab01

Lab 1: Example Lab Submission

Description

I used Arduino with a green LED. I changed the code to lighting up for 2 seconds and then off for 4 seconds. Uploaded the code and made sure that it has changed.

Components

  • 1 Arduino
  • 1 LED
  • 1 Resistor (220Ω)
  • 1 Breadboard

Code

/*
Blink
Turns on an LED on for one second, then off for one second, repeatedly.
This example code is in the public domain.
*/

// Pin 13 has an LED connected on most Arduino boards.
// give it a name:
int led = 13;

// the setup routine runs once when you press reset:
void setup() {
  // initialize the digital pin as an output.
  pinMode(led, OUTPUT);
}

// the loop routine runs over and over again forever:
void loop() {
  digitalWrite(led, HIGH); // turn the LED on (HIGH is the voltage level)
  delay(2000); // wait for 2 second
  digitalWrite(led, LOW); // turn the LED off by making the voltage LOW
  delay(4000); // wait for 4 second
}
1
2