Fishkin and Wearable Devices

Fishkin’s taxonomy provides a framework to think about different TUIs. The paper was published in 2004, more than 10 years ago, some examples are a little bit outdated, while many of them are still cutting edge today. I keep thinking about wearable devices while reading the paper. Some wearable devices such as Fitbit and Apple Watch have become ubiquitous and affordable in the past 5 years. As the name Apple Watch indicated, most of wearable devices are designed like watches that people can wear on wrists. According to Fishkin’s definition, they have a full embodiment, as the output device is the input device. The level of metaphor is also full: it has the metaphor of noun, as the physical shape and look of the wearable devices is analogous to the shape and look of traditional watches; it also has the metaphor of verb, as once you lift up your wrist as a gesture to read your watch, the digital screen will be activated automatically and display your biological stats as well as the real time. As people are used to “watch” time, now they can “watch” their biological time, such as heart rates, sleep, steps, etc.

Fishkin wrote at the end of the article that “the trend has been to increase the levels of embodiment and metaphor…as that occupied by the intersection of the Holmquist ‘tokens’ and the Holmquist ‘containers’.” The popularity of wearable devices today verifies this projection. The more that a TUI artifact resembles an ordinary object in appearance and in motion, perhaps the better its user’s experience could be. Minimizing cognitive overhead by associating the new learning with what people have already known is imperative, especially in industrial design.

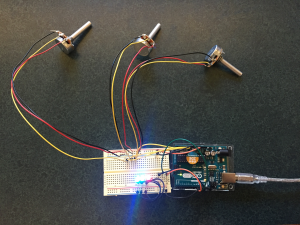
Control the brightness of 3 LED lights

Description

I used 3 potentiometers to light three LED lights. Each potentiometer controls the brightness of one LED light.

Components

  • 1 Arduino
  • 3 LEDs
  • 3 Resistors (220Ω)
  • 3 Potentiometers
  • 1 Breadboard

Code

// select the input pin for the potentiometer
int sensorPinRed = A0;    
int sensorPinGreen = A1;    
int sensorPinBlue = A2;
// select the pin for the LEDs
int redPin = 9;      
int greenPin = 10;
int bluePin = 11;
// variable to store the value coming from the sensor
int sensorValueRed = 0;
int sensorValueGreen = 0;
int sensorValueBlue = 0;

void setup() {
  // declare the ledPin as an OUTPUT:
  pinMode(redPin, OUTPUT);
  pinMode(greenPin, OUTPUT);
  pinMode(bluePin, OUTPUT);
  Serial.begin(9600);
}

void loop() {
  // read the value from the sensor:
  sensorValueRed = analogRead(sensorPinRed);
  sensorValueGreen = analogRead(sensorPinGreen);
  sensorValueBlue = analogRead(sensorPinBlue);
  
  // turn the Pins on
  analogWrite(redPin, sensorValueRed/4);
  analogWrite(greenPin, sensorValueGreen/4);
  analogWrite(bluePin, sensorValueBlue/4);

  // stop the program for 10 milliseconds:
  delay(10);
}

pot_brightness

Rainbow Ball

Description

I created a rainbow ball. It allows users to type the initial character of a rainbow color, and LEDs inside the ball will graduate changes their brightness to show this color. It accepts 7 characters from users:

  1. ‘r’: set the ball to red;
  2. ‘o’: set the ball to orange;
  3. ‘y’: set the ball to yellow;
  4. ‘g’: set the ball to green;
  5. ‘c’: set the ball to cyan;
  6. ‘b’: set the ball to blue;
  7. ‘p’: set the ball to purple.

Components

  • 1 Arduino
  • 1 Diffuser (cotton ball)
  • 3 LEDs
  • 3 Resistors (220Ω)
  • 7 Jumper wires
  • 1 USB cable
  • 1 Breadboard

Code

char serInString[100];  
int redVal, greenVal, blueVal;
int redCurr = 127;
int greenCurr = 127;
int blueCurr = 127;
int increRed, increBlue, increGreen;
int redPin   = 9;   
int greenPin = 10;  
int bluePin  = 11; 
int redPre = 127;
int bluePre = 127;
int greenPre = 127;

void setup() {
  pinMode(redPin,   OUTPUT);  
  pinMode(greenPin, OUTPUT);   
  pinMode(bluePin,  OUTPUT);
  Serial.begin(9600);
  analogWrite(redPin,   redPre);   
  analogWrite(greenPin, bluePre);   
  analogWrite(bluePin,  greenPre);  
  Serial.println("enter a rainbow color 
  ('r' for Red, 
  'o' for Orange,
  'y' for Yellow, 
  'g' for Green, 
  'c' for Cyan, 
  'b' for Blue,
  'p' for Purple)");  
}

void printSerial() {
  Serial.print("setting color ");
  Serial.print("red");
  Serial.print(" to ");
  Serial.print(redCurr);
  Serial.println(); 

  Serial.print("setting color ");
  Serial.print("blue");
  Serial.print(" to ");
  Serial.print(blueCurr);
  Serial.println();

  Serial.print("setting color ");
  Serial.print("green");
  Serial.print(" to ");
  Serial.print(greenCurr);
  Serial.println();
}

void loop () {
  memset(serInString, 0, 100);
  readSerialString(serInString);
    
  if( serInString[0]== 'r') {
    redCurr = 255;
    greenCurr = 0;
    blueCurr = 0;
    printSerial();
    serInString[0] = ' ';                  
  }
  if( serInString[0]== 'o') {
    redCurr = 255;
    greenCurr = 127;
    blueCurr = 0;
    printSerial();
    serInString[0] = ' ';                  
  }
  if( serInString[0]== 'y') {
    redCurr = 255;
    greenCurr = 255;
    blueCurr = 0;
    printSerial();
    serInString[0] = ' ';  
  }
  if( serInString[0]== 'g') {
    redCurr = 0;
    greenCurr = 255;
    blueCurr = 0;
    printSerial();
    serInString[0] = ' ';
  }
  if( serInString[0]== 'c') {
    redCurr = 0;
    greenCurr = 255;
    blueCurr = 255;
    printSerial();
    serInString[0] = ' ';
  }
  if( serInString[0]== 'b') {
    redCurr = 0;
    greenCurr = 0;
    blueCurr = 255;
    printSerial();
    serInString[0] = ' '; 
  }
  if( serInString[0]== 'p') {
    redCurr = 127;
    greenCurr = 0;
    blueCurr = 255;
    printSerial();
    serInString[0] = ' '; 
  }
  
  if(redPre > redCurr) {
    increRed = -1;
  }
  else {
    increRed = 1;
  }
  redVal = redPre;
  while(redVal != redCurr) {
    analogWrite(redPin, redVal);
    delay(10);
    redVal += increRed;
  }
  redPre = redCurr;
  
  if(bluePre > blueCurr) {
    increBlue = -1;
  }
  else {
    increBlue = 1;
  }
  blueVal = bluePre;
  while(blueVal != blueCurr) {
    analogWrite(bluePin, blueVal);
    delay(10);
    blueVal += increBlue;
  }
  bluePre = blueCurr;
  if(greenPre > greenCurr) {
    increGreen = -1;
  }
  else {
    increGreen = 1;
  }

  greenVal = greenPre;
  while(greenVal != greenCurr) {
    analogWrite(greenPin, greenVal);
    greenVal += increGreen;
    delay(10);
  }
  greenPre = greenCurr;
  
delay(100);
}

void readSerialString (char *strArray) {
  int j = 0;
  if(!Serial.available()) {
    return;
  }
  while (Serial.available()) {
    strArray[j] = Serial.read();
    j++;
  }
}

Tactile texture display: what you see is what you feel

As McCullough argued that “the computer is inherently a tool for the mind and not for the hands” 20 years ago, this argument is still valid today. Despite computer has become more versatile in sizes and powerful in computing speed, the interaction between computer and human is mainly achieved through traditional graphical user interface(GUI). Even with the ubiquitous presence of touch-screen phones all over the world, the touch technology is still underdeveloped, limited to only point and drag. As McCullough pointed out, “the much ballyhooed ‘look and feel’ of contemporary computing is almost all look and hardly any feel.”

I had a chance to visit the Human-Computer Interaction Institute at Carnegie Mellon University (CMU) early this year. At CMU, a tactile texture screen project addresses McCullough’s point on enriching the touching experience of human-computer interaction. They developed a new technology that could bring rich, dynamic tactile feedback to the touchscreens. The technology allows the users to actually “feel” virtual elements through touch. It is based on the electrovibration principle, which generates friction between the conductive touch interface and skin of the moving fingers across the screen, creating a variety of tactile sensations such as sticky, rubbery, or bumpy to the fingers. As the project’s webpage indicates, with combination of an interactive graphical display, this technology enables touch experiences with rich textures and physical affordances.

Touch brings a unique experience when we interact with the world. We enjoy the feeling of different tactile textures, and we explore the properties of objects that cannot be perceived otherwise. CMU’s electrostatic vibration technology comes very close to McCullough’s vision that “human-computer interaction is evolving toward much more satisfactory haptic engagement”. In particular, the technology could potentially benefit visually impaired people who are unable to enjoy the touch-screen technology. I truly hope that this kind of technology could be implemented in our daily lives soon.

Lab 1 – Blink

Description

I used Arduino with a red LED. I changed the code to lighting up for 0.1 seconds and then off for 0.1 seconds, and then lighting up for 0.5 seconds, and then off for 0.5 seconds.

Components

  • 1 Arduino
  • 1 LED
  • 1 Resistor (220Ω)
  • 3 Jumper wires
  • 1 USB cable
  • 1 Breadboard

Code

// the setup function runs once 
when you press reset or power the board
void setup() {
 pinMode(13, OUTPUT);
}

// the loop function runs over 
and over again forever
void loop() {
 digitalWrite(13, HIGH); 
 delay(100); 
 digitalWrite(13, LOW); 
 delay(100); 
 digitalWrite(13, HIGH); 
 delay(500); 
 digitalWrite(13, LOW); 
 delay(500); 
}

Google Maps

I use Google Maps almost everyday and it greatly impacts my everyday life. Although the main motivation of using Google Map (or any form of map) is almost always the same, which is to get to my destination, Google Maps in particular can help me achieve different goals in different conditions.

When I first came to Berkeley, I needed to use Google Maps as a navigation tool to get me to school. At first, I followed its audio instructions step by step to make turns. After a few days, I’ve remembered the turns and internalized the process in my head. I don’t have to use Google Maps to get to school, but I still turn it on in rush hours to avoid traffics. Google Maps tells me which roads are busy and which are not, and I can optimize my route accordingly. Google Maps can also be customized to avoid toll roads or highways to meet special needs. A few days ago, I got a flat tire and I had to use my spare tire for a few days. I was not supposed to drive faster than 35 MPH using my spare tire, and I had to adjust the setting in Google Maps to avoid highways. Last but not least, the search nearby function in Google Maps is a perfect tool for searching nearby places such as restaurants or gas stations.