2EZ2Play – Music Box

2ez2play
This is no ordinary music box. It’s an interactive music box. It makes composing and enjoying music a very easy task, basically, too easy to play.
diagram
Let me explain a bit about the box. If you look at the diagram attached, you will see a spherical enclosure, the bottom of which is attached a speaker for sound output. Above that you can see a depressed surface (gray shaded area). This surface allows the control of the drum beats in the song. On the right of this surface, you will see a knob-like structure. This knob allows one to pinch and pull it to change the type of strings playing in a song. To the extreme left of the sphere, you will see a bump like structure. That bump allows one to change the beats per minute of the song by turning it.
diagram2
This image is of the other end of the music box. This has in the center, a single line LED matrix display, and a swipe/slide area to change the genre of the music playing.

The Music Box allows everyone to compose beautiful music. The Working is simple, switch on the music box, swipe to select the particular genre you want to compose a song in. Tap to confirm the selection. Your music starts whenever you start by either pushing the depressed area to start the drums or by pulling the knob-like structure to start the strings and the bassline of the song. The same surfaces would be used to change the type of strings that are playing and the type of drum beats that are playing. String variants would cycle from rhythms to rhythms and solos. Drum beats would cycle from drum beats to drum rolls. If you wish to change the tempo of the song, you can do so by turning the bump like structure. You would be allowed to change the tempo of the song in multiples of 1x,1.2x,1.4x,1.6x,2x where x is the current bpm.

chart1

Additionally, LED lights attached inside the translucent material allows a visualization to be displayed based on the beats of the song.

All these create a new combination every time making every song unique in its own ways. There is no failure, anyone can play a beatiful piece of music on this. We were able to do this by restricting the factors that vary in the song and curating the original content to be generic and ones that can easily transition into one another in a particular genre.

Through the music box, we are able to create interesting affordance – output mappings.

  • Pinching/ Pulling – String manipulation
  • Pushing – Drumbeat manipulation
  • Turning – Beats per minute manipulation

Both the input and the output reside within the same boundary of the surface of the sphere.

I feel this will be an interesting thing to play with and it would empower people with the capability to compose music with minimum efforts.

Is it really Virtual Reality ?

In the course of twenty minutes, I played 2 titles on the HTC Vive – Whale simulation and Tilt Brush.They were mostly fantastic experiences, full of personality and just as varied as you might expect. One minute I was on top of a mountain throwing a stick in the distance for a robotic dog like creature to capture it and bring it back to me and I could pat it, the next I was inside a three dimensional canvas where I could paint whatever I wanted to. The Tilt Brush experience was amazing as for the first time I drew in the 3 dimensional space. Apart from being just a drawing in the 3D space, there were different brushes that added animation to the strokes, so essentially, I was creating a 3D video in realtime. I can easily see how VR paintings could be a thing of the near future where people all around the world would showcase their creations. The best part is that there is no training required to create unlike a lot of 3d video software. There are a lot of things I liked about the HTC Vive – the 110 degrees view angle, the dynamic view based on head orientation, the amazingly intuitive controllers. All these along with the Valve software help create these new experiences but I would now like to talk if these experiences can really be called Virtual Reality.

One aspect of VR that confuses me is the extent to which we are trying to simulate the reality. Right now the only sense that VR stimulates is vision and to a little extent touch, through haptic feedback. As far as i can see, the difference since flatscreens to VR headsets is the dynamic view based on head orientation. I feel that unless there are experiences that are able to stimulate all the 5 senses in a virtual world, we are far from reality. For example, when standing on top of the mountain, I would love to feel the chill and the wind, probably feel the coarse ground beneath my feet and maybe actually feel the stick that i throw or the dog when i pat it.

About the HTC Vive design, although I get to see my boundaries in the virtual world, not having any idea about the area around you can be dangerous and the wire that keeps hanging around could make someone trip and fall.

The Crashed Swimming Plane

Description:

This looks like a crashed plane trying to swim. I attached two hands of the servo motor attachment to the two wings of the plane which makes the wings go forward alternately. I used the arduino sweep code for this assignment

Components Used:

1 Arduino
1 Servomotor
Cardboard pieces
Screws
Dampening rubbers

Code:


/* Sweep
by BARRAGAN
This example code is in the public domain.

modified 8 Nov 2013
by Scott Fitzgerald
http://www.arduino.cc/en/Tutorial/Sweep
*/

#include

Servo myservo; // create servo object to control a servo
// twelve servo objects can be created on most boards

int pos = 0; // variable to store the servo position

void setup() {
myservo.attach(9); // attaches the servo on pin 9 to the servo object
}

void loop() {
for (pos = 0; pos <= 180; pos += 1) { // goes from 0 degrees to 180 degrees // in steps of 1 degree myservo.write(pos); // tell servo to go to position in variable 'pos' delay(15); // waits 15ms for the servo to reach the position } for (pos = 180; pos >= 0; pos -= 1) { // goes from 180 degrees to 0 degrees
myservo.write(pos); // tell servo to go to position in variable 'pos'
delay(15); // waits 15ms for the servo to reach the position
}
}

img_20161018_205221

img_20161018_205246

Touch me not !

Description: 

Well everyone must have seen the touch me not leaves which close when touched. I tried to create something similar but a different reaction to the touch. I created an origami lily and attached the stalk to the dc motor. On the flower is a photo sensor that detects if a hand is close to the petals. When close, the dc motor gets activated and moves the flower in order to depict that the flower is not meant to be plucked.

Components:

  • Arduino Uno
  • 1 DC motor
  • 1 Transistor
  • 1 Diode
  • 2 resistors (one 1KΩ, one 10KΩ)
  • 1 photo sensor
  • 1 piezo sensor
  • 1 origami lily
  • battery pack
  • two AA batteries
  • jumper wires

Code:

// This code is to move the DC motor based on input from a photosensor

const int dcMotorPin = 11;
const int piezoPin = 7;
const int photPin = 1;

int photValue;
int dcMotorValue;
int potValueBeats;

void setup() {
// Still need to set a baud rate, even for USB.
Serial.begin(9600);
// Set DC Motor and Piezo pins to output.
pinMode(dcMotorPin, OUTPUT);
pinMode(piezoPin, OUTPUT);

// photo sensor analogue pin is an input.
pinMode(photPin, INPUT);
}

void loop() {
// The photo sensor values are mapped from 300 to 1024 onto 0 to 150
photValue = analogRead(photPin);

if(photValue <= 300) { dcMotorValue = 150; } else if(photValue > 300 && photValue < 700)
{
dcMotorValue = 70;
}
else
{
dcMotorValue = 0;
}

analogWrite(dcMotorPin,dcMotorValue);
digitalWrite(piezoPin, HIGH);
delayMicroseconds(956);
digitalWrite(piezoPin, LOW);
delayMicroseconds(956);
}

img_20161011_174648
 

Thoughtless acts around us !

We Indians are known to do a lot of thoughtless acts in our life. In Hindi we call it “jugaad” (refer this link). So I thought, there must be a lot of instances around me that would prove the same. I looked around myself and found these three thoughtless acts.

1.

img_20161010_113758

This is a lampshade which is also being used as a headphone holder. This helps me keep the wire untangled and provides me an easy access to my headphones whenever listening privately.

2.

img_20161010_113928

This is a Wok which is huge to be put in either a dishwasher or any drawer. The obvious solution to placing it somewhere – hanging it from one of the drawer handles !

3.

img_20161010_114154

This is a toothbrush holder which is being used to store a variety of items from pens to nail cutter, keys , memory card etc.

Handshake

Description

We must have heard people defining various intensities of handshakes. Some say that a handshake was “mellow” and some say it was “warm”. Well, these terms sound pretty vague as they are subjective. It’s time to bring in a device that actually measures how strong was your handshake. I used a Force Sensitive Resistor on a glove to measure how hard the handshake was. The way people would be able to measure this “hardness” is by seeing the color change of the LED on the glove and the sound of the speaker. The harder the handshake, the higher the frequency. It was a difficult task to find out the exact spot on the hand that would measure the intensity appropriately. Light handshakes might not involve the touch of palms, so the FSR had to be placed somewhere, where there is a definite contact. I figured it out to be the tip of the index finger.

Components

  • 1 Arduino Uno R3
  • 1 Piezo Speaker
  • 1 Force Sensitive Resistor
  • 3 LEDs
  • 1 Glove (woolen)

Code


// The three primary colour LEDs, driven as analogue outputs (actually PWM, but
// close enough for our analogue eyes).

const int ledPinRed = 11; // Red LED connected to analogue out pin
const int ledPinGrn = 10; // Green LED connected to analogue out pin
const int ledPinBlu = 9; // Blue LED connected to analogue out pin
const int piezoPin = 7;

// The Brightness potentiometer goes on an analogue pin, taking the pin from
// 0V to 5V.

const int fsr = 1;

// Constants to define the ranges.

const int hueRedLow = 0;
const int hueRedHigh = 255;
const int hueBlue = 170;

// The size of the angle of one sector (1/6 of a colour wheel), and of a complete
// cycle of the colour wheel.

const int angleMin = 0;
const int angleSector = 60;
const int angleMax = 360;

const int brightMin = 0;
const int brightMax = 255;

//constants to define the range of beats
const int beatsMin = 40;
const int beatsMax = 220;

// Work variables.

// The hue potentiometer value is mapped to the range 0 to 360 (degrees).
int fsrValueHue;

//The brightness potentiometer value is mapped from 0 to 255 (full brightness)
int fsrValueSound;

int hue, brightness;

const int saturation = 255;

// The brightess of each LED (0 to 255).

unsigned int r, g, b;

void setup() {
// Still need to set a baud rate, even for USB.
Serial.begin(9600);

// Set LED pins to output.
pinMode(ledPinRed, OUTPUT);
pinMode(ledPinGrn, OUTPUT);
pinMode(ledPinBlu, OUTPUT);
pinMode(piezoPin , OUTPUT);

// Poteniometer analogue pin is an input.
pinMode(fsr, INPUT);
}

void loop() {

// fsr values are mapped to create a color based on the intensity of the handshake
fsrValueHue = map(analogRead(fsr), 0, 1023, angleMin, angleMax);
// fsr values are mapped to create sound of a particular frequency based on the intensity of the handshake. Lower the intensity, lower the frequency
fsrValueSound = map(analogRead(fsr), 0, 1023, 75, 10000);

// Colour wheel mode (red to red, wrapped around in a cycle).
hue = map(fsrValueHue, angleMin, angleMax, hueRedLow, hueRedHigh);

// Do the conversion.
HSBToRGB(hue, saturation, brightness, &r, &g, &b);

analogWrite(ledPinRed, r);
analogWrite(ledPinGrn, g);
analogWrite(ledPinBlu, b);
digitalWrite(piezoPin , fsrValueSound);
}

// This function taken from here:
// http://eduardofv.com/read_post/179-Arduino-RGB-LED-HSV-Color-Wheel-

void HSBToRGB(
unsigned int inHue, unsigned int inSaturation, unsigned int inBrightness,
unsigned int *oR, unsigned int *oG, unsigned int *oB )
{
if (inSaturation == 0)
{
// achromatic (grey)
*oR = *oG = *oB = inBrightness;
}
else
{
unsigned int scaledHue = (inHue * 6);
unsigned int sector = scaledHue >> 8; // sector 0 to 5 around the color wheel
unsigned int offsetInSector = scaledHue - (sector << 8); // position within the sector unsigned int p = (inBrightness * ( 255 - inSaturation )) >> 8;
unsigned int q = (inBrightness * ( 255 - ((inSaturation * offsetInSector) >> 8) )) >> 8;
unsigned int t = (inBrightness * ( 255 - ((inSaturation * ( 255 - offsetInSector )) >> 8) )) >> 8;

switch( sector ) {
case 0:
*oR = inBrightness;
*oG = t;
*oB = p;
break;
case 1:
*oR = q;
*oG = inBrightness;
*oB = p;
break;
case 2:
*oR = p;
*oG = inBrightness;
*oB = t;
break;
case 3:
*oR = p;
*oG = q;
*oB = inBrightness;
break;
case 4:
*oR = t;
*oG = p;
*oB = inBrightness;
break;
default: // case 5:
*oR = inBrightness;
*oG = p;
*oB = q;
break;
}
}
}


QRing

Andrew Blauvelt’s Strangely Familiar : Design and Everyday life tells about various examples that cover the domains of Multifunctionality, Transforming the everyday, Portability, etc. While going through the examples I could understand that in the world around us, design in everywhere: the tools we use, the clothes we wear, the cars we drive, the houses we dwell, etc. One thing that covered all the domains mentioned above and was an everyday design marvel would be the QRing.
Designed by an industrial design major at Georgia Tech, the QRing is basically a piece of jewellery which doubles up as a resting spot for the cue stick. Personally, I love playing 8 ball and an artifact as simple and useful as the QRing aids me during my game. Now, it isn’t as stable as the cue stick stand which may be available at a pool table but the fact that it is so portable that it can fit on your hand all the time while adorning as a piece of jewellery is simply convenient. Secondly, pool is a game that is mostly related to men but the Qring gives an opportunity to women players who find it difficult to take shots to be a pro at the game.
All in all, I would say that QRing is an industrial designed artifact I love that not only meets my expectations but also goes beyond and changes the way I think about a ring.

Details about the project can be found here

qring-poster-2

Pocket Tanks !

Description


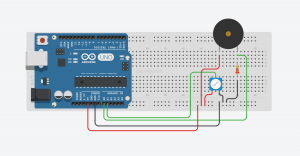
We all (most of us) have played the popular game of Pocket Tanks. For those who dont know about it, it’s a two player turn based game where one player controls the velocity and the angle at which his/her tank will shoot so as to land a hit on the opponent’s tank. I thought of an interesting way in which pocket tanks can be played. I used a potentiometer to control the angle of the nozzle and the force sensor to decide the velocity with which one is supposed to hit the other tank. The harder you press on the force sensor , the further the shot goes. I mapped the values of the potentiometer from 0 to 180 and the values of the FSR from 0 to 100.

Materials

  • Arduino
  • 1 Force Sensitive Resistor (FSR)
  • 1 Potentiometer
  • 1 10 KΩ resistor

Code

Arduino


const int fsrPin = 0;
const int potPin = 1;

void setup() {
// Still need to set a baud rate, even for USB.
Serial.begin(9600);
// Poteniometer analogue pin is an input.
pinMode(potPin, INPUT);
pinMode(fsrPin, INPUT);
}

void loop() {

int velocity = map(analogRead(fsrPin),0,1023,0,100);
int angle = map(analogRead(potPin),0,1023,0,180);
Serial.print(String(velocity) +'a'+ String(angle)+' ');
delay(50);

}

Processing


//importing processing libraries
import processing.serial.*;
// Change this to the portname your Arduino board
String portname = "COM5"; // or "COM5"
//defining custom font
PFont mono;
//defingin position values for the two tanks
int xpos1, ypos1, xpos2, ypos2, xpos, ypos, distance = 0, angleX, angleY;
int velocity = 50, velocity1 = 50, velocity2 = 50; //saves velocity and angles for each person
int angle = 90, angle1 = 90, angle2 = 90;
int fuel1 = 50, fuel2 = 50, fuel = 50;
int tS = 15; //tank size
float bS = .1; //ball size
boolean player1Turn = true, shoot = false, gameEnd = false, loopOne = true, moveTank = false;
float ballX, ballY;
float vx, vy, grav = 9.8, t = 0;
int win1 = 0, win2 = 0; //counts the wins for each person
int btnMoveRed = 255, btnMoveGreen = 255,btnMoveBlue = 255; //change the color of the move button when clicked
int btnSSR = 255, btnSSG = 255,btnSSB = 255, btnSmallR = 37, btnSmallG = 116,btnSmallB = 169,btnMedB = 255, btnMedR = 255, btnMedG = 255,btnBigB = 255, btnBigR = 255, btnBigG = 255; //change color of gamemode buttons
Serial myPort;
//Built on the base program provided by
/* OpenProcessing Tweak of *@*http://www.openprocessing.org/sketch/374777*@* */
//Jarod Searle
void setup() {
size(1000, 800);
smooth();
do {
xpos1 = int(random(1000));
ypos1 = 600;
xpos2 = int(random(1000));
ypos2 = 600;
distance = abs(xpos2 - xpos1);
} while(distance < 75); textSize(13); stroke(0); mono = createFont("segoeui.ttf",32); textFont(mono); // List all the available serial ports: printArray(Serial.list()); // Open the port you are using at the rate you want: myPort = new Serial(this, Serial.list()[0], 9600); //buffering each input till the delimiter for easy read myPort.bufferUntil(' '); } void draw() { //drawing the various elements in the game textSize(13); background(236,236,236); fill(0); line(0, 600, 1000, 600); fill(22, 160, 133); 
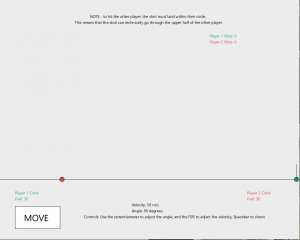
ellipse(xpos1, ypos1, tS, tS); //player 1 = red text("Player 1 Color", 50, 650); text("Fuel: " + fuel1, 50, 670); text("Player 1 Wins: " + win1, 700, 125); fill(214,69,65); ellipse(xpos2, ypos2, tS, tS); //player 2 = blue text("Player 2 Color", 825, 650); text("Fuel: " + fuel2, 825, 670); text("Player 2 Wins: " + win2, 700, 145); fill(0); text("Velocity: " + velocity + " m/s", 440, 690); text("Angle: " + angle + " degrees", 440, 710); text("Controls: Use the potentiometer to adjust the angle, and the FSR to adject the velocity, Spacebar to shoot", 280, 730); text("NOTE - to hit the other player, the shot must land within their circle.", 300, 60); text("This means that the shot can technically go through the upper half of the other player.", 250, 80); fill(btnMoveRed, btnMoveGreen, btnMoveBlue); rect(50, 690, 150, 75); fill(0); textSize(30); text("MOVE", 80, 740); fill(btnSSR, btnSSG, btnSSB); rect(20, 100, 100, 50); fill(btnSmallR, btnSmallG, btnSmallB); rect(140, 100, 100, 50); fill(btnMedR, btnMedG, btnMedB); rect(260, 100, 100, 50); fill(btnBigR, btnBigG, btnBigB); rect(380, 100, 100, 50); fill(0); textSize(13); text("Super Small", 30, 130); text("Small", 170, 130); text("Medium", 285, 130); text("Big", 420, 130); if (player1Turn == true) { //Player 1's turn if (loopOne == true) { velocity = velocity1; //saves the previous turn's velocity and angle angle = angle1; xpos = xpos1; ypos = ypos1; fuel = fuel1; } loopOne = false; velocity1 = velocity; angle1 = angle; xpos1 = xpos; ypos1 = ypos; fuel1 = fuel; //defining the trajectory angleX = int(xpos - velocity * cos(angle * (3.14/180))); //velocity * the rest will make the line longer for more power angleY = int(ypos - velocity * sin(angle * (3.14/180))); line(xpos, ypos, angleX, angleY); if (shoot == true) { loopOne = true; shot(); textSize(30); //code to check if the trajectory of the tank shot hits the other tank if ((ballX >= xpos2 - tS / 2 && ballX <= xpos2 + tS / 2) && (ballY >= ypos2 - tS)) {
text("PLAYER 1 WINS", 350, 300);
gameEnd = true;
fill(255);
rect(420, 350, 100, 50);
fill(0);
text("RESET", 430, 380);
win1 += 1;
}
else {
text("CLICK TO CONTINUE", 350, 300);
player1Turn = false;
noLoop();
}
}
}

else if (player1Turn == false) { //Player 2's turn
if (loopOne == true) {
velocity = velocity2;
angle = angle2;
xpos = xpos2;
ypos = ypos2;
fuel = fuel2;
}
loopOne = false;
velocity2 = velocity;
angle2 = angle;
xpos2 = xpos;
ypos2 = ypos;
fuel2 = fuel;

angleX = int(xpos - velocity * cos(angle * (3.14/180)));
angleY = int(ypos - velocity * sin(angle * (3.14/180)));
line(xpos, ypos, angleX, angleY);
if (shoot == true) {
loopOne = true;
shot();

textSize(30);

//code to check if the trajectory of the tank shot hits the other tank
if ((ballX >= xpos1 - tS / 2 && ballX <= xpos1 + tS / 2) && (ballY >= ypos1 - tS)) {
text("PLAYER 2 WINS", 350, 300);
gameEnd = true;
fill(255);
rect(420, 350, 100, 50);
fill(0);
text("RESET", 430, 380);
win2 += 1;
}
else {
text("CLICK TO CONTINUE", 350, 300);
player1Turn = true;
noLoop();
}
}
}

if (gameEnd == true) {
noLoop();
}
}

void shot() { //will shoot the ball, gets rid of code up above
do {
vx = velocity * cos(angle * (3.14/180));
vy = velocity * sin(angle * (3.14/180));
t += .02;
ballX = xpos -(vx * t);
ballY = ypos -(vy * t - (grav/2)*t*t);
fill(0);
ellipse(ballX, ballY, bS, bS);
} while (!(ballY > 600));
}

void resetButtons() {
btnSSR = 255;
btnSSG = 255;
btnSSB = 255;
btnSmallR = 255;
btnSmallG = 255;
btnSmallB = 255;
btnMedR = 255;
btnMedG = 255;
btnMedB = 255;
btnBigR = 255;
btnBigG = 255;
btnBigB = 255;
}

// called whenever serial data arrives
void serialEvent(Serial p) {

while (myPort.available() > 0) {

//reading the buffer until ' ' which is the delimiter
String inString = myPort.readStringUntil(' ');
//the two values of the sensors are separated by 'a'
String nums[] = inString.split("a");
velocity = int(nums[0]);
nums[1] = trim(nums[1]);
angle = int(nums[1]);
printArray(nums);
}

}

void keyPressed() {
if (key == CODED) {
if (keyCode == RIGHT) {
if (moveTank == true && fuel > 0) {
xpos += 1;
fuel -= 1;
}
}
else if (keyCode == LEFT) {
if (moveTank == true && fuel > 0) {
xpos -= 1;
fuel -= 1;
}
}
}
else if (keyCode == ' ')
shoot = true;
}

void mousePressed() {
if (shoot == true && gameEnd == false) {
shoot = false;
t = 0;
moveTank = false;
loop();
btnMoveGreen = 255;
btnMoveRed = 255;
btnMoveBlue = 255;
}
else if (gameEnd == true) {
if (mouseX >= 420 && mouseX <= 520 && mouseY >= 350 && mouseY <= 400) { do { xpos1 = int(random(1000)); xpos2 = int(random(1000)); distance = abs(xpos2 - xpos1); } while(distance < 75); angle1 = 90; angle2 = 90; velocity1 = 50; velocity2 = 50; fuel1 = 50; fuel2 = 50; textSize(13); shoot = false; gameEnd = false; loopOne = true; t = 0; if (win1 > win2)
player1Turn = false;
else if (win2 > win1)
player1Turn = true;
else {
int x = int(random(2));
if (x == 1)
player1Turn = true;
else
player1Turn = false;
}
loop();
}
}
else if (mouseX >= 50 && mouseX <= 200 && mouseY >= 690 && mouseY <= 765) { //move button if (moveTank == false) { moveTank = true; btnMoveGreen = 116; btnMoveRed = 37; btnMoveBlue = 169; } else { moveTank = false; btnMoveGreen = 255; btnMoveRed = 255; btnMoveBlue = 255; } } else if (mouseX >= 20 && mouseX <= 120 && mouseY >= 100 && mouseY <= 150) { //super small resetButtons(); btnSSR = 37; btnSSG = 116; btnSSB = 169; tS = 5; } else if (mouseX >= 140 && mouseX <= 240 && mouseY >= 100 && mouseY <= 150) { resetButtons(); btnSmallR = 37; btnSmallG = 116; btnSmallB = 169; tS = 15; } else if (mouseX >= 260 && mouseX <= 360 && mouseY >= 100 && mouseY <= 150) { resetButtons(); btnMedR = 37; btnMedG = 116; btnMedB = 169; tS = 100; } else if (mouseX >= 380 && mouseX <= 480 && mouseY >= 100 && mouseY <= 150) { resetButtons(); btnBigR = 37; btnBigG = 116; btnBigB = 169; tS = 200; } }

fsr

game

Fitness Trackers !

There are a lot of examples discussed by Pousman and Stasko in their paper about the taxonomy of Ambient Media where they explain the core factors that help us categorize ambient media systems. Systems have been categorized based on their levels in each dimension of information capacity, notification level, representational fidelity and aesthetic emphasis. One such example from the systems that have become very common now is fitness trackers.

Fitness trackers come in various sizes and a broad range of capabilities. Some are just a watch replacement where the devices, on connecting to Bluetooth, display very basic notification information from the phone along with the time. Others are more complex with heart rate monitors where the devices monitor sleep patterns, steps and calculate calories expended during the day. Let’s discuss the fitness trackers with a heart rate monitor. For the particular example of the Samsung Smartwatch, one can see a varying range of ambient information as well as personal information on it. Since it displays a lot of ambient information such as the weather details, activity tracker details, sleep pattern details, etc. we can categorize it as a high information capacity system. There are notifications both in the “ignore” and “interrupt” levels in the watch. While pulling up the watch in front of your face can show you the time and weather information or the fitness information, you also get notified whenever there is a phone call or a message is received. The weather animation with the state of weather around, the charts that represent the amount one needs to walk to reach workout goal along with various watch faces clearly shows how high the smartwatch is on the representational fidelity. Even though the watch is so much more powerful than a “normal” watch, it maintains the beauty and simplicity of a normal watch that looks great on one’s hands ! Smartwatches are truly very aesthetic.

In conclusion, I would say that there are plenty of other ambient media systems around us that fall into one of the different levels in the 4 dimensions. A status LED on a hard disk, the router with its different light modes which informs us of the status of the internet are all examples of ambient media.

samsung-gears2-banner

Midterm Proposal : Kitchen Choreography (Nisha ,Sam , Sandeep)

Smart cutting Board

Sam Meyer

Sandeep Pal

Nisha Pathak

­

“Kitchen Choreography”


We aim to make cooking for everyone a straightforward, simple job. We will do this by revolutionizing the way people have thought about cutting boards. We will bring to you a smart cutting board that will tell you how to chop or slice vegetables, meat etc. Not just will it show you how to cut but it will tell you if you are doing it right! It’s always an issue to have the exact weight of ingredients for your recipe, so our cutting board will also weigh it for you. Remember the last time you made a dish while looking at your iPad and you had dirty hands, so you had to wash your hands everytime you wanted to go to the next step. You can forget that because we will provide you with a display on your cutting board that will display content starting from recipes to various timers that you have set for multiple dishes you are going to cook. Want to know how you have been performing over time? We will tell you that too!

This smart board consists of a hard glass panel underneath which lie an array of sensors (pressure, temperature). These sensors are also used to give feedback to the user indicating how their chopping/cutting methods correlate to proper technique and to the preparation requirements of the recipe. For example, chopping and slicing will have different pressure patterns, and users can be given a message telling them that their chopping is more like slicing. For extra guidance on chopping technique, the screen under the knife can project width of slices for each ingredient. All of these features will allow the users get quick feedback regarding how their cooking is progressing.

The board will be divided into sections where one area is the cutting board and the remaining area will digitally display relevant information. The chopping area will be able to display widths of the knife’s cuts along with angles at which the ingredients should be chopped. The idea here is to enable the user to prepare their ingredients using proper methods. This smart cutting board will also have a unique timer based around preparing multiple dishes at the same time. A user can input a list of recipes and the cutting board will keep track of preparation times for each step. The cutting board will then take this information and work backwards to schedule when the user should begin preparing certain items so they are all finished at the same time (e.g. when to start thawing meat, when to make the salad, when to set the table, etc). Notification sounds will let users know when to move on to the next step, possibly in a different recipe. In this way, the board will support more than one recipe at a time. Finally, the recipe section will also suggest alternate ingredients in the event that the user doesn’t have certain ones on hand. For example, replacing whole milk with another liquid or being able to substitute a certain type of cheese with another product.


Rough Product Specs

Cutting Board

  • Pressure sensor (for chopping/cutting technique, weighing food)
  • Display for recipe (multiple recipes being all shown)
  • Display for graph of force
  • Display of temperature (relevant for meat)
  • ⅓ -¼ of the board displays the recipe and the above numerical data
  • Screen under cutting surface
    • Project width of knife cuts
    • Project angle of knife
  • Timer for steps in recipe:
    • Play music
    • Notifications (audio) of things to prepare and when to start preparing them
    • It also can hold multiple timers for the various items that are being cooked (each is labelled with the item’s name) – beeps when it’s done
  • Suggests alternate ingredients in case you don’t have a particular one at home