Cacophony of sounds!

Team: Molly, Yifei, Olivia, Owen, Michelle

Description:

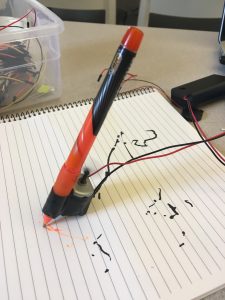
For this assignment, our team tried explore how to get motors to operate and manipulate musical instruments that we easily are able to play as humans. For this, we explored the claves, kalimba, egg shakers, bell kit, and tambourine. We first tried having servos operate the claves, but this proved to be too much of a challenge since we need to hold the claves at the point and allow them to resonate, which is something we do easily when we hold them with our hands, but not with a servo. We also looked into making noise on the kalimba using ear plugs on servos (which mimic human fingers), but the sliding motion with adjusting pressure was too difficult. We also tried using the egg shaker and a coffee cup full of beans using a DC motor or servo, but we found that the shaking beads just went towards the edge of the shaker container.

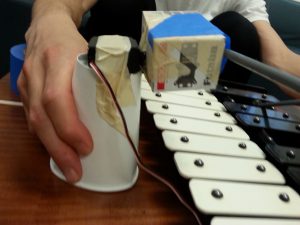
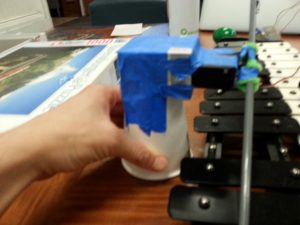
We then explored different ways to get servo motors to hit mallets on a bell kit. We noticed that if we allow for a little bit of “give” to allow a bounce on the key, rather than directly hitting the key and dampening the sound, we got a better sound. We made a “competitive game” out of the instrument: we attached two servos to the mallets and allow two player to operate pots to change the percussive nature of the mallets and instruments.

We also explored using a DC motor on a tambourine. We found if we attached tape at different diameters, we can change the amount it hits the bells. We decided to change this with a potentiometer as well.
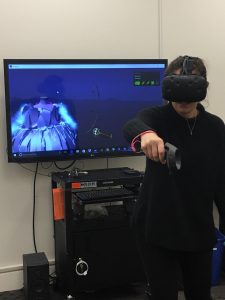
We also decided to explore a visual medium on processing, where if you click and move the mouse – depending on how slow and fast you go, the visual component and the sound changes.

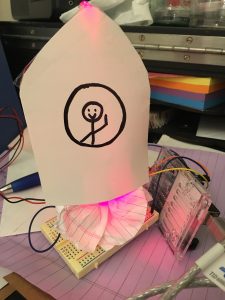
In the end we decided on having servo motors (controlled by pots) hit the bell kit and kalimba, a DC motor (controlled by pot) operate the tambourine, and a processing script on a computer. Our 4 inputs are: 2 pots for the mallets, 1 pot for the tambourine, and 1 mouse for machine. We created a fun noise game where we all contribute a part to create a cacophony of sounds!

Materials used:

  • Bell Kit
  • Tambourine
  • Kalimba
  • Computer (mouse input, processing)
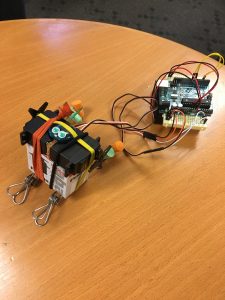
  • 2x Arduino uno
  • 3x pot
  • 2x servo
  • 1x 1k resistor
  • 1x transistor
  • 1x diode
  • 1x DC motor
  • 1x battery pack

Vimeo URL to Demo video

20161106_15264320161106_152638

Code for Processing


Maxim maxim;
AudioPlayer player;
AudioPlayer player2;
void setup()
{
size(640, 960);
maxim = new Maxim(this);
player = maxim.loadFile("atmos1.wav");
player.setLooping(true);
player2 = maxim.loadFile("bells.wav");
player2.setLooping(true);
player.volume(0.25);
background(0);
rectMode(CENTER);
}
void draw()
{
//
}
void mouseDragged()
{
player.play();
player2.play();
float red = map(mouseX, 0, width, 0, 255);
float blue = map(mouseY, 0, width, 0, 255);
float green = dist(mouseX,mouseY,width/2,height/2);

float speed = dist(pmouseX, pmouseY, mouseX, mouseY);
float alpha = map(speed, 0, 20, 0, 10);
//println(alpha);
float lineWidth = map(speed, 0, 10, 10, 1);
lineWidth = constrain(lineWidth, 0, 10);

noStroke();
fill(0, alpha);
rect(width/2, height/2, width, height);

stroke(red, green, blue, 255);
strokeWeight(lineWidth);

//rect(mouseX, mouseY, speed, speed);
line(pmouseX, pmouseY,mouseX, mouseY);
//brush1(mouseX, mouseY,speed, speed,lineWidth);
//brush2(mouseX, mouseY,speed, speed,lineWidth);
//brush3(mouseX, mouseY,speed, speed,lineWidth);
//brush4(pmouseX, pmouseY,mouseX, mouseY,lineWidth);
//brush5(pmouseX, pmouseY,mouseX, mouseY,lineWidth);
//brush6(mouseX, mouseY,speed, speed,lineWidth);
//brush7(pmouseX, pmouseY,mouseX, mouseY,lineWidth);
player.setFilter((float) mouseY/height*5000,mouseX / width);
//player2.setFilter((float) mouseY/height*5000,mouseX / width);

player2.ramp(1.,1000);
player2.speed((float) mouseX/width/2);
}
void mouseReleased()
{
//println("rel");
player2.ramp(0.,1000);

}

Code for 2x Servos for bell kit, controlled by pot


/*
* Servo with Potentiometer control
* Theory and Practice of Tangible User Interfaces
* October 11 2007
*/
int servoPin1 = 4; // Control pin for servo motor
int servoPin2 = 5;
int potPin1 = A1; // select the input pin for the potentiometer
int potPin2 = A2;
int pulseWidth1 = 0; // Amount to pulse the servo
int pulseWidth2 = 0;
long lastPulse = 0; // the time in millisecs of the last pulse
//long lastPulse2 = 0;
int refreshTime = 20; // the time in millisecs needed in between pulses
int val1; // variable used to store data from potentiometer
int val2;
int minPulse = 500; // minimum pulse width
void setup() {
pinMode(servoPin1, OUTPUT); // Set servo pin as an output pin
pinMode(servoPin2, OUTPUT);
pulseWidth1 = minPulse; // Set the motor position to the minimum
pulseWidth2 = minPulse;
Serial.begin(9600); // connect to the serial port
Serial.println("servo_serial_better ready");
}
void loop() {
val1 = analogRead(potPin1); // read the value from the sensor, between 0 - 1024
if (val1 > 0 && val1 <= 999 ) { pulseWidth1 = val1*2 + minPulse; // convert angle to microseconds Serial.print("moving servo to "); Serial.println(pulseWidth1,DEC); } updateServo1(); // update servo position val2 = analogRead(potPin2); if (val2 > 0 && val2 <= 999 ) { pulseWidth2 = val2*2 + minPulse; // convert angle to microseconds Serial.print("moving servo to "); Serial.println(pulseWidth2,DEC); } updateServo2(); // update servo position } // called every loop(). void updateServo1() { // pulse the servo again if the refresh time (20 ms) has passed: if (millis() - lastPulse >= refreshTime) {
digitalWrite(servoPin1, HIGH); // Turn the motor on
delayMicroseconds(pulseWidth1); // Length of the pulse sets the motor position
digitalWrite(servoPin1, LOW); // Turn the motor off
lastPulse = millis(); // save the time of the last pulse
}
}
void updateServo2() {
// pulse the servo again if the refresh time (20 ms) has passed:
if (millis() - lastPulse >= refreshTime) {
digitalWrite(servoPin2, HIGH);
delayMicroseconds(pulseWidth2);
digitalWrite(servoPin2, LOW);
lastPulse = millis(); // save the time of the last pulse
}
}

Code for DC motor controlled by Pot


/*
* one pot fades one motor
* modified version of AnalogInput
* by DojoDave
* http://www.arduino.cc/en/Tutorial/AnalogInput
* Modified again by dave
*/

int potPin = 0; // select the input pin for the potentiometer
int motorPin = 9; // select the pin for the Motor
int val = 0; // variable to store the value coming from the sensor
void setup() {
Serial.begin(9600);
}
void loop() {
val = analogRead(potPin); // read the value from the sensor, between 0 - 1024
Serial.println(val);
analogWrite(motorPin, val/4); // analogWrite can be between 0-255
}

Amazon Box Cuckoo Clock

Team: Neera, Olivia, Mudit, Michelle

We built a cuckoo clock out of an Amazon box. The basic idea is that the bird sits on a stick arrangement that has a rubber band attached to it. When the stick is pushed outward, it pushes the door open and the rubberband slacks. On the other hand, when the stick is pulled back in, the rubber band gets stretched and pulls the door shut due to the tension it develops. We built rails around the stick to guide it more accurately and allow for more control in addition to smoother operation.

We are happy that we were able to overcome Design Fixation in our design as the concept and the look are quite different from the sample we saw in class. We approached the problem afresh from the grassroot level and figured out the whole mechanism. This realization became even more prominent when we were made aware that our cuckoo clock has just one door unlike the one in shown in class which had two doors. We had a lot of fun putting it together and are excited to share it at the showcase tomorrow.

Cuckoo Clock TUI

make action GIFs like this at MakeaGif

Virtual Reality >>> Regular Reality

My favorite part of the HTC Vive experience was creating a crazy cool dress in Tiltbrush! I made it out of the duct tape brush, with fireworks coming out over the skirt, with a waveform belt and fog sleeves, a rainbow cape, and fire shoes. Pretty cool, huh? I think I probably spent 30 minutes creating this very detailed dress and I really enjoyed it! I really liked experimenting with the different textures and exploring what drawing in a 3D space felt like. I did do a lot of cool intersections and explored the 3D space. If I were to suggest a way to improve the experience would be to have a matching dress form in real life so I could prevent myself from drawing through the form and I could tell where the form ends.

img_1639

My least favorite part of the HTC Vive experience was when I did the Van Gogh room. I accidentally stumbled into an “Easter Egg” room which was all dark except a table with a handwritten note from Van Gogh himself – it felt like a horror movie! I had no idea what was in the darkness and I couldn’t find my way out of the room, and Noura had to watch as I freaked out and ran around and circles. If I were to improve it, I would make it clear when you enter a different “Room” rather than just surprising you once you reach a different threshold.

Little google eye crawler!

Description:

This week Molly and I teamed up to have a crawler for the TUI crawler challenge! We used 2 servomotors and a large battery pack, and some earplugs for grip on the carpet. It was difficult to stabilize the body – we tried markers, triangle shaped highlighters, and ended up using the servo box with clips to raise it.

img_1683


Components

  • 1x Bread board
  • 1x Arduino
  • 1x servomotor
  • 1x box
  • 2x paperclip
  • 1x battery pack
  • 4x ear plug
  • 10x+ rubber bands and hair ties

Code


/*
* Code modified from this code: http://www.robotoid.com/appnotes/arduino-operating-two-servos.html
*/
#include
Servo servoLeft; // Define left servo
Servo servoRight; // Define right servo
int pos7 = 0;
int pos8 = 0;
void setup() {
servoLeft.attach(8); // Set left servo to digital pin 8
servoRight.attach(7); // Set right servo to digital pin 7
servoLeft.write(0);
servoRight.write(0);
}
void loop() { // Loop through motion tests
moveR(); // Example: move forward
moveL();
// moveR();
// moveL();
// moveR();
// moveL();
}
// Motion routines for forward, reverse, turns, and stop
void moveR() {
//servoLeft.write(0);
//servoRight.write(130);
for (pos7 = 0; pos7 <= 120; pos7 += 5) { // goes from 0 degrees to 180 degrees // in steps of 1 degree servoRight.write(pos7); // tell servo to go to position in variable 'pos' delay(15); // waits 15ms for the servo to reach the position } for (pos7 = 120; pos7 >= 0; pos7 -= 10) { // goes from 180 degrees to 0 degrees
servoRight.write(pos7); // tell servo to go to position in variable 'pos'
delay(15); // waits 15ms for the servo to reach the position
}
}
void moveL() {
//servoLeft.write(130);
//servoRight.write(0);
for (pos8 = 0; pos8 <= 120; pos8 += 5) { // goes from 0 degrees to 180 degrees // in steps of 1 degree servoLeft.write(pos8); // tell servo to go to position in variable 'pos' delay(15); // waits 15ms for the servo to reach the position } for (pos8 = 120; pos8 >= 0; pos8 -= 10) { // goes from 180 degrees to 0 degrees
servoLeft.write(pos8); // tell servo to go to position in variable 'pos'
delay(15); // waits 15ms for the servo to reach the position
}
}


Ghost Writer

Description:

South Hall is haunted by a ghost!
Just kidding (maybe) – I used the setup given in lab to explore how movement of pens would work when attached to a motor. I used the same circuit from the basic lab instructions, and connected different types of pens to to the motor and let it draw across the paper.
I found that the pens with the larger tip perform better, and they are more stable. The motor tends to just drag the pen across the paper, as you speed up the motor with the pot, it moves faster. If you change the speeds rapidly, it creates more of a “bend” pattern as the weight of the pen is distributed on the motor.
Is it the ghost telling us to finish our homework? Probably.

This is similar to Spinbot: http://www.makershed.com/products/make-spinbot-kit-bagged
img_1607img_1608-2img_1609


Components

  • 1x Bread board
  • 1x Arduino
  • 1x pot
  • 1x 1k resistor
  • 1x transistor
  • 1x diode
  • 1x DC motor
  • 1x battery pack

Code

/*
* one pot fades one motor
* modified version of AnalogInput
* by DojoDave
* http://www.arduino.cc/en/Tutorial/AnalogInput
* Modified again by dave
*/

int potPin = 0; // select the input pin for the potentiometer
int motorPin = 9; // select the pin for the Motor
int val = 0; // variable to store the value coming from the sensor
void setup() {
Serial.begin(9600);
}
void loop() {
val = analogRead(potPin); // read the value from the sensor, between 0 - 1024
Serial.println(val);
analogWrite(motorPin, val/4); // analogWrite can be between 0-255
}


Kaleidoscape

The first thing that came to mind about an industrial design artifact that changed the way I normally look at things was Kaleidoscape – an interactive modular public seating system at the Berkeley Art Museum and Pacific Film Archive. If you have not had the pleasure of interacting with it, it is a series of different size seating blocks that can be moved around to create new patterns and arrangements.
kaleidoscape

The size, shape, and color of the pieces are extremely inviting to manipulate, evoking the “strangely familiar” principle from Blauvelt, and “design for experiencing” and “participatory culture” from Sanders. The size is slightly larger than normal public seating systems, making the user feel small like a child, and the colors are bright like children’s toys, and this taps into how users interact with these objects: playing with them like in their childhood. The structures are also portable, multifunctional (facilitate multiple social or solo activities), and extraordinary design that change the entire space of the BAMPFA.

Since there are many components to the seating sculpture, it is also allows for users to feel like they are creating a new pattern and contributing to the space – which is “participatory culture” as defined by Sanders. Additionally, since there are many components, every user has an opportunity to contribute and participate.

When I first interacted with the piece, it was an extremely social and fun experience. My friends and I could create a new space with strangers, an experience we would never have had on a traditional public bench or other seating system. The piece invites conversation and interaction, but can also be broken into smaller pieces to create private spaces for conversation. It makes me wish that more participatory sculptures existed in public spaces, or that public seating could be rearranged – it would be strange to move a bench in Wheeler Hall to the window, but it is totally acceptable – in fact, encouraged – to do it at the BAMPFA.

URL to video on Kaleidoscape: https://www.youtube.com/watch?v=6kcRN5OL5cI

Spaceship bouncing

Description:

For this exercise I worked with a force sensor and LED light to create a processing visual. The force sensor, when pressed, turns off the LED light. The visual is of a bouncing ball, and the gravity of how much the ball is able to bounce is increased when the sensor is pressed. My diffuser is a spaceship.

My force sensor is much like “turning off” the thruster on a spaceship – when the force sensor is on, the spaceship thruster (LED light) is off, and the ball falls to the floor. When the force sensor is not pressed, the ball bounces normally and the spaceship “thrusters” are on.

I tried to have my visual design be a series of cubes that would increase based on the force sensor input, but I found that working with classes in processing is difficult, so instead I opted to edit the bouncing ball example and adjust the gravity based on sensor input.

img_1577

sep-27-2016-22-24-09-bouncing


Components:

  • Arduino Uno
  • Breadboard
  • 1x force sensor
  • 1x LEDs (red)
  • 1x 220Ω resistors
  • 1x 10Ω resistor
  • jumper wires
  • USB cable
  • computer

Arduino Code:


int forcePin = A0; // the cell and 10K pulldown are connected to a0
int forceReading; // the analog reading from the sensor divider
int LEDpin = 13; // connect Red LED to pin 11 (PWM pin)
int LEDbrightness; //
void setup(void) {
// We'll send debugging information via the Serial monitor
Serial.begin(9600);
}

void loop(void) {
forceReading = analogRead(forcePin);

//Serial.print("Analog reading = ");
//Serial.println(forceReading); // the raw analog reading

// LED gets brighter the darker it is at the sensor
// that means we have to -invert- the reading from 0-1023 back to 1023-0
forceReading = 1023 - forceReading;
//now we have to map 0-1023 to 0-255 since thats the range analogWrite uses
LEDbrightness = map(forceReading, 0, 1023, 0, 255);
analogWrite(LEDpin, LEDbrightness*4);
Serial.println(forceReading);
}

Processing Code:


import processing.serial.*;
// Change this to the portname your Arduino board
String portname = "/dev/cu.usbmodem1421"; // or "COM5"
Serial port;
String buf="";
int cr = 13; // ASCII return == 13
int lf = 10; // ASCII linefeed == 10

int serialVal = 0;
int serial_factor = 0;
PVector location; // Location of shape
PVector velocity; // Velocity of shape
PVector gravity; // Gravity acts at the shape's acceleration

void setup() {
size(640,640);
location = new PVector(100,100);
velocity = new PVector(1.5,2.1);
gravity = new PVector(0,0.2);
port = new Serial(this, portname, 9600);
}

void draw() {
background(0);

// Add velocity to the location.
location.add(velocity);
// Add gravity to velocity
velocity.add(gravity);

// Bounce off edges
if ((location.x > width) || (location.x < 0)) {
velocity.x = velocity.x * -1;
}
if (location.y > height) {
// We're reducing velocity ever so slightly
// when it hits the bottom of the window
velocity.y = velocity.y * -0.95;
serial_factor = serialVal/30000;
if (serialVal > 1000) {
gravity.y = .3;
}
if (serialVal < 1000 ) {
gravity.y = 1.2;
}
location.y = height;
}

// Display circle at location vector
stroke(255);
strokeWeight(2);
fill(127);
ellipse(location.x,location.y,48,48);
}

// called whenever serial data arrives
void serialEvent(Serial p) {
int c = port.read();
if (c != lf && c != cr) {
buf += char(c);
}
if (c == lf) {
serialVal = int(buf);
println("val="+serialVal);
buf = "";
}
}

Wearable Information

With the rise of wearable technology and constantly tracking aspects of your life, I would like to see how we could share data about ourselves in the form of ambient media. I think it would be fun and engaging to display “stats” about ourselves through wearable symbols, like clothing that changes colors as you meet your “goals” for the day – it could be a conversation starter or an area where the people you see daily encourage you to succeed, whether that is in the form of steps or completing your checklist. It also raises the question about what information people want to share about themselves – maybe a pair of headphones could change based on the genre of music you’re listening to or your mood in order to passively signal to others information about yourself without needing to engage.


You could also image some kind of pin or token that could be altered based on an event need – for example at a MIMS alumni event you can change your pin color based on what you are interested in, as defined by the event organizer.


These types of “wearable” passive examples of ambient media would be considered to be under the “Symbolic Sculptural Display Archetype” Design Pattern by Pousman and Stasko (Fig 2, p. 72), since it only displays a few key pieces of information about the user in an abstract symbolic form that can be altered. They could also be elements of aesthetic design, or fashionable pieces, as well as cultural statements.

Midterm Project Proposal – Daniel, Safei, Michelle

Tangible User Interface C262 – Mid-semester Project Proposal

Group: Daniel, Safei, Michelle

Date: 20160921


Project Title

Melodic Memento


Observation and Goal

People have always had intimate relationships with music. Music provides powerful and long-lasting impact to the users during the experience of interaction. However, the impact of the interaction dwindles after the experience. Our group thinks that every music interaction is unique even if the song being played to the user is the same. We want to create a memento that will help the user to relive and share the experiences with his or her friends. We are also interested in the various ways user responds to the music experience, be it verbal description, physical movement, or emotional responses shown on their face. We think all of the responses and reactions from the users are what make the experience unique. We are interested in exploring how we use words for physical texture to describe acoustic sound, and similar synesthetic experiences.


Input Output
User’s description Geometric shape (generative design)
Emotion Lights
Physical movement Color
Brainwave A digital diary through data visualization
Heat, force music (chords, timbre, rhythm, genre)
Music note
Music tone


Possible Implementation

We create a space where one or a group of people can have an interactive experience with music, and:

  • after the experience, they will be able to have something to remember in the form of a token that can capture their experience, eg. 3D printed art piece representing their own memory of the music
  • Or, after the experience, they will be able to share a digital art piece which contains their collective emotional roadmap along with the music itself, and they can share it with other people through social networks.
  • Or, after the experience, they will have an air piece and they will be reminded to listen to the same music every month, every year, or every 10 years, and the series of tangible art pieces could remind them of how differently their response to the same music evolve over the time.
  • Or, during the experience, our interactive system could create responsive real-time feedback with emotional data and/or heart beat as another layer of atmosphere along with the music. Example: https://www.youtube.com/watch?v=k8FraCD6VAg (from 2:46’ how an ocean of the LED lights wearing by the audience changed according to the live music)


Embodiment/Metaphor

None Noun Verb Noun and Verb Full
Full x
Nearby x
Environment x
Distant x


Vertical = Embodiment, Horizontal = Metaphor


Since we are not sure what our output is, everyone row on the embodiment is highlighted. On the metaphor side, since the user will be enjoying and interacting with the music normally, we don’t think there’s a noun/verb metaphor at this point of time. However, since we might instruct the user to interact with the music in a certain way, there could be some interaction that mimic real world behavior. We will update the table when the time comes.


RR03

While reading Fishkin (2004), I was most struck by examples like Virtual Reality and the tiltbrush. I really liked Mithen’s argument that ‘‘the most powerful [metaphors] are those which cross domain boundaries, such as by associating a living entity with something that is inert or an idea with something that is tangible” – and I feel like aspects of tiltbrush cross into that multi-modal metaphor spectrum, like the weight of similar textiles in real life having weight in the VR space.

Fishkin’s taxonomy is also helpful in understanding the UIs because it attempts to create a framework in order to discuss different types of embodiment. I feel like tiltbrush falls into both Environmental and Full experience. I can see aspects of certain environments that could fall into one category, like Distant/None (keyboard interface), but change as a game evolves or player levels up (like Eviro/Verb), so it is difficult to classify a TUI as one category for the duration of the interaction.