Reverse Caroling

Description

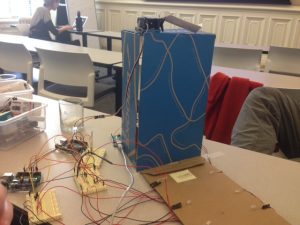
We were inspired by the music of people going caroling from house to house where the visitor is the one that does the singing. But, what if we reverse who does the singing and instead have the house and person’s home do the caroling? Furthermore, what if the person who visits starts a song and then the person who’s home it is (who is answering the door) adds to that song in a duet or collaborative way? That’s what our caroling house does.

How it works:

  • A visitor walks up to the beginning of the path
  • The christmas lights light up the path
  • The visitor steps on the welcome mat
  • A song begins playing
  • The visitor presses the door bell
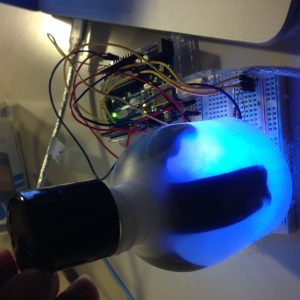
  • Snow falls from the gutter to create a wintery environment
  • The person who lives at the house answers the door. When they turn the doorknob, the song changes to a different octave adding to the duet.
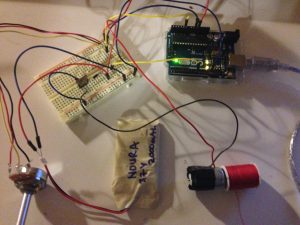
Inputs used:

  • FSR (x3)
  • Potentiometer

Outputs used:

  • 6 LEDs
  • piezo speaker
  • servo motor to dump snow from the gutter

Materials used

  • FSR (x3)
  • Potentiometer
  • 6 LEDs
  • Piezo speaker
  • Servo motor
  • 3 Arduinos
  • 4 breadboards
  • 6 220k ohm resistors
  • 4 10k ohm resistor

Doorknob and Welcome Mat Code

// TONES ========================================== // Start by defining the relationship between
 // note, period, & frequency.
 #define C 523
 #define Db 554
 #define D 587 
 #define Eb 622
 #define E 659
 #define f 698 // Does not seem to like capital F
 #define Gb 740
 #define G 783
 #define Ab 830 
 #define A 880
 #define Bb 932
 #define B 988
 #define c_ 1046
 #define dd 1109
 #define d 1175
 #define eb 1244
 #define e 1318
 #define ff 1397
 #define gb 1480
 #define g 1568 
 // Define a special note, 'R', to represent a rest
 #define R 0
 // SETUP ============================================
 // Set up speaker on a PWM pin (digital 9, 10 or 11)
 int speakerOut = 9;
 int FSRPin = A0;
 int potPin = A1;
 int valFSR = 0;
 int valPot = 0;
 int i = 0;
 // Do we want debugging on serial out? 1 for yes, 0 for no
 int DEBUG = 1;
 void setup() {
 pinMode(speakerOut, OUTPUT);
 if (DEBUG) {
 Serial.begin(9600); // Set serial out if we want debugging
 }
 }
 // MELODY and TIMING =======================================
 // melody[] is an array of notes, accompanied by beats[],
 // which sets each note's relative length (higher #, longer note)
 int melody1a[] = {E, E, E,R,
 E, E, E,R,
 E, G, C, D, E, R,
 f, f, f,f, f, E, E,E, E, D ,D,E, D, R, G ,R,
 E, E, E,R,
 E, E, E,R,
 E, G, C, D, E, R,
 f, f, f,f, f, E, E, E, G,G, f, D, C,R, G, R }; 
 
 int melody1b[] = {B, B, B,R,
 B, B, B,R,
 B, D, G, A, B, R,
 C, C, C,C, C, B, B,B, B, D ,D,C, A, R, G ,R,
 B, B, B,R,
 B, B, B,R,
 B, D, G, A, B, R,
 C, C, C,C, C, B, B,B, B, D ,D,C, A, R, G ,R };
 
 //put melody 2a and 2b here 
 int melody2a[] = {E,R, R, R,
 f, E, Eb, E, 
 f, R, R, R, 
 Gb, G, R, R,
 R, A, B, c_, 
 d, c_, B, A, 
 G,R, R, R,
 E,R, R, R,
 f, E, Eb, E, 
 f, R, R, R, 
 Gb, G, R, R,
 R, A, B, c_, 
 d, c_, B, A, 
 G,R, R, R};
 
 int melody2b[] = {A, R, R, R,
 B, A, Ab, A,
 Bb, R, R, R, 
 B, c_, R, R,
 R, d, e, f, 
 g, f, e, d,
 c_, R, R, R,
 A, R, R, R,
 B, A, Ab, A,
 Bb, R, R, R, 
 B, c_, R, R,
 R, d, e, ff, 
 g, ff, e, d,
 c_, R, R, R};
 
// int MAX_COUNT1 = sizeof(melody1) / 2; // Melody length, for looping.
// int MAX_COUNT2 = sizeof(melody2) / 2;
 // Set overall tempo
 long tempo = 10000;
 // Set length of pause between notes
 int pause = 1000;
 // Loop variable to increase Rest length
 int rest_count = 100; //<-BLETCHEROUS HACK; See NOTES
 // Initialize core variables
 int tone_ = 0;
 int beat = 0;
 long duration = 0;
 // PLAY TONE ==============================================
 // Pulse the speaker to play a tone for a particular duration
 void playTone() {
 long elapsed_time = 0;
 if (tone_ > 0) { // if this isn't a Rest beat, while the tone has
 // played less long than 'duration', pulse speaker HIGH and LOW
 while (elapsed_time < duration) {
 digitalWrite(speakerOut,HIGH);
 delayMicroseconds(tone_ / 2);
 // DOWN
 digitalWrite(speakerOut, LOW);
 delayMicroseconds(tone_ / 2);
 // Keep track of how long we pulsed
 elapsed_time += (tone_);
 }
 }
 else { // Rest beat; loop times delay
 for (int j = 0; j < rest_count; j++) { // See NOTE on rest_count
 delayMicroseconds(duration); 
 } 
 } 
 }
 
 void playNote(int melody[]) {
 tone_ = melody[i];
 beat = 50;
 duration = beat * tempo;
 playTone();
 delayMicroseconds(pause);
 }
 
 // LET THE WILD RUMPUS BEGIN =============================
 
 void loop() {
 valFSR = analogRead(FSRPin); // read value from the sensor
 valPot = analogRead(potPin);
// int *melody = melody1; ///fix later
 if (valFSR >= 10 && valFSR < 500 ){ 
 Serial.println(valFSR);
 Serial.println(valPot);
 if (valPot < 10) {
 int *melody = melody1a;
 playNote(melody);
 } else {
 int *melody = melody1b; //move to duet
 playNote(melody);
 }
 }
 if (valFSR >= 500 ){ 
 Serial.println(valFSR);
 Serial.println(valPot);
 if (valPot < 10) {
 int *melody = melody2a;
 playNote(melody);
 } else {
 int *melody = melody2b; //move to duet
 playNote(melody);
 }
 }
// playNote(melody);
 i++;
}
// if (valFSR >= 500) { //second song
// Serial.println(valFSR);
// int *melody = melody1a;
// playNote(melody);
// i++;
// }
// if (i%60 == 0) {
// i = 0;
// }
//}


img_7584

Final Project Proposal – Emotive Watercolor Palette

Final Project Proposal – Emotive Watercolor Palette [better name TBD]

We are interested in collaborative art making. Collaborations simply for the enjoyment of experiencing the creative process with another person, to create a more inclusive environment for non-artists and to redirect the value of art from finished masterpieces to the explorative and failure-driven process. We imagine that collaborative art making would harness the energy/movement/attitudes of your partner which could be extended to include remote collaboration.  The following proposes an Emotive Watercolor Palette to engage partners in painting in a new, collaborative way.

Imagine this scenario: two painters, each with their own an Emotive Watercolor Palette, paintbrush (with FSR and tilt sensors), and a water cup. Partner A is painting and the intensity at which they paint influences the colors available to Partner B. And, vice versa, resulting in a dance between Partner A and Partner B where the actions of one influences the creative process/outcome of the other. Both partners could either be in the same room, or in remote locations*.

Process:

  • Read the level of intensity at which Partner A holds their paintbrush (with FSR and tilt sensors**)
  • Partner B’s watercolor palette will have lids covering each paint color.  These lids will flap up and down at various rates depending on the intensity read in from Partner A’s brush – a faster rate if Partner A is painting with higher intensity and slower rate if Partner B is painting with lower intensity. The flapping lids are meant to indicate life in a rhythmic fashion, similar to playing the keys of a piano or beating a drum.
  • When Partner B needs more paint, they will dip their paint brush into the water cup. This activates a sensor (either photocell or FSR) which sends a signal to the water palette to pause the up and down flapping motion of the paint lids for approximately 1 minute. (This is so Partner B can actually get their brush into the paint color).
  • The paint colors available (because their lids stay open, while others stay closed) will be 3 consecutive colors along the ROYGBIV spectrum which indicate intensity. So, for example:
    • ROY would be open and GBIV would be closed at the highest intensity state. [ROY]GBIV
    • ROYG would be closed and BIV would be open at the lowest intensity state. ROYG[BIV]
    • For a middle intensity, YGB would be open while RO IV would be close. RO[YGB]IV.

This gives the painter a range of colors to work with that all have a similar tone to them.

  • Additionally, a complimentary color would be shown. For example, if [ROY] is open, [B] would also remain open to give Partner B encouragement to use a color that may be out of their comfort zone (this could be an educational tool for novices).
  • Meanwhile, this same process is happening for Partner A.

We plan to make the water color palettes on a wooden box such that the colors from the paint will seep into and color the wood over time. This will serve as an artifact of the intensity state of one’s partner over time.

Team execution:

All team members intend to continue to participate in all aspects of design and creation. Although, we have identified leaders for each aspect to ensure organized development. Dina will lead research, Jake will lead electronics, and Andrea will lead the coding.

* We intend to focus first on synchronous interactions, but plan to consider asynchronous interactions, time permitting.

** We will test the FSR to see if we can detect the degree of the painter’s intensity by pressure on the brush bristles, or the pressure at which someone holds the brush.

Virtual Reality

In trying the HTC Vive, the thing I liked the most was using the Tilt Brush – drawing and creating in a 3D space. I liked how it forced me to draw something in its entirety, not just the flat 2D perspective. For example, if I were to draw a house and then walk inside of it, I’d have to think about what the house looked like from the inside, the outside, and all 4 walls. As someone creating on a 2D space, I force the viewer to observe the piece in a certain way. In the 3D space I lose a lot of that ability. What I also liked was the ability to play back someone else’s drawing. This places so much more emphasis on the process and observing someone else at work and making mistakes. I like that I can literally put myself in someone else’s shoes and follow their actions step by step. To expand on the experience, I would want the ability to stop, slow, rewind, etc. in following someone else’s process to really use it as an educational tool. I would also want the ability to look at something in the real world and try to draw it. For example, if I go to draw a mountain in the VR realm of Tilt Brush, I am only drawing the mountain from my memory, as opposed to drawing the mountain by looking at it.


The piece of VR that I liked the least was the limited sensory feedback to go with the very immersive visual environment. For example, I wanted to be feeling the textures, heat, and weight of something as I held it. I wanted to feel the swoosh in the water as the whale tale flew by me. When skiing down the mountain, I wanted to feel the pull of gravity as I flew off the cliff. The design team could create a room where you do VR to give you the illusion of some of these senses. For example, a room could have wind and/or rain functionality. A room could have different forces (ex: tipping side to side) to give the illusion of the various forces that the user is experiencing in the game. The user could also have gloves or a bodysuit that changes heat or somehow gives varying senses of texture. As shown in the video and discussed in the reading, physical blocks can be used in the physical world, paired with image manipulation to give the user the illusion that they are playing with multiple blocks and physically touching them, but actually only playing with a single block.

Spinning thread spool

Description

Uses a DC motor to spin a thread spool to put the thread on it. A pot can be used to adjust the speed of the spinning, similar to how someone would use a foot pedal of a sewing machine to adjust the speed of the thread spinning.

Parts

  • 1 pot
  • 1 transistor
  • 1 diode
  • 1 DC motor
  • 1k ohm resistor
  • Arduino uno
  • 3V battery
  • Spool

Code

/*
 * one pot fades one motor
 * modified version of AnalogInput
 * by DojoDave <http://www.0j0.org>
 * http://www.arduino.cc/en/Tutorial/AnalogInput 
 * Modified again by dave
 */

int potPin = A0; // select the input pin for the potentiometer
int motorPin = 9; // select the pin for the Motor
int val = 0; // variable to store the value coming from the sensor
void setup() {
 Serial.begin(9600);
}
void loop() {
 val = analogRead(potPin); // read the value from the sensor, between 0 - 1024
 Serial.println(val);
 analogWrite(motorPin, val/4); // analogWrite can be between 0-255
}

img_7426

Exercise Train

  1. Lady using the rail intended for holding onto on public transport train to perform gymnastics.
  2. When people are transporting between places, it takes time, but is not necessarily productive time. This lady is making use of the train structure and turning it into an urban gym. One potential solution here would be to replace the majority of the seats in the train with areas for people to do mini exercises. It would be an interesting experiment to see if such a layout of the train would be used. Sometimes people don’t want to exercise in front of the general public, and usually people on the train are wearing street clothes as opposed to workout clothes. Maybe if exercise equipment was available on a train people would start wearing the appropriate clothes and the cultural norms would break down. All of these would have to be considered if introducing exercise equipment to the design of train cars.

screen-shot-2016-10-09-at-10-40-41-am

Experiencing Target’s Open House

Last year, Target had an Open House set up in its downtown San Francisco city store. The Open House was a very early stage prototype of what a smart home might look like. The coffee maker talked to the baby monitor, which talked to the lights, to the curtains, to your cell phone, etc. Everything in your home was smart, connected, and could communicate with each other. So, for example, the baby monitor would hear your baby cry in the morning, which would signal to the coffee maker to start brewing, which would signal to your alarm clock to wake you up. We’ve seen this type of functionality in movies, but Target was prototyping a physical space for potential users to explore. Instead of us, the users, seeing a video or a movie, we got to explore and experience the environment first hand.


One thing aspect of the smart home I was surprised by was these text bubbles that were projected on the walls with the conversations that were being passed from baby monitor to coffee maker to alarm clock. The texts were peripheral information for the human in the scene to pay attention to if they so choose, but their main purpose was to inform the user of what was going on and that devices were in motion/action. The text bubbles gave the illusion that the human was writing the messages themselves delegating and giving orders to the devices. While I didn’t like the text bubbles on the wall because I found them unaesthetic and distracting, it did make me think about what types of information I would want to know about when devices are fully connected such that they can truly act as full personal assistants. Having a personal assistant that tells me everything they are doing is almost more distracting than me just doing all of the actions myself. But, having no visibility into actions that are going on between devices could potentially be dangerous or concerning depending on the device/situation. Of course, these thresholds of how much information would like to know/not know varies for each user. But, I thought this was such a great way to “provoke insights into important functional and emotional issues and inspire thoughts about how to deal with them” (Experience Prototyping, pg. 426). I don’t think I would have had such a strong reaction and thoughts on the idea if I hadn’t experienced it for myself.

Enchanted bottle

Description

When the cap of a bottle is screwed on, the bottle is not enchanted. But, when the lid of the bottle is unscrewed, the contents inside the bottle light up and change different colors!

Materials

  • 3 LEDs (Red, Green, Blue)
  • 3 220k ohm resistors
  • 1 potentiometer
  • 1 diffuser
  • 1 arduino uno
  • 1 breadboard

Code

/*

 * Code Adapted From:

 http://www.arduino.cc/en/Tutorial/AnalogInput

 */

int sensorPin = A0; // select the input pin for the potentiometer
int greenLedPin = 11; // select the pin for the LED
int blueLedPin = 10;
int redLedPin = 9;
int sensorValue = 0; // variable to store the value coming from the sensor


int potPin = A1; // Analog input pin that the potentiometer is attached to
int potValue = 0; // value read from the pot
int led = 9; // PWM pin that the LED is on. n.b. PWM 0 is on digital pin 9
int i = 1; //to drive the movement through the lights
int valueGreen = 125;
int valueRed = 75;
int valueBlue =125;

void setup() {
 // declare the ledPin as an OUTPUT:
 pinMode(greenLedPin, OUTPUT);
 pinMode(redLedPin, OUTPUT);
 pinMode(blueLedPin, OUTPUT);

 // initialize serial communications at 9600 bps:
 Serial.begin(9600);
 // declare the led pin as an output:
// pinMode(led, OUTPUT);
}

void loop() {
 // read the value from the sensor:
 sensorValue = analogRead(sensorPin);
 Serial.println(sensorValue);
 // turn the ledPin on
 if (sensorValue > 375) {
 analogWrite(greenLedPin, 0);
 analogWrite(redLedPin, 0);
 analogWrite(blueLedPin, 0);
 }
 else {
 analogWrite(greenLedPin, valueGreen);
 analogWrite(redLedPin, valueRed);
 analogWrite(blueLedPin, valueBlue);
 valueGreen += i;
 if (valueGreen == 255) {
 i = -i;
 }
 if (valueGreen == 125) {
 i = -i;
 }
 delay(20);
 }
}


img_7382

Responsive Drawing (Lab 4)

Description

Placing an FSR on a charcoal pencil, so that when I draw, the pressure I use in gripping the pencil maps to the color of a brush stroke on a processing visualization. The intention is to create a physical drawing, but also create a completly different digital drawing that reflects my process and maps to the same intensities I was using throughout the drawing. The next iteration will have an FSR on my eraser, also mapping to a specific color on the Processing image. This will show when I erase or backtrack in my work.

The Processing image is a spiral, meant to reflect the iterative and never finished aspects of drawing. Multiple slightly curved marks are used side by side to look like a brush stroke. Slight +/- randomness is put into the mark size to give a more organic effect. There is also a +/- randomness to the angle of each mark, so as the spiral is painted, it gives the effect of a brush moving along as some marks appear to be following other marks.

Materials

  • 1 Arduino Uno
  • 1 Breadboard
  • 1 10k ohm resistor
  • 1 FSR
  • Drawing pad
  • Charcoal pencil
  • Next iteration: 1 more 10k ohm resistor
  • Next iteration: 1 more FSR
  • Next iteration: eraser

Code


//Variables for serial port set up
import processing.serial.*;
// Change this to the portname your Arduino board
String portname = "/dev/cu.usbmodem1411"; // or "COM5"
Serial port;
String buf="";
int cr = 13; // ASCII return == 13
int lf = 10; // ASCII linefeed == 10

int serialVal = 0;


//Variables for image
float c = .1; //any constant. higher = radius gets larger faster.
int canvas_w = 600;
int canvas_h = 600;
int origin_w = canvas_w/2;
int origin_h = canvas_h/2;
float r_x = 0.0;
float r_y = 0.0;
float r = 0.0; //changes the trailing effect with the radians randomly going plus or minus. 
int i = 1;
float angle = 0.0;
float radius = 0.0;
int lineLength = 60;
 
void settings() {
 size(canvas_w, canvas_h);
}

void setup() {
 //other setup things here? 
 //frameRate(10);
 background(50); 
 //noLoop();
 port = new Serial(this, portname, 9600); 
}

void draw() {
 stroke(0, serialVal/2, serialVal/2);
 translate(canvas_w/2, canvas_h/2); 
 r_x = random(-1.0, 1.0);
 r_y = random(-1.0, 1.0);
 r = random(-.25, .25);
 pushMatrix();
 radius = c*(i^(1/2)); //fibonacci
 angle += 1/radius; //as circle gets larger, we want the angle to be smaller to maintain same rate on circumference of spiral
 rotate(angle + r);
 translate(0, radius);
 strokeWeight(2+r_x);
 curve(-r_x, -r_y, r_x, lineLength + r_y, 5, 20, 10, 30);
 popMatrix();
 i += 1;
}


void serialEvent(Serial p) {
 int c = port.read();
 if (c != lf && c != cr) {
 buf += char(c);
 }
 if (c == lf) {
 serialVal = int(buf);
 println("val="+serialVal); 
 buf = ""; 
 }
}

//Use this for debugging
//void mousePressed() {
// loop(); 
//}
screen-shot-2016-09-23-at-2-17-30-pmimg_7360

Blinking and dimming LEDs

Components

  • 1 Arduino Uno
  • 3 220 ohm resistors
  • 3 LEDs (one red, one green, one blue)
  • 2 potentiometers
  • 1 breadboard

Description

Make lights blink faster or slower by turning one of the pots. Make the lights dim by turning one of the pots.

Code

int sensorPin = A0; // select the input pin for the potentiometer
int blueLedPin = 11; // select the pin for the LED
int greenLedPin = 10;
int redLedPin = 9;
int sensorValue = 0; // variable to store the value coming from the sensor


int potPin = A1; // Analog input pin that the potentiometer is attached to
int potValue = 0; // value read from the pot
//int led = 9; // PWM pin that the LED is on. n.b. PWM 0 is on digital pin 9

void setup() {
 // declare the ledPin as an OUTPUT:
 pinMode(blueLedPin, OUTPUT);
 pinMode(redLedPin, OUTPUT);
 pinMode(greenLedPin, OUTPUT);

 // initialize serial communications at 9600 bps:
 Serial.begin(9600);
 // declare the led pin as an output:
// pinMode(led, OUTPUT);
}

void loop() {
 // read the value from the sensor:
 sensorValue = analogRead(sensorPin);
 potValue = analogRead(potPin); // read the pot value
 // turn the ledPin on
 analogWrite(blueLedPin, potValue/4);
 analogWrite(redLedPin, potValue/4);
 analogWrite(greenLedPin, potValue/4);
 // stop the program for <sensorValue> milliseconds:
 delay(sensorValue);
 // turn the ledPin off:
 analogWrite(blueLedPin, 0);
 analogWrite(redLedPin, 0);
 analogWrite(greenLedPin, 0);
 // stop the program for for <sensorValue> milliseconds:
 delay(sensorValue);
}

IMG_7357

TUI not in Taxonomy

Fishkin’s taxonomy does not capture TUIs where the input is remote from the output. For example, the Materiable TUI that we saw in class. In this TUI, the user gives input to the square pegs and then the output is reflected on the square pins, but in a remote location. Fishkin’s taxonomy, on the embodiment axis includes ‘distant’, but the Materiable input/output doesn’t fit in this category because the user conducting the input isn’t shifting their gaze to the output at some distant location, but rather a second user is receiving the output in an un-seeable, remote location. I would add ‘remote’ to the embodiment scale in the taxonomy.
Additionally, Fishkin claims that TUIs that are at higher levels of embodiment and metaphor are ‘more tangible’. Yet, a TUI can be multiple levels on the embodiment scale at once (ex: ‘environmental’ and ‘full’), indicating that they the levels are not hierarchical. This flaws the logic of thinking about the two axes as scales. I agree that a TUI can be multiple of these levels, so I wouldn’t change that in the taxonomy, but I would more simply talk about them as categories and a TUI can fall into multiple categories along one axis.