
Description
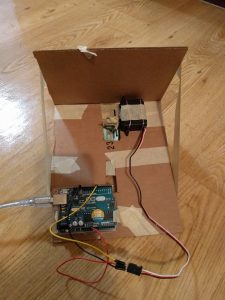
The servo motor is placed on top of a cardboard sled that has two legs in front to keep the front up. The servo motor base it tied with twine and taped to the cardboard. The servo motor head is taped to legos. The legos have a rubber band through them that makes the hinge try to extend like a prosthetic leg. When it pushes down, the movement pushes the sled forward. On the return trip, the knee flexes as it is pulled the other direction. The Arduino is also on the sled.
Materials
- 1 Arduino
- 1 servo motor
- wires
- masking tape
- cardboard
- twine
Image
Code
int servoPin = 7; // Control pin for servo motor
int pulseWidth = 0; // Amount to pulse the servo
long lastPulse = 0; // the time in millisecs of the last pulse
int refreshTime = 20; // the time in millisecs needed in between pulses
int minPulse = 500; // minimum pulse width
long lastUpdate = 0; // last position update time in milliseconds
int refreshUpdateTime = 200; // time in milliseconds between position updates
void setup() {
pinMode(servoPin, OUTPUT); // Set servo pin as an output pin
pulseWidth = minPulse; // Set the motor position to the minimum
Serial.begin(9600); // connect to the serial port
Serial.println("servo_serial_better ready");
}
void loop() {
if (millis() - lastUpdate >= refreshUpdateTime) {
if (pulseWidth < 700) {
pulseWidth = 720;
} else {
pulseWidth = 500;
}
Serial.print("moving servo to ");
Serial.println(pulseWidth,DEC);
lastUpdate = millis();
}
updateServo(); // update servo position
}
// called every loop().
void updateServo() {
// pulse the servo again if the refresh time (20 ms) has passed:
if (millis() - lastPulse >= refreshTime) {
digitalWrite(servoPin, HIGH); // Turn the motor on
delayMicroseconds(pulseWidth); // Length of the pulse sets the motor position
digitalWrite(servoPin, LOW); // Turn the motor off
lastPulse = millis(); // save the time of the last pulse
}
}