Midterm Project Proposal — Collaborative Creation

Midterm Project Proposal

Dina Bseiso, Jake Petterson, and Andrea Gagliano


We are interested in collaborative art making. Collaborations simply for the enjoyment of experiencing the creative process with another person, to create a more inclusive environment for non-artists, or to redirect the value of art from finished masterpieces to the explorative and failure-driven process. We imagine that collaborative art making would harness the energy/movement/attitudes of your partner which could be extended to include remote collaboration. Here, we suggest two ideas along these veins.


Idea 1 – Orchestrated Ink


Similar to how an orchestra of musicians come together to carry out a composition, translating physical elements into art, so can artists come together to create a composition. Imagine a group of people going about their daily lives, each with a different device that measures a certain physical metric. One person in the group is near a canvas with a brush tool. The brush tool makes a mark depending on the physical metrics that are measured by the group, collectively.


For example:

  • Person A stretches a rubber band. The tension of the rubber band is an input to the thickness of the mark.
  • Person B wears a heat sensing armband while doing an activity of their choice (running / walking / jumping around / laying down). The hotter the armband the warmer or redder the color of the mark is, and the cooler the armband, the cooler the color of the mark.
  • Person C wears an emotion sensing wristband. When they are feeling particularly relaxed, the marks get wispy and light (perhaps slightly translucent). When they are feeling particularly agitated, the marks get more opaque, more intense, and more indelible.
  • Person D bends a potentiometer, controlling the amount of time that the marks will remain. For example, they could be ephemeral or lasting.
  • Person E squeezes a ball. The more force they use, the smaller the interval of time between the moments when the inputs of person A-D are sampled.


Through the assortment of input devices, each one held by an individual in the group, the group of artists work together by combining their creative energy and sharing in the responsibility for composing the aesthetic of the resulting mark on the canvas.


Idea 2 – Collaborative art-making


Imagine this scenario: You are in a beginning pottery class about to make your first bowl on the turntable. You watch the instructor at the front of the room move her hands up and down, in and out, and turn the table at different speeds to make a perfect bowl. But, as you try yours, you fail miserably. The teacher comes over to you and puts her hands over yours as you throw your bowl so that you begin to feel different pressures. But, what if there was something on the outside of your hands giving you haptic instructions instead of the instructor?


Idea: A device on the outside of your hands (one sided glove, rings, or something on the fingernail maybe?) that were able to detect where your hands were positioned in throwing your clay bowl, and then gave output in the form of pressure, tapping, or heat, indicating that part of the hand should move up/down or apply more/less pressure. When throwing on the turntable, you use your foot on a pedal to make the table spin faster/slower. A similar device could be on your foot (toe ring, or anklet, maybe?) instructing you through pressure/tapping/heat to go at a faster or slower pace. Detection on the instructor’s hands and foot would be the input that informs your output.


Such a device could be used for instruction, but could also be used for two people to feed off of each other’s actions in tandem to create art pieces they couldn’t have created on their own. For example, partner A and partner B are throwing bowls at the same time. Similar to how partner A and partner B might feed off of each other’s motions when dancing, partner B could feel partner A’s motions (via their hands) while throwing their bowl and respond with different speed/pressure/movement accordingly. Partner B’s responsive motion would be sent back to partner A continuing the process.


Other domains of application could be in playing musical instruments (helping someone learn the proper posture and fingering), calligraphy (and/or learning the script of a new language associated with the sounds), drawing, skiing, etc. It could also serve as dismantling barriers to entry to certain crafts with regard to accessibility.

 

Blinking and dimming LEDs

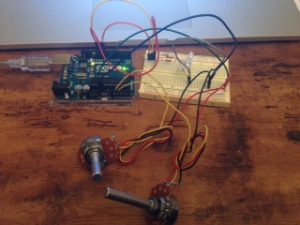
Components

  • 1 Arduino Uno
  • 3 220 ohm resistors
  • 3 LEDs (one red, one green, one blue)
  • 2 potentiometers
  • 1 breadboard

Description

Make lights blink faster or slower by turning one of the pots. Make the lights dim by turning one of the pots.

Code

int sensorPin = A0; // select the input pin for the potentiometer
int blueLedPin = 11; // select the pin for the LED
int greenLedPin = 10;
int redLedPin = 9;
int sensorValue = 0; // variable to store the value coming from the sensor


int potPin = A1; // Analog input pin that the potentiometer is attached to
int potValue = 0; // value read from the pot
//int led = 9; // PWM pin that the LED is on. n.b. PWM 0 is on digital pin 9

void setup() {
 // declare the ledPin as an OUTPUT:
 pinMode(blueLedPin, OUTPUT);
 pinMode(redLedPin, OUTPUT);
 pinMode(greenLedPin, OUTPUT);

 // initialize serial communications at 9600 bps:
 Serial.begin(9600);
 // declare the led pin as an output:
// pinMode(led, OUTPUT);
}

void loop() {
 // read the value from the sensor:
 sensorValue = analogRead(sensorPin);
 potValue = analogRead(potPin); // read the pot value
 // turn the ledPin on
 analogWrite(blueLedPin, potValue/4);
 analogWrite(redLedPin, potValue/4);
 analogWrite(greenLedPin, potValue/4);
 // stop the program for <sensorValue> milliseconds:
 delay(sensorValue);
 // turn the ledPin off:
 analogWrite(blueLedPin, 0);
 analogWrite(redLedPin, 0);
 analogWrite(greenLedPin, 0);
 // stop the program for for <sensorValue> milliseconds:
 delay(sensorValue);
}

IMG_7357

TUI not in Taxonomy

Fishkin’s taxonomy does not capture TUIs where the input is remote from the output. For example, the Materiable TUI that we saw in class. In this TUI, the user gives input to the square pegs and then the output is reflected on the square pins, but in a remote location. Fishkin’s taxonomy, on the embodiment axis includes ‘distant’, but the Materiable input/output doesn’t fit in this category because the user conducting the input isn’t shifting their gaze to the output at some distant location, but rather a second user is receiving the output in an un-seeable, remote location. I would add ‘remote’ to the embodiment scale in the taxonomy.
Additionally, Fishkin claims that TUIs that are at higher levels of embodiment and metaphor are ‘more tangible’. Yet, a TUI can be multiple levels on the embodiment scale at once (ex: ‘environmental’ and ‘full’), indicating that they the levels are not hierarchical. This flaws the logic of thinking about the two axes as scales. I agree that a TUI can be multiple of these levels, so I wouldn’t change that in the taxonomy, but I would more simply talk about them as categories and a TUI can fall into multiple categories along one axis.

Fingernail UIs

I was recently at the Berkeley Center for New Media Open House and there was a student who was working on fingernails that can show digital information, such as dots for numbers or ambient light. When asked how the fingernails might be used in the world, she gave the example of holding your hand up to a dishwasher and the fingernails lighting up as ambient information indicating whether or not the dishes are clean. Essentially using fingers to physically touch the world around us to gain additional digital information.  The fingernails immediately came to mind when reading McCullough’s piece, because it is such a beautiful extension of the hand.

As McCullough describes, the hand is so closely connected to the mind so to place a digital object on the hands which extends its ability to sense and perceive the world around us seems like a logical place. I like that the fingernails require placing one’s hand on physical objects to sense this additional digital information, which is in line with McCullough’s arguments. Although, the idea of ambient light on the fingernails is requiring a secondary sense, sight. To align more with McCullough’s argument, it might be more fitting to have the digital fingernails output another form of information, maybe some sort of buzz or change in temperature. This would leverage our body’s innate ability to feel and sense more through our fingers (ex: some sort of information conveyed when the left thumb nail changes in temperature which our brains may pick up faster/distinguish more than our left thumb nail lighting up).

Drinks in a Wine Glass

Description

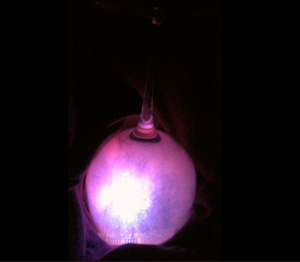
3 LEDs diffused together with fluff in an upside down wine glass. The user can input in what type of drink they’d like. For example, they can have ‘wine’, a ‘smoothie’, or an ‘abc’ drink which is a mystery drink. The wine glass will fill with an appropriate color for each of the drinks. For the ‘abc’ mystery drink the glass fills with a fading progression through all of the colors.

Components

1 Arduino

3 LED

3 220 Ohm Resistor

1 Breadboard

4 wires

Code

/* 
 * Serial RGB LED
 * ---------------
 * Serial commands control the brightness of R,G,B LEDs 
 *
 * Command structure is "<colorCode><colorVal>", where "colorCode" is
 * one of "r","g",or "b" and "colorVal" is a number 0 to 255.
 * E.g. "r0" turns the red LED off. 
 * "g127" turns the green LED to half brightness
 * "b64" turns the blue LED to 1/4 brightness
 *
 * Created 18 October 2006
 * copyleft 2006 Tod E. Kurt <tod@todbot.com
 * http://todbot.com/
 */

char serInString[100]; // array that will hold the different bytes of the string. 100=100characters;
 // -> you must state how long the array will be else it won't work properly
String colorCode;
int colorVal;

int redPin = 9; // Red LED, connected to digital pin 9
int greenPin = 10; // Green LED, connected to digital pin 10
int bluePin = 11; // Blue LED, connected to digital pin 11

void setup() {
 pinMode(redPin, OUTPUT); // sets the pins as output
 pinMode(greenPin, OUTPUT); 
 pinMode(bluePin, OUTPUT);
 Serial.begin(9600);
 analogWrite(redPin, 0); // set them all to mid brightness
 analogWrite(greenPin, 0); // set them all to mid brightness
 analogWrite(bluePin, 0); // set them all to mid brightness
 Serial.println("What would you like to drink? wine, smoothie, or abc?"); 
}

void loop () {
 // clear the string
 memset(serInString, 0, 100);
 //read the serial port and create a string out of what you read
 readSerialString(serInString);
 
 colorCode = String(serInString);
 if( colorCode == "wine" || colorCode == "smoothie" || colorCode == "abc" ) {
 Serial.println("We will now poor your drink!");
 if(colorCode == "wine") {
 analogWrite(redPin, 255);
 analogWrite(greenPin, 10);
 analogWrite(bluePin, 10);
 } else if(colorCode == "smoothie") {
 analogWrite(redPin, 200);
 analogWrite(greenPin, 100);
 analogWrite(bluePin, 100);
 } else if(colorCode == "abc") {
 int i = 1;
 int rValue = 0;
 int gValue = 30;
 int bValue = 60;
 int change = 5;
 while (i < 1000) {
 rValue = (rValue + change)%255;
 gValue = (gValue + change)%255;
 bValue = (bValue + change)%255;
 analogWrite(redPin, rValue);
 analogWrite(greenPin, gValue);
 analogWrite(bluePin, bValue);
 delay(50);
 if (i%50 == 0) {
 change = change*-1;
 }
 i++;
 } 
 }
 }
 
 delay(100); // wait a bit, for serial data
}

//read a string from the serial and store it in an array
//you must supply the array variable
void readSerialString (char *strArray) {
 int i = 0;
 if(!Serial.available()) {
 return;
 }
 while (Serial.available()) {
 strArray[i] = Serial.read();
 i++;
 }
}
Screen Shot 2016-09-11 at 11.22.20 AM

Blinking – doubled

Description

A blinking LED that starts at with a given number of blinks and then doubles the number of blinks progressively. Example: 1 blink, pause, 2 blinks, pause, 4 blinks, pause, 8 blinks, …, all the way to 100 blinks.

Components

1 Arduino

1 LED

1 220 Ohm Resistor

1 Breadboard

3 wires

Code

/*
 Blink
 Turns on an LED 1 time, pauses, turns on an LED 2 times quickly, pauses, 
 turns on an LED 4 times quickly, pauses, etc., doubling the number
 of quick blinks each time. 
 */

// the setup function runs once when you press reset or power the board
void setup() {
 // initialize digital pin 13 as an output.
 pinMode(13, OUTPUT);
}

// the loop function runs over and over again forever
void loop() {
 int blinkCount = 1; //initialize the first number of blinks in a series
 while (blinkCount < 100) { //max number of blinks in a series
 for (int i = 0; i < blinkCount; i++) {
 digitalWrite(13, HIGH); //turn on LED
 delay(100); //time LED is on
 digitalWrite(13, LOW); //turn off LED
 delay(100); //time LED is off
 }
 delay(2000); //delay between blinking series
 blinkCount = blinkCount + blinkCount; //double the length of the series
 }
}

Image

Arduino