Backward/Forward Crawler

For my crawler, I originally created a wheel with many “knees” so that only the forward option would bite into the ground, with the backward motion only causing each joint to close. However, it only went around in circles.

To get around that, I tried playing around with the design so that motion would be forward and backwards. I tried making a larger forward leg to see if the uneven legs would cause the crawler to move forward if a peg attached to the motor struck the forward and backward leg.

Then I tried placing a large rubber band across the center and have the motor tense and relax the tension of the rubber band. Unfortunately I did not succeed – the crawler stands motionless.

crawler

Let’s crawl

Description

It was hard to derive linear motion out of a motor whose direction of rotation alternates. Initially I tried to design shoes out of erasers but it turns out the friction was too much for it to begin moving. The video for this attempt can be found here – https://goo.gl/photos/QXmh7DSLDyzkFmXM8


To fix this problem, I tried removing the feet and reworked the placement of wires. I got something which moves a little but only on a rough surface like that of a carpet or a rug – https://goo.gl/photos/5Jiy4hLLPD3BEsbm6


Components

Arduino Board
Bread board
Servo motor
Wires


/*
* Servo with Potentiometer control
* Theory and Practice of Tangible User Interfaces
* October 11 2007
*/

int servoPin = 7; // Control pin for servo motor
int potPin = 0; // select the input pin for the potentiometer

int pulseWidth = 0; // Amount to pulse the servo
long lastPulse = 0; // the time in millisecs of the last pulse
int refreshTime = 20; // the time in millisecs needed in between pulses
int val; // variable used to store data from potentiometer

int minPulse = 500; // minimum pulse width

void setup() {
pinMode(servoPin, OUTPUT); // Set servo pin as an output pin
pulseWidth = minPulse; // Set the motor position to the minimum
Serial.begin(9600); // connect to the serial port
Serial.println("servo_serial_better ready");
}

void loop() {
val = analogRead(potPin); // read the value from the sensor, between 0 - 1024

if (val > 0 && val <= 999 ) { pulseWidth = val*2 + minPulse; // convert angle to microseconds Serial.print("moving servo to "); Serial.println(pulseWidth,DEC); } updateServo(); // update servo position } // called every loop(). void updateServo() { // pulse the servo again if the refresh time (20 ms) has passed: if (millis() - lastPulse >= refreshTime) {
digitalWrite(servoPin, HIGH); // Turn the motor on
delayMicroseconds(pulseWidth); // Length of the pulse sets the motor position
digitalWrite(servoPin, LOW); // Turn the motor off
lastPulse = millis(); // save the time of the last pulse
}
}

The Chopstick Bot

To make a crawler, the first thing that came into my mind was chopsticks. So I gather a few chopsticks, break them, and them try to put them together in a way that would make the single-legged servo motor crawl. It took some observation and reiteration. I used a lot of tapes and a few coins to adjust the balance. Now this robot is really crawling.. but not in a straight line.. It seems to be moving towards Northwest…

Video

Arduino Code

#include //add servo library

Servo myservo;

int pos = 0; // variable to store the servo position

void setup() {
myservo.attach(9); // attaches the servo on pin 9 to the servo object
}

void loop() {
for (pos = 0; pos <= 180; pos += 1) { // goes from 0 degrees to 180 degrees // in steps of 1 degree myservo.write(pos); // tell servo to go to position in variable 'pos' delay(4); // waits 15ms for the servo to reach the position } delay(200); for (pos = 180; pos >= 0; pos -= 1) { // goes from 180 degrees to 0 degrees
myservo.write(pos); // tell servo to go to position in variable 'pos'
delay(4); // waits 15ms for the servo to reach the position
}
delay(200);
}

3D-Printed Crawler

Video: https://www.youtube.com/watch?v=Pf1nZoAFWvA&feature=youtu.be


For this assignment I happened to have a 3D-printed arm in a box in my room (what?), so I set about programming it to crawl forward in a straight line. The arm is made from 3D-printed finger joints, metal wire, a plastic housing, and some zip-ties and a laser-cut servo protector. It wasn’t originally designed to crawl forward along carpeted surfaces, but with a little bit of retrofitting it does the job nicely.


Materials:

  1. Servo Motor
  2. 3D-printed lobster tail
  3. Arduino Uno
  4. Lead wires
  5. 4 AA batteries
  6. Battery holder
  7. Steel cable
  8. Hot glue
  9. Zip ties

Code:


/* Sweep

by BARRAGAN <http://barraganstudio.com>
This example code is in the public domain.

modified 10/19/2016
by Adam Hutz
http://www.arduino.cc/en/Tutorial/Sweep
*/

#include <Servo.h>

Servo myservo; // create servo object to control a servo
// twelve servo objects can be created on most boards

int pos = 0; // variable to store the servo position

void setup()
{
myservo.attach(9); // attaches the servo on pin 9 to the servo object
}

void loop()
{
for(pos = 0; pos <= 110; pos += 1) // goes from 0 degrees to 180 degrees
{ // in steps of 1 degree
myservo.write(pos); // tell servo to go to position in variable ‘pos’
delay(8); // waits 15ms for the servo to reach the position
}
for(pos = 110; pos>=0; pos-=1) // goes from 180 degrees to 0 degrees
{
myservo.write(pos); // tell servo to go to position in variable ‘pos’
delay(8); // waits 15ms for the servo to reach the position
}
}


Lab 07

Description

I used Arduino with servo motor. I followed the lab instruction and set up the Arduino with a servo motor. I used the sample code provided in the lab to make Arduino interact with the servo motor. I also attached the servo motor with for legs and decorated the servo motor. Lastly, I  uploaded the code and took pictures of the result.

Components

  • 1 Arduino
  • 1 servo Motor
  • 1 Breadboard
  • 8 lego pieces
  • Pot

Video

https://drive.google.com/open?id=0B0Lealdkh-I8Vi1CQUEzQ2NMdXM

Code

/*
 * Servo with Potentiometer control
 * Theory and Practice of Tangible User Interfaces
 * October 11 2007
 */

int servoPin = 7;      // Control pin for servo motor
int potPin   = 0;      // select the input pin for the potentiometer

int pulseWidth = 0;    // Amount to pulse the servo
long lastPulse = 0;    // the time in millisecs of the last pulse
int refreshTime = 20;  // the time in millisecs needed in between pulses
int val;               // variable used to store data from potentiometer

int minPulse = 500;   // minimum pulse width

void setup() {
  pinMode(servoPin, OUTPUT);  // Set servo pin as an output pin
  pulseWidth = minPulse;      // Set the motor position to the minimum
  Serial.begin(9600);         // connect to the serial port
  Serial.println("servo_serial_better ready");
}

void loop() {
  val = analogRead(potPin);    // read the value from the sensor, between 0 - 1024
  
  if (val > 0 && val <= 999 ) {
    pulseWidth = val*2 + minPulse;  // convert angle to microseconds
    
    Serial.print("moving servo to ");
    Serial.println(pulseWidth,DEC);
  
  }
  updateServo();   // update servo position
}

// called every loop(). 
void updateServo() {
  // pulse the servo again if the refresh time (20 ms) has passed:
  if (millis() - lastPulse >= refreshTime) {
    digitalWrite(servoPin, HIGH);   // Turn the motor on
    delayMicroseconds(pulseWidth);  // Length of the pulse sets the motor position
    digitalWrite(servoPin, LOW);    // Turn the motor off
    lastPulse = millis();           // save the time of the last pulse
  }
}


Single and Double Servo Crawlers

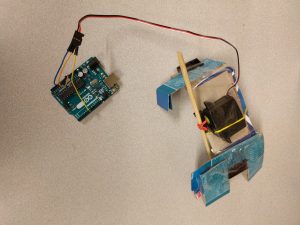
Ganesh and I worked on a proof of concept with one servo motor wherein we used a single wire to propel the servo forward.  The motion is illustrated in the video at the link –

https://drive.google.com/open?id=0ByHw8c_nutT2ZVZ6WllBbUJpOVk

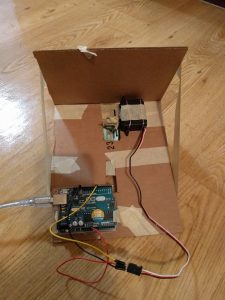
After trying various mechanisms, we picked this one with two legs made out of a single wire. The key in this arrangement is that the two legs are of different lengths. This enables each leg to alternately anchor and drag the motor while also drifting slightly sideways and the next step correcting for the sideways drift.

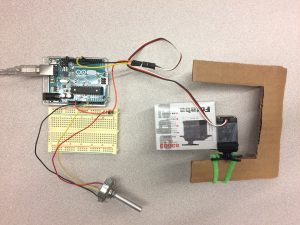
After being successful with the single motor and the mechanism, we tried using two motors to propel a stuffed toy supported on chopsticks. The idea being that the two motors would work in opposite directions –  anchoring and propelling forward alternately (pic included below).

crawler


Code:


/*
* Servo Control Serial
* modified for TUI October 2007
* Servo Serial Better
* ——————-
*
* Created 18 October 2006
* copyleft 2006 Tod E. Kurt <tod@todbot.com>
* http://todbot.com/
*
* adapted from “http://itp.nyu.edu/physcomp/Labs/Servo”
*/

int servoPin1 = 7; // Control pin for servo motor
int servoPin2 = 8; // Control pin for servo motor

int pulseWidth = 0; // Amount to pulse the servo
long lastPulse = 0; // the time in millisecs of the last pulse
int refreshTime = 20; // the time in millisecs needed in between pulses
int val; // variable used to store data from serial port

int minPulse = 500; // minimum pulse width
int maxPulse = 2250; // maximum pulse width

void setup() {
pinMode(servoPin1, OUTPUT); // Set servo pin as an output pin
pinMode(servoPin2, OUTPUT); // Set servo pin as an output pin
pulseWidth = minPulse; // Set the motor position to the minimum
Serial.begin(9600); // connect to the serial port
Serial.println(“Servo control program ready”);
}

void loop() {
pulseWidth = (4 * (maxPulse-minPulse) / 8) + minPulse;
updateServo();
delay(1000);
pulseWidth = (8 * (maxPulse-minPulse) / 8) + minPulse;
updateServo();
delay(1000);
}
// called every loop().
// uses global variables servoPi, pulsewidth, lastPulse, & refreshTime
void updateServo() {
// pulse the servo again if rhe refresh time (20 ms) have passed:
if (millis() – lastPulse >= refreshTime) {
digitalWrite(servoPin1, HIGH); // Turn the motor on
digitalWrite(servoPin2, HIGH); // Turn the motor on
delayMicroseconds(pulseWidth); // Length of the pulse sets the motor position
digitalWrite(servoPin1, LOW); // Turn the motor off
digitalWrite(servoPin2, LOW); // Turn the motor off
lastPulse = millis(); // save the time of the last pulse
}
}

Crawler frog

Description

For this project I used a servo motor and an old tape dispenser. Once I got the project working well I decided to improve its aesthetics. Since the tape dispenser was green I decided to convert it into a frog. Nevertheless, it seems that now it looks cute but it doesn’t work as it should. Probably I’ll have to remove the green paper and test it again tomorrow.

Components

  • 1 Arduino Uno
  • 1 Futaba Servo Motor
  • 1 battery holder
  • 2 rubber bands
  • 1 pot
  • Jumper Wires
  • 1 bread board
  • 1 old plastic tape dispenser
  • Green paper

Code

int servoPin = 7; // Control pin for servo motor
int potPin = A0; // select the input pin for the potentiometer

int pulseWidth = 0; // Amount to pulse the servo
long lastPulse = 0; // the time in millisecs of the last pulse
int refreshTime = 20; // the time in millisecs needed in between pulses
int val; // variable used to store data from potentiometer

int minPulse = 500; // minimum pulse width

void setup() {
pinMode(servoPin, OUTPUT); // Set servo pin as an output pin
pulseWidth = minPulse; // Set the motor position to the minimum
Serial.begin(9600); // connect to the serial port
Serial.println(“servo_serial_better ready”);
}

void loop() {
val = analogRead(potPin); // read the value from the sensor, between 0 – 1024

if (val > 0 && val <= 999 ) {
pulseWidth = val*2 + minPulse; // convert angle to microseconds

Serial.print(“moving servo to “);
Serial.println(pulseWidth,DEC);

}
updateServo(); // update servo position
}

// called every loop().
void updateServo() {
// pulse the servo again if the refresh time (20 ms) has passed:
if (millis() – lastPulse >= refreshTime) {
digitalWrite(servoPin, HIGH); // Turn the motor on
delayMicroseconds(pulseWidth); // Length of the pulse sets the motor position
digitalWrite(servoPin, LOW); // Turn the motor off
lastPulse = millis(); // save the time of the last pulse
}
}

Servo Motor

Description

My servo sometimes crawls  and sometimes doesn’t, depending on its mood…I used cardboards as its legs.

Components

  • 1 Arduino
  • 1 DC Motor
  • 1 Servo Motor
  • Several cardboards
  • 1 Breadboard

Code

/*
 * Servo with Potentiometer control
 * Theory and Practice of Tangible User Interfaces
 * October 11 2007
 */

int servoPin = 7;      // Control pin for servo motor
int potPin   = 0;      // select the input pin for the potentiometer

int pulseWidth = 0;    // Amount to pulse the servo
long lastPulse = 0;    // the time in millisecs of the last pulse
int refreshTime = 20;  // the time in millisecs needed in between pulses
int val;               // variable used to store data from potentiometer

int minPulse = 500;   // minimum pulse width

void setup() {
  pinMode(servoPin, OUTPUT);  // Set servo pin as an output pin
  pulseWidth = minPulse;      // Set the motor position to the minimum
  Serial.begin(9600);         // connect to the serial port
  Serial.println("servo_serial_better ready");
}

void loop() {
  val = analogRead(potPin);    // read the value from the sensor, between 0 - 1024
  
  if (val > 0 && val <= 999 ) {
    pulseWidth = val*2 + minPulse;  // convert angle to microseconds
    
    Serial.print("moving servo to ");
    Serial.println(pulseWidth,DEC);
  
  }
  updateServo();   // update servo position
}

// called every loop(). 
void updateServo() {
  // pulse the servo again if the refresh time (20 ms) has passed:
  if (millis() - lastPulse >= refreshTime) {
    digitalWrite(servoPin, HIGH);   // Turn the motor on
    delayMicroseconds(pulseWidth);  // Length of the pulse sets the motor position
    digitalWrite(servoPin, LOW);    // Turn the motor off
    lastPulse = millis();           // save the time of the last pulse
  }
}

Bouncing sled

Description

The servo motor is placed on top of a cardboard sled that has two legs in front to keep the front up. The servo motor base it tied with twine and taped to the cardboard. The servo motor head is taped to legos. The legos have a rubber band through them that makes the hinge try to extend like a prosthetic leg. When it pushes down, the movement pushes the sled forward. On the return trip, the knee flexes as it is pulled the other direction. The Arduino is also on the sled.

Materials

  • 1 Arduino
  • 1 servo motor
  • wires
  • masking tape
  • cardboard
  • twine

Image

Bouncy Sled

Code

int servoPin = 7; // Control pin for servo motor

int pulseWidth = 0; // Amount to pulse the servo
long lastPulse = 0; // the time in millisecs of the last pulse
int refreshTime = 20; // the time in millisecs needed in between pulses
int minPulse = 500; // minimum pulse width
long lastUpdate = 0; // last position update time in milliseconds
int refreshUpdateTime = 200; // time in milliseconds between position updates

void setup() {
pinMode(servoPin, OUTPUT); // Set servo pin as an output pin
pulseWidth = minPulse; // Set the motor position to the minimum
Serial.begin(9600); // connect to the serial port
Serial.println("servo_serial_better ready");
}

void loop() {
if (millis() - lastUpdate >= refreshUpdateTime) {
if (pulseWidth < 700) { pulseWidth = 720; } else { pulseWidth = 500; } Serial.print("moving servo to "); Serial.println(pulseWidth,DEC); lastUpdate = millis(); } updateServo(); // update servo position } // called every loop(). void updateServo() { // pulse the servo again if the refresh time (20 ms) has passed: if (millis() - lastPulse >= refreshTime) {
digitalWrite(servoPin, HIGH); // Turn the motor on
delayMicroseconds(pulseWidth); // Length of the pulse sets the motor position
digitalWrite(servoPin, LOW); // Turn the motor off
lastPulse = millis(); // save the time of the last pulse
}
}

Crawler with Servo Motor

Description

For this mini project, I used one servo motor and tested with different geometries and two different cardboard directions to come up with this mini cardboard crawler. I also played around with different combinations of the paper box and the servo motor to optimize the location of center of gravity to avoid the crawler turning over in the process of crawling

Components

  • 1 Bread Board
  • 1 Arduino Uno
  • 1 Futaba Servo Motor
  • 1 Box
  • 1 Green Wire
  • Transparent Tape
  • Jumper Wires
Code
int servoPin = 7; // Control pin for servo motor
int potPin = 0; // select the input pin for the potentiometer

int pulseWidth = 0; // Amount to pulse the servo
long lastPulse = 0; // the time in millisecs of the last pulse
int refreshTime = 20; // the time in millisecs needed in between pulses
int val; // variable used to store data from potentiometer

int minPulse = 500; // minimum pulse width

void setup() {
 pinMode(servoPin, OUTPUT); // Set servo pin as an output pin
 pulseWidth = minPulse; // Set the motor position to the minimum
 Serial.begin(9600); // connect to the serial port
 Serial.println("servo_serial_better ready");
}

void loop() {
 val = analogRead(potPin); // read the value from the sensor, between 0 - 1024
 
 if (val > 0 && val <= 999 ) {
 pulseWidth = val*2 + minPulse; // convert angle to microseconds
 
 Serial.print("moving servo to ");
 Serial.println(pulseWidth,DEC);
 
 }
 updateServo(); // update servo position
}

// called every loop(). 
void updateServo() {
 // pulse the servo again if the refresh time (20 ms) has passed:
 if (millis() - lastPulse >= refreshTime) {
 digitalWrite(servoPin, HIGH); // Turn the motor on
 delayMicroseconds(pulseWidth); // Length of the pulse sets the motor position
 digitalWrite(servoPin, LOW); // Turn the motor off
 lastPulse = millis(); // save the time of the last pulse
 }
}

Image & Video

img_1012

img_1013

img_1015