Walker aide

Members:

Yifei Liu, Reema Naqvi, Olivia Ting

Components:

1 Walker

Arduino

LEDs

FSRs

Piezo speaker

DC motor

Some wireless mechanism for controlling the sensors

Idea:

For our final project, we decided to do something different from our mid term presentation while staying in the same space i.e. building something to benefit the elderly. We will build a system around a walker that through light, sound and vibration signals, enables the correct and safe use of walkers.

A large number of the elderly population uses a walker at some point, whether on a temporary basis following a fall/surgery or permanently when need be. But using a walker correctly is not easy or instinctive, and has a learning curve itself. Where to hold the handle, how fast to walk, how close it is to one’s body are all critical in avoiding falls or injuries. Having such a system is important not just to help people learn using a walker for the first time, but also so they don’t forget the fundamentals later on.

We will place pressure sensors on the handles as well as on a light mitt-like glove. These sensors will detect whether the person got up by putting their weight on the walker right away, or  by pushing themselves off the chair by using their hands against the chair. If they grasp the walker and try to use it to pull themselves up, they can potentially slip and fall. So, DC motor vibrations along with the Piezo speakers will buzz and alert the user if they are getting up incorrectly. Similarly, placing LEDs on the handle will signal the correct place to hold the handle.

We are in the process of deciding on a wireless technology so that we don’t have wires sticking out of the walker which would be aesthetically unappealing, as well as dangerous in case they get tangled around the wheels or the user.

Final Project Proposal – Emotive Watercolor Palette

Final Project Proposal – Emotive Watercolor Palette [better name TBD]

We are interested in collaborative art making. Collaborations simply for the enjoyment of experiencing the creative process with another person, to create a more inclusive environment for non-artists and to redirect the value of art from finished masterpieces to the explorative and failure-driven process. We imagine that collaborative art making would harness the energy/movement/attitudes of your partner which could be extended to include remote collaboration.  The following proposes an Emotive Watercolor Palette to engage partners in painting in a new, collaborative way.

Imagine this scenario: two painters, each with their own an Emotive Watercolor Palette, paintbrush (with FSR and tilt sensors), and a water cup. Partner A is painting and the intensity at which they paint influences the colors available to Partner B. And, vice versa, resulting in a dance between Partner A and Partner B where the actions of one influences the creative process/outcome of the other. Both partners could either be in the same room, or in remote locations*.

Process:

  • Read the level of intensity at which Partner A holds their paintbrush (with FSR and tilt sensors**)
  • Partner B’s watercolor palette will have lids covering each paint color.  These lids will flap up and down at various rates depending on the intensity read in from Partner A’s brush – a faster rate if Partner A is painting with higher intensity and slower rate if Partner B is painting with lower intensity. The flapping lids are meant to indicate life in a rhythmic fashion, similar to playing the keys of a piano or beating a drum.
  • When Partner B needs more paint, they will dip their paint brush into the water cup. This activates a sensor (either photocell or FSR) which sends a signal to the water palette to pause the up and down flapping motion of the paint lids for approximately 1 minute. (This is so Partner B can actually get their brush into the paint color).
  • The paint colors available (because their lids stay open, while others stay closed) will be 3 consecutive colors along the ROYGBIV spectrum which indicate intensity. So, for example:
    • ROY would be open and GBIV would be closed at the highest intensity state. [ROY]GBIV
    • ROYG would be closed and BIV would be open at the lowest intensity state. ROYG[BIV]
    • For a middle intensity, YGB would be open while RO IV would be close. RO[YGB]IV.

This gives the painter a range of colors to work with that all have a similar tone to them.

  • Additionally, a complimentary color would be shown. For example, if [ROY] is open, [B] would also remain open to give Partner B encouragement to use a color that may be out of their comfort zone (this could be an educational tool for novices).
  • Meanwhile, this same process is happening for Partner A.

We plan to make the water color palettes on a wooden box such that the colors from the paint will seep into and color the wood over time. This will serve as an artifact of the intensity state of one’s partner over time.

Team execution:

All team members intend to continue to participate in all aspects of design and creation. Although, we have identified leaders for each aspect to ensure organized development. Dina will lead research, Jake will lead electronics, and Andrea will lead the coding.

* We intend to focus first on synchronous interactions, but plan to consider asynchronous interactions, time permitting.

** We will test the FSR to see if we can detect the degree of the painter’s intensity by pressure on the brush bristles, or the pressure at which someone holds the brush.

2EZ2Play – Music Box

2ez2play
This is no ordinary music box. It’s an interactive music box. It makes composing and enjoying music a very easy task, basically, too easy to play.
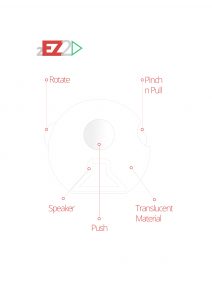
diagram
Let me explain a bit about the box. If you look at the diagram attached, you will see a spherical enclosure, the bottom of which is attached a speaker for sound output. Above that you can see a depressed surface (gray shaded area). This surface allows the control of the drum beats in the song. On the right of this surface, you will see a knob-like structure. This knob allows one to pinch and pull it to change the type of strings playing in a song. To the extreme left of the sphere, you will see a bump like structure. That bump allows one to change the beats per minute of the song by turning it.
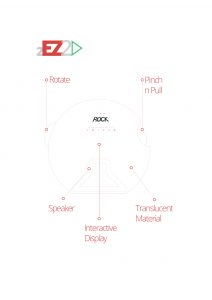
diagram2
This image is of the other end of the music box. This has in the center, a single line LED matrix display, and a swipe/slide area to change the genre of the music playing.

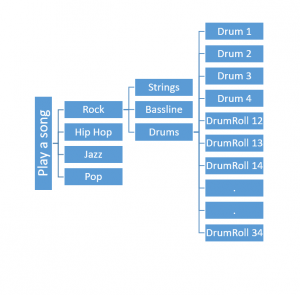
The Music Box allows everyone to compose beautiful music. The Working is simple, switch on the music box, swipe to select the particular genre you want to compose a song in. Tap to confirm the selection. Your music starts whenever you start by either pushing the depressed area to start the drums or by pulling the knob-like structure to start the strings and the bassline of the song. The same surfaces would be used to change the type of strings that are playing and the type of drum beats that are playing. String variants would cycle from rhythms to rhythms and solos. Drum beats would cycle from drum beats to drum rolls. If you wish to change the tempo of the song, you can do so by turning the bump like structure. You would be allowed to change the tempo of the song in multiples of 1x,1.2x,1.4x,1.6x,2x where x is the current bpm.

chart1

Additionally, LED lights attached inside the translucent material allows a visualization to be displayed based on the beats of the song.

All these create a new combination every time making every song unique in its own ways. There is no failure, anyone can play a beatiful piece of music on this. We were able to do this by restricting the factors that vary in the song and curating the original content to be generic and ones that can easily transition into one another in a particular genre.

Through the music box, we are able to create interesting affordance – output mappings.

  • Pinching/ Pulling – String manipulation
  • Pushing – Drumbeat manipulation
  • Turning – Beats per minute manipulation

Both the input and the output reside within the same boundary of the surface of the sphere.

I feel this will be an interesting thing to play with and it would empower people with the capability to compose music with minimum efforts.

Embodied Geometry – Final Project Proposal

Proposed Interaction: Think Twister meets Tetris.
We are creating a collaborative, embodied geometry game. This game could provide children with a collaborative learning environment in which to explore geometric properties of shapes as well as properties of symmetry and spatial reasoning. We are also exploring possibility of creating a shareable memento/artifact of their game play.

Figure 1 - Embodied Geometry
Figure 1 – Initial Setup

Interaction
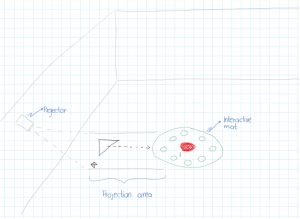
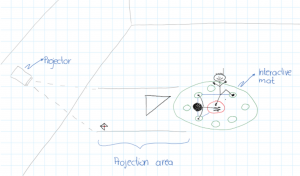
For the scope of the current project, a pair of users will use their limbs to activate circles on an interactive mat (Figure 1). Users must always keep one limb on the center spot. From a geometric stand-point, this center point acts as a frame of reference for body movements (rotations, extensions, etc.). This is an intentional design constraint within the environment that allows for comparison of asynchronously created shapes. We intend for this point to guide their movements such that we believe they will more likely notice patterns and relationships.

Figure 2 - Embodied Geometry
Figure 2 – As the shape approaches towards the users, they are supposed to collaborate and create the shape before it hits the mat.

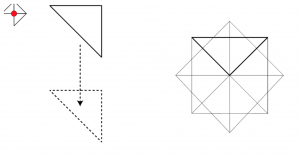
Users will coordinate their body positions to make composite shapes supplied by the system (Figure 2) paying special attention to the orientation of each component shape. A shape will be projected on the floor near the mat, moving slowly toward the mat. Users must create the shape before it reaches the mat (time runs out). For a shape to be recognized as successfully created, users must be touching all necessary points at the same time. The display will also include a small schematic of all the shapes completed so far. In Figure XXX, the triangle is the challenge shape (component), the image in the upper left represents shapes completed so far (composite). Users will also receive feedback on the mat regarding their touch positions.

The game will have different levels of difficulty that require users to use more limbs (easy: legs only, medium: legs and an arm, hard: both legs and both arms). All successfully created shapes will be overlaid to create a final image that users could take with them (Figure 3 below).

Figure 3 - Embodied Geometry
Fig 3: How the UI could possibly look like in terms of shapes created and to be created. This is an early sample

TUI Final Project proposal – Brushee

Members: Mudit, Adam and Neera

We intend to continue working on Brushee as per the mid-term project proposal. Additionally, based on the feedback after the mid-term project proposal presentations, here are a few aspects we will strive to build upon  –

1)     We plan to stick to our original scope of encouraging pre-linguistic children to brush their teeth. We will not be focusing on the technique they use for brushing their teeth.

2)     In addition, we will focus on fleshing out the interaction to sustain routine. As we heard in feedback and also had an opportunity to observe (although very limited) that the age group of kids we are focusing on, get bored of the same routine very quickly. In order to address that and keep them engaged, we will be working on the same character doing different things everyday and even characters changing over time e.g Elmo appearing on the screen from different directions, Elmo appearing with Abby, Bob train appearing instead of Elmo/Abby etc.

3)      Furthermore, we strive to keep the interaction really simple, so that we do not overwhelm the child and distract him away from the main task of brushing. Some initial interaction design details are illustrated in the sketch below –

  • Elmo emerges from one corner of the mirror as soon as the child picks up the brush
  • Elmo  greets the child with a welcome message like, “Hey, good morning. Let’s put some toothpaste on the brush  and start brushing!”
  • Following the child’s cue, Elmo takes out a brush and starts brushing, with a pleasant background score
  • Elmo takes the child through a 3 minute routine which involves brushing teeth and gums, spitting, and finally, rinsing the mouth. Anytime during the 3 minutes, if the child stops brushing, Elmo becomes sad and prompts the child to continue brushing.
  • After the 3 minutes are over, Elmo congratulates the child and invites the child to pose for a picture with him. Next, the laptop/tablet’s front camera comes on and captures the face of the child and creates a snapshot of Elmo and the child side by side.
  • This snapshot is the child’s reward for brushing and is stored in memory. The child can accrue a streak of snapshots and subsequently get to unlock new characters.

4)     On the hardware front, we will be using an accelerometer instead of the tilt sensor as the data stream we were getting as output from the tilt sensor (comprised of 1s and 0s) is quite hard to map to the physical movement and process further downstream.

Materials Required to be Reserved: None

Memento – Final Project Proposal

Team Memento
Group: Fay, Daniel, Michelle

Materials
Arduino Uno (x2)
Nitinol Wire (purchased, ordered, arriving Friday)
Bluetooth Shield (purchased, ordered, arriving Saturday) (x2)
Arduino Uno sensors pack kit (Grove Starter Kit Plus – https://www.seeedstudio.com/grove-starter-kit-plus-p-1294.html ) (already have) (x2)
FS/button, Sound output, Temp sensor, sound input sensor, LED, Sound sensor
Accelerometer (do not have, looking for resource) (x2)

Project Description:
We are building on top our midterm project Memento. Memento is a pair of personal devices used between two friends or family members. For the final project, we have added a third component, a shape-changing object that will react towards the interaction between the two personal devices and represent the relationship journey. We are using Nitinol Wire (wire with memory muscle) to change the shapes of objects that will symbolize the status of the relationship.

The idea is simple: I give my best friend one of these devices and i keep the other for myself. We keep the shape-changing sculptures on our desks or workspaces, and we carry around our little “sensor” eggs. Whenever we hang out or interact with each other, our sculptures grow and change. When we don’t hang out, our sculptures display that we haven’t seen each other in a while.

Our interactions may change the sculpture in a variety of ways: when we talk a lot, our sculpture could make little sounds. When we both push the button when we’re together, there will be a visual hint sent to the paired device, and our sculpture could have elements or flowers “bloom” or a tree “grow.” And when we shake the device when hanging out together, the different levels of shaking inputs will enable different intensity of output of the device. When we both go to the same place, such as a cafe or a gym, the paired device will capture the same location information through beacon bluetooth and return visual hints.

This is an ambient way for us to collect aspects of our friendships and display it in a fun and interactive way.

Nitinol Wire Inspiration:
Nitinol Engine: https://www.youtube.com/watch?v=3MfTJVAtx6w
Watch How Smart Parts Self-Assemble: https://www.youtube.com/watch?v=GIEhi_sAkU8
More Memory Wire Experiment: https://www.youtube.com/watch?v=JKBM9my5eOA
Responsive Panel: https://www.youtube.com/watch?v=teI7baA9_1o

Final project proposal

We plan to continue the project we outlined in our midterm presentation. The patch will work with Adafruit FLORA’s suite of wearable, sewable products in order to get a close-to-skin form factor. For a prototype, this will likely involve fabric rather than something that adheres to the skin, but should be wearable nonetheless.

Here is the list of products we anticipate experimenting with:

  • FLORA sensor pack – includes ancillary items like conductive thread and various sensors
  • Heating modules
  • Bluetooth modules
  • Pressure-sensitive conductive sheets
  • Haptic motor controllers
  • Vibrating mini motor discs
  • Temperature sensors

While we do not anticipate using each item to create our prototype, we see this as an opportunity to try out different sensations and sensors to see what people respond to the most, and use those for our prototype.

Party Platter Player

Members:

Sam Meyer
Nisha Pathak

Components:

  • 1 table
  • 1 tray (we will build a special tray which facilitates the capabilities we will need)
  • 1 disco ball
  • 1 LED diffuser (TBD)
  • 6 plates (will be made from a variety of materials – glass, paper, styrofoam)
  • 6 meals/snacks
  • 6 FSRs for plates
  • 20 light sensors for tray
  • 1 Windows Surface for tray sound (already owned)
  • 1 laptop for table sound

We will create a party tray which controls the start and end of a party through various light and sound effects. The tray, outfitted with light sensors, will react when plates are placed on top of it. When the tray is lifted, a disco ball starts spinning and LEDs on the table light up and move through a sequence of color combinations. Based on the number and location of plates, we will play a musical beat and/or melody. No music plays until the tray is lifted off the table or until the users take a plate off of the tray. Then, when the plates are replaced back on the tray, the music sounds are eliminated, one by one, plate by plate. Once the tray is placed back on the table, the LEDs turn off and the disco stops spinning, indicating the end of the event.

Musical Sandbox

Members: Andrew Chong, Owen Hsiao, Vivian Liu

Our final project will be a music sandbox that allows users to engage with music haptically and visually. This is a scaled down, more interactive version of the installation chamber we had in mind for our midterm project.

Hands can make music and visuals by playing in the sand.

Hands can make music and visuals by playing in the sand.

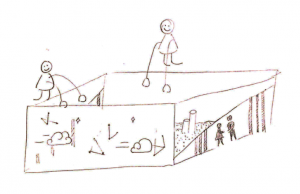
The interaction would be to have people stick their hands in the box and play around with the sand. Thus, the box would become an instrument that transduces hand motion into visuals (Processing, LED lights) and melody changes.

Only one wall will be augmented with a Processing display. The other two will be laser-cut with negative-space silhouettes. Through these holes, LED lights will shine through and change color. The point of the visuals is to invite people to engage with the box and to more demonstrably illustrate results.

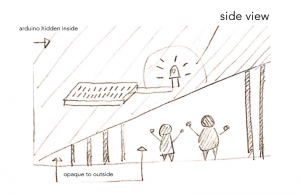
This is the side view. The silhouettes represent negative space through which LED-colored lights would flow through. Perhaps they won't be negative-space but could be made of some semi-opaque inspired by Cesar's talk today.

This is the side view. The silhouettes represent negative space through which LED-colored lights would flow through. Perhaps they won’t be negative-space but could be made of some semi-opaque inspired by Cesar’s talk today.


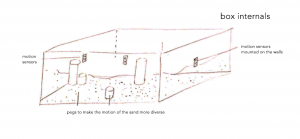
To track the motion, we will be using the same motion sensors we mentioned in our previous presentation. They will be mounted on each of the three non-Processing walls.

Within the box, besides sand there will also be pegs that will allow the sand to scatter when thrown down for a larger range of motion.

This is a view of the box ignoring the processing wall and the side walls.

This is a view of the box ignoring the processing wall and the side walls.

The changes in music will be simple and will most likely be changes in speed. For example, if there is more motion in one wall, the melody will be played at a faster frequency (less time between each note).

Our game plan is to first iterate with a cardboard box and make sure that the motion can alter the music. We’ll be exploring PureData and linking things through FirmData. After getting that done (our MVP) we will work on the bells and whistles of visual output. Our thoughts are that the final product will be a laser cut box that we can set on the floor in the center of the exhibition.