Description
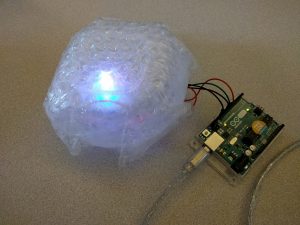
I used an Arduino to control three LED’s: red, green, and blue. With pulse width modification, I control the brightness of each. They are all under a plastic container that has been covered with a couple layers of bubble wrap to act as a diffuser. The brightness of each can be controlled by using serial communication sending combinations of the letters “r”, “g”, and “b”. For example, “rrrrrbbbb” will result in a purple light.
Components
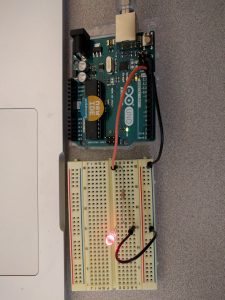
- Arduino
- 3 LED’s: red, green, blue
- 3 Resistors (220Ω)
- 5 Wires
- 1 Breadboard
- 1 Plastic storage container
- Bubble wrap
Code
char serInString[100]; // array that will hold the different bytes of the string. 100=100characters;
// -> you must state how long the array will be else it won't work properly
char colorCode;
int colorVal;
int redVal;
int greenVal;
int blueVal;
int redPin = 9; // Red LED, connected to digital pin 9
int greenPin = 10; // Green LED, connected to digital pin 10
int bluePin = 11; // Blue LED, connected to digital pin 11
void setup() {
pinMode(redPin, OUTPUT); // sets the pins as output
pinMode(greenPin, OUTPUT);
pinMode(bluePin, OUTPUT);
Serial.begin(9600);
analogWrite(redPin, 127); // set them all to mid brightness
analogWrite(greenPin, 127); // set them all to mid brightness
analogWrite(bluePin, 127); // set them all to mid brightness
Serial.println("enter color command using r's, b's, and g's (e.g. 'rrrrrrggggg') :");
}
void loop () {
// clear the string
memset(serInString, 0, 100);
//read the serial port and create a string out of what you read
readSerialString(serInString);
// initialize all back to zero for each loop
redVal = 0;
greenVal = 0;
blueVal = 0;
colorCode = serInString[0];
if( colorCode == 'r' || colorCode == 'g' || colorCode == 'b' ) {
// increment each color based on number of each letter
for (int i = 0; i < strlen(serInString); i++) {
switch(serInString[i]) {
case 'r':
redVal += 25;
break;
case 'g':
greenVal += 25;
break;
case 'b':
blueVal += 25;
break;
}
}
Serial.print("Setting color ");
Serial.println();
Serial.print("red to ");
Serial.print(redVal);
Serial.println();
Serial.print("green to ");
Serial.print(greenVal);
Serial.println();
Serial.print("blue to ");
Serial.print(blueVal);
Serial.println();
serInString[0] = 0; // indicates we've used this string
analogWrite(redPin, redVal);
analogWrite(greenPin, greenVal);
analogWrite(bluePin, blueVal);
}
delay(100); // wait a bit, for serial data
}
//read a string from the serial and store it in an array
//you must supply the array variable
void readSerialString (char *strArray) {
int i = 0;
if(!Serial.available()) {
return;
}
while (Serial.available()) {
strArray[i] = Serial.read();
i++;
}
}