Midterm Project Proposal — Collaborative Creation

Midterm Project Proposal

Dina Bseiso, Jake Petterson, and Andrea Gagliano


We are interested in collaborative art making. Collaborations simply for the enjoyment of experiencing the creative process with another person, to create a more inclusive environment for non-artists, or to redirect the value of art from finished masterpieces to the explorative and failure-driven process. We imagine that collaborative art making would harness the energy/movement/attitudes of your partner which could be extended to include remote collaboration. Here, we suggest two ideas along these veins.


Idea 1 – Orchestrated Ink


Similar to how an orchestra of musicians come together to carry out a composition, translating physical elements into art, so can artists come together to create a composition. Imagine a group of people going about their daily lives, each with a different device that measures a certain physical metric. One person in the group is near a canvas with a brush tool. The brush tool makes a mark depending on the physical metrics that are measured by the group, collectively.


For example:

  • Person A stretches a rubber band. The tension of the rubber band is an input to the thickness of the mark.
  • Person B wears a heat sensing armband while doing an activity of their choice (running / walking / jumping around / laying down). The hotter the armband the warmer or redder the color of the mark is, and the cooler the armband, the cooler the color of the mark.
  • Person C wears an emotion sensing wristband. When they are feeling particularly relaxed, the marks get wispy and light (perhaps slightly translucent). When they are feeling particularly agitated, the marks get more opaque, more intense, and more indelible.
  • Person D bends a potentiometer, controlling the amount of time that the marks will remain. For example, they could be ephemeral or lasting.
  • Person E squeezes a ball. The more force they use, the smaller the interval of time between the moments when the inputs of person A-D are sampled.


Through the assortment of input devices, each one held by an individual in the group, the group of artists work together by combining their creative energy and sharing in the responsibility for composing the aesthetic of the resulting mark on the canvas.


Idea 2 – Collaborative art-making


Imagine this scenario: You are in a beginning pottery class about to make your first bowl on the turntable. You watch the instructor at the front of the room move her hands up and down, in and out, and turn the table at different speeds to make a perfect bowl. But, as you try yours, you fail miserably. The teacher comes over to you and puts her hands over yours as you throw your bowl so that you begin to feel different pressures. But, what if there was something on the outside of your hands giving you haptic instructions instead of the instructor?


Idea: A device on the outside of your hands (one sided glove, rings, or something on the fingernail maybe?) that were able to detect where your hands were positioned in throwing your clay bowl, and then gave output in the form of pressure, tapping, or heat, indicating that part of the hand should move up/down or apply more/less pressure. When throwing on the turntable, you use your foot on a pedal to make the table spin faster/slower. A similar device could be on your foot (toe ring, or anklet, maybe?) instructing you through pressure/tapping/heat to go at a faster or slower pace. Detection on the instructor’s hands and foot would be the input that informs your output.


Such a device could be used for instruction, but could also be used for two people to feed off of each other’s actions in tandem to create art pieces they couldn’t have created on their own. For example, partner A and partner B are throwing bowls at the same time. Similar to how partner A and partner B might feed off of each other’s motions when dancing, partner B could feel partner A’s motions (via their hands) while throwing their bowl and respond with different speed/pressure/movement accordingly. Partner B’s responsive motion would be sent back to partner A continuing the process.


Other domains of application could be in playing musical instruments (helping someone learn the proper posture and fingering), calligraphy (and/or learning the script of a new language associated with the sounds), drawing, skiing, etc. It could also serve as dismantling barriers to entry to certain crafts with regard to accessibility.

 

Globes and Maps

A tangible user interface not discussed in the paper is a map, or a globe, both related but different in interaction. They qualify as a Token in the taxonomy, in that they physically resemble the information they represent to a degree. Globes arguably represent the Earth more realistically than maps do, as maps are flat (even though there may be curvatures to denote roundness); however, people are able to impose their own information upon these TUIs in different ways to more easily extract different data. For example, a cartographer may have an easier time visualizing trajectories on a map, but may have a better perception of time it may take to travel that trajectory on a globe due to how it spins on its axis and representations of wind channels.

Digital maps, such as Google maps, have taken these more physical representations of the Earth to a different level. It is neither more related to a globe nor a map, but somewhere in between due to the skew morphism that has recently been added. And while a user may interact with this interface with a mouse (or a finger) to drag and zoom, or even dictate a trajectory, I’m unsure how to categorize the Street Map view of Google Maps. At that point, I wonder if the TUI becomes no longer a Token, but maybe an Object as Reconfigurable Tool.

Dual Potentiometer Lab

Description:

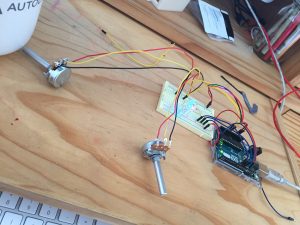
I used an Arduino-Uno as a microprocessor to light three LED lights, pulsing at a rate dependent on a reading from a potentiometer, and at a brightness dependent on a different potentiometer.

Components Used:

  • 1 Arduino
  • 3 LEDs (red, green, and blue)
  • 3 Resistor (220Ω)
  • 1 Breadboard
  • 2 Potentiometers

Code:

/*
 Analog Input
 Demonstrates analog input by reading an analog sensor on analog pin 0 and
 turning on and off a light emitting diode(LED) connected to digital pin 13.
 The amount of time the LED will be on and off depends on
 the value obtained by analogRead().

 The circuit:
 * Potentiometer attached to analog input 0
 * center pin of the potentiometer to the analog pin
 * one side pin (either one) to ground
 * the other side pin to +5V
 * LED anode (long leg) attached to digital output 13
 * LED cathode (short leg) attached to ground

 * Note: because most Arduinos have a built-in LED attached
 to pin 13 on the board, the LED is optional.


 Created by David Cuartielles
 modified 30 Aug 2011
 By Tom Igoe

 This example code is in the public domain.

 http://www.arduino.cc/en/Tutorial/AnalogInput

 */

int sensorPin = A0; // select the input pin for the potentiometer for pulse
int sensorPinBrightness = A1; 
int redledPin = 9;
int blueledPin = 10;
int greenledPin = 11; // select the pin for the LED
int sensorValue = 0; // variable to store the value coming from the sensor
int sensorValueBrightness = 0;

void setup() {
 // declare the ledPin as an OUTPUT:
 pinMode(redledPin, OUTPUT);
 pinMode(blueledPin, OUTPUT);
 pinMode(greenledPin, OUTPUT);
}

void loop() {
 // read the value from the sensor:
 sensorValue = analogRead(sensorPin);
 sensorValueBrightness = analogRead(sensorPinBrightness); 
 // turn the ledPin on
 digitalWrite(redledPin, HIGH);
 digitalWrite(blueledPin, HIGH);
 digitalWrite(greenledPin, HIGH);
 // adjust brightness
 analogWrite(redledPin, sensorValueBrightness/4); 
 analogWrite(blueledPin, sensorValueBrightness/4); 
 analogWrite(greenledPin, sensorValueBrightness/4); 
 // stop the program for <sensorValue> milliseconds:
 delay(sensorValue);
 // turn the ledPin off:
 digitalWrite(redledPin, LOW);
 digitalWrite(blueledPin, LOW);
 digitalWrite(greenledPin, LOW);
 // stop the program for for <sensorValue> milliseconds:
 delay(sensorValue);
}

49582925048__3F2AECA0-B12D-46AB-8157-6A311A04527E


TiltBrush

Hands, in their ability to touch — fingertips serving as input data points to the brain — feed a constant stream of data to the brain that is enriched per the homunculus’s illustration. Not only are they sensitive, but they are the most adaptable limb, quick to contort or reposition themselves as reflexes or deliberate actions call for. They are particularly useful in novel situations. In art-making, they study tangible landscapes or tools that can be manipulated, reshaped after feedback from the brain. They are part of a feedback loop, cracial (arguably necessary) to the creative process. Without hands, it is very difficult to transform the mind’s abstract thought to a concrete reality. Regardless of the medium. This point is also why a computer is inherently a tool for the mind, as it deals with abstract concepts and reshaped interactivity that doesn’t necessarily require hands to explore  the unknown.

I think a great example of McCullough’s argument is TiltBrush, a 3D drawing environment within virtual reality. The computer, in this situation, is the software that in a literal, warped reality, allows you to execute otherwise traditional tasks (sculpting, drawing) with your hands via the controllers. Feedback from how the “ink” dispenses from the controller to paint/sculpt your work of art is rendered before you in this reality, allowing you to reprocess and alter your actions to either explore things differently or repeat.

Rainbow House

Description:

I used an Arduino-Uno as a microprocessor to light three LED lights dependent on input from a keyboard. There are three different modes: ROYGBIV explicit color input, RGB explicit color input, or step-dimness color input. As a diffuser, I used a house that I 3D designed and printed from an Ultimaker 2+ out of PLA and ABS material, with some cotton distributed by the windows. The LEDs are capable of entering the house via the chimney.

Components Used:

  • 1 Arduino
  • 3 LEDs (red, green, and blue)
  • 3 Resistor (220Ω)
  • 1 Breadboard
  • A keyboard
  • A 3D printed house with holes in it.
  • Cotton.

Code:

/* 
 * Serial RGB LED
 * ---------------
 * Serial commands control the brightness of R,G,B LEDs 
 *
 * Command structure is "<colorCode><colorVal>", where "colorCode" is
 * one of "r","g",or "b" and "colorVal" is a number 0 to 255.
 * E.g. "r0" turns the red LED off. 
 * "g127" turns the green LED to half brightness
 * "b64" turns the blue LED to 1/4 brightness
 *
 * Created 18 October 2006
 * copyleft 2006 Tod E. Kurt <tod@todbot.com
 * http://todbot.com/
 */

char serInString[100]; // array that will hold the different bytes of the string. 100=100characters;
 // -> you must state how long the array will be else it won't work properly
char colorCode;
String colorCodeString; // necessary for first conditional check for ROYGBIV
float colorVal; // necessary for step-change conditional
int colorValInt; // necessary for clean println statements
float colorDuplicateInput; // necessary for computation of LED power


struct RGB { //instantiate a datastructure for RGB values
 char colorName[50];
 int r;
 int g;
 int b;
};

struct RGB variable[9]; // declare a variable array that contains data types of data structure RGB

int redPin = 9; // Red LED, connected to digital pin 9
int greenPin = 10; // Green LED, connected to digital pin 10
int bluePin = 11; // Blue LED, connected to digital pin 11

void setup() {
// ROYGBIV defined
strcpy(variable[0].colorName, "white");
variable[0].r = 255; 
variable[0].g = 255;
variable[0].b = 255;


strcpy(variable[1].colorName, "red");
variable[1].r = 255; 
variable[1].g = 0;
variable[1].b = 0;

strcpy(variable[2].colorName, "orange");
variable[2].r = 255; 
variable[2].g = 165;
variable[2].b = 0;

strcpy(variable[3].colorName, "yellow");
variable[3].r = 255; 
variable[3].g = 255;
variable[3].b = 0;

strcpy(variable[4].colorName, "green");
variable[4].r = 0; 
variable[4].g = 255;
variable[4].b = 0;

strcpy(variable[5].colorName, "blue");
variable[5].r = 0; 
variable[5].g = 0;
variable[5].b = 255;

strcpy(variable[6].colorName, "indigo");
variable[6].r = 75; 
variable[6].g = 0;
variable[6].b = 130;

strcpy(variable[7].colorName, "violet");
variable[7].r = 238; 
variable[7].g = 130;
variable[7].b = 238;

strcpy(variable[8].colorName, "black");
variable[8].r = 0; 
variable[8].g = 0;
variable[8].b = 0;
 
 pinMode(redPin, OUTPUT); // sets the pins as output
 pinMode(greenPin, OUTPUT); 
 pinMode(bluePin, OUTPUT);
 Serial.begin(9600); // instantiate communication between the computer and the microprocessor
 analogWrite(redPin, variable[0].r); //default is R value for white
 analogWrite(greenPin, variable[0].g); //default is G value for white
 analogWrite(bluePin, variable[0].b); //default is B value for white
 Serial.println("Please enter color command (e.g. r43, red, rrr) :"); 
}

void loop () {
 // clear the string
 memset(serInString, 0, 100);
 //read the serial port and create a string out of what you read
 readSerialString(serInString);
 //this is basically catching everything... 
 if (atoi(serInString + 1) > 0 || atoi(serInString + 1) == 0) {
 colorCodeString = String(serInString);
 colorCode = serInString[0];
 // check if we have the word in our dictionary 
 if( colorCodeString == "red" || colorCodeString == "green" || colorCodeString == "blue" || colorCodeString == "white" || colorCodeString == "black" || colorCodeString == "yellow" || colorCodeString == "orange" || colorCodeString == "violet" || colorCodeString == "indigo") {
 for (int count = 0; count <= 8; count++) {
 if(colorCodeString == variable[count].colorName) {
 analogWrite(redPin, variable[count].r);
 analogWrite(greenPin, variable[count].g);
 analogWrite(bluePin, variable[count].b);
 Serial.print("Setting RGB values for default ");
 Serial.print(colorCodeString);
 Serial.print(" hue: ");
 String colorSentence_R = "R: " + String(variable[count].r); 
 String colorSentence_G = ", G: " + String(variable[count].g);
 String colorSentence_B = ", B: " + String(variable[count].b);
 Serial.println(colorSentence_R + colorSentence_G + colorSentence_B);
 return;
 }
 }
 }
 // if not a full word in our dictionary... 
 else if (colorCode == 'r' || colorCode == 'g' || colorCode == 'b') {
 // if not a step conditional but an explicit value
 if (serInString[0] != serInString[1]) {
 colorVal = atoi(serInString+1);
 }
 // the step conditional
 else {
 colorDuplicateInput = strlen(serInString);
 colorVal = (float)(colorDuplicateInput/10 * 255.0); 
 }
 colorValInt = (int)colorVal;
 Serial.print("setting color ");
 Serial.print(colorCode);
 Serial.print(" to ");
 Serial.print(colorValInt);
 Serial.println();
 serInString[0] = 0; // indicates we've used this string
 if(colorCode == 'r') 
 analogWrite(redPin, colorValInt);
 else if(colorCode == 'g')
 analogWrite(greenPin, colorValInt);
 else if(colorCode == 'b')
 analogWrite(bluePin, colorValInt);
 }
 }


 delay(100); // wait a bit, for serial data

}

//read a string from the serial and store it in an array
//you must supply the array variable
void readSerialString (char *strArray) {
 int i = 0;
 if(!Serial.available()) {
 return;
 }
 while (Serial.available()) {
 strArray[i] = Serial.read();
 i++;
 }
}


Rainbow House Clip

Sprinting LED

Description:

I used an Arduino-Uno as a microprocessor to light an LED light at a decelerating pace.

Components Used:

  • 1 Arduino
  • 1 LED
  • 1 Resistor (220Ω)
  • 1 Breadboard

Code:

/*
 * Blink
 * 
 */

int ledPin = 13;


int stepFunction(int x, int y){
 //the rate at which the LED will decelerate.
 int result;
 result = x + y;
 return result;
}

int pace = 0;

void setup() {
 // put your setup code here, to run once:
 pinMode(ledPin, OUTPUT);
 Serial.begin(9600);
}

void loop() {
 // set the running pace for the LED blinking
 int increment = 20; // first, set increment to 20ms. 
 digitalWrite(ledPin, HIGH); // turn the LED on (HIGH is the voltage level)
 pace = stepFunction(pace, increment);
 Serial.println(increment);
 delay(pace);
// delay(2000); // wait for a second
 digitalWrite(ledPin, LOW); // turn the LED off by making the voltage LOW
 delay(pace);
// delay(1000); // wait for a second
 increment = pace;
}

My Grandmother’s Cardigan

Often, I am quite cold. I own a burgundy cardigan that I am quite fond of, not just for the warmth it provides, but also for the type of warmth I receive by it. Decades ago, my grandmother wove it for my mother, which she has passed down to me. The yarn is soft, and has grown softer with every wear from my mother and now myself. I did not know my grandmother very well, as she passed away when I was young, but I know she loved me and my family very much. And I can feel that love every time I slip on the cardigan, along with a more scientific sense of warmth. In the reading, activity is considered “to be the key source of development of both the object and the subject.” As I seek warmth, I wear my grandmother’s cardigan, and as I wear it the cardigan changes through mild abrasions, washes, and my stitching. It is successful in both keeping me warm, and in reminding me of the closely-knit family I have surrounding me.