Team: Molly, Yifei, Olivia, Owen, Michelle
Description:
For this assignment, our team tried explore how to get motors to operate and manipulate musical instruments that we easily are able to play as humans. For this, we explored the claves, kalimba, egg shakers, bell kit, and tambourine. We first tried having servos operate the claves, but this proved to be too much of a challenge since we need to hold the claves at the point and allow them to resonate, which is something we do easily when we hold them with our hands, but not with a servo. We also looked into making noise on the kalimba using ear plugs on servos (which mimic human fingers), but the sliding motion with adjusting pressure was too difficult. We also tried using the egg shaker and a coffee cup full of beans using a DC motor or servo, but we found that the shaking beads just went towards the edge of the shaker container.
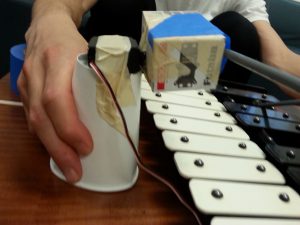
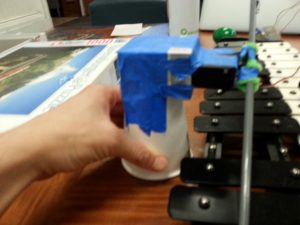
We then explored different ways to get servo motors to hit mallets on a bell kit. We noticed that if we allow for a little bit of “give” to allow a bounce on the key, rather than directly hitting the key and dampening the sound, we got a better sound. We made a “competitive game” out of the instrument: we attached two servos to the mallets and allow two player to operate pots to change the percussive nature of the mallets and instruments.
We also explored using a DC motor on a tambourine. We found if we attached tape at different diameters, we can change the amount it hits the bells. We decided to change this with a potentiometer as well.
We also decided to explore a visual medium on processing, where if you click and move the mouse – depending on how slow and fast you go, the visual component and the sound changes.
In the end we decided on having servo motors (controlled by pots) hit the bell kit and kalimba, a DC motor (controlled by pot) operate the tambourine, and a processing script on a computer. Our 4 inputs are: 2 pots for the mallets, 1 pot for the tambourine, and 1 mouse for machine. We created a fun noise game where we all contribute a part to create a cacophony of sounds!
Materials used:
- Bell Kit
- Tambourine
- Kalimba
- Computer (mouse input, processing)
- 2x Arduino uno
- 3x pot
- 2x servo
- 1x 1k resistor
- 1x transistor
- 1x diode
- 1x DC motor
- 1x battery pack


Code for Processing
Maxim maxim;

AudioPlayer player;

AudioPlayer player2;

void setup()

{

  size(640, 960);

  maxim = new Maxim(this);

  player = maxim.loadFile("atmos1.wav");

  player.setLooping(true);

  player2 = maxim.loadFile("bells.wav");

  player2.setLooping(true);

  player.volume(0.25);

  background(0);

  rectMode(CENTER);

}

void draw()

{

//

}

void mouseDragged()

{

  player.play();

  player2.play();

  float red = map(mouseX, 0, width, 0, 255);

  float blue = map(mouseY, 0, width, 0, 255);

  float green = dist(mouseX,mouseY,width/2,height/2);
float speed = dist(pmouseX, pmouseY, mouseX, mouseY);
float alpha = map(speed, 0, 20, 0, 10);
//println(alpha);
float lineWidth = map(speed, 0, 10, 10, 1);
lineWidth = constrain(lineWidth, 0, 10);
noStroke();
fill(0, alpha);
rect(width/2, height/2, width, height);
stroke(red, green, blue, 255);
strokeWeight(lineWidth);
//rect(mouseX, mouseY, speed, speed);
line(pmouseX, pmouseY,mouseX, mouseY);
//brush1(mouseX, mouseY,speed, speed,lineWidth);
//brush2(mouseX, mouseY,speed, speed,lineWidth);
//brush3(mouseX, mouseY,speed, speed,lineWidth);
//brush4(pmouseX, pmouseY,mouseX, mouseY,lineWidth);
//brush5(pmouseX, pmouseY,mouseX, mouseY,lineWidth);
//brush6(mouseX, mouseY,speed, speed,lineWidth);
//brush7(pmouseX, pmouseY,mouseX, mouseY,lineWidth);
player.setFilter((float) mouseY/height*5000,mouseX / width);
//player2.setFilter((float) mouseY/height*5000,mouseX / width);
player2.ramp(1.,1000);
player2.speed((float) mouseX/width/2);
}
void mouseReleased()
{
//println("rel");
player2.ramp(0.,1000);
}
Code for 2x Servos for bell kit, controlled by pot
/*

 * Servo with Potentiometer control

 * Theory and Practice of Tangible User Interfaces

 * October 11 2007

 */

int servoPin1 = 4;      // Control pin for servo motor

int servoPin2 = 5;

int potPin1 = A1;      // select the input pin for the potentiometer

int potPin2 = A2;

int pulseWidth1 = 0;    // Amount to pulse the servo

int pulseWidth2 = 0;

long lastPulse = 0;    // the time in millisecs of the last pulse

//long lastPulse2 = 0;

int refreshTime = 20;  // the time in millisecs needed in between pulses

int val1;               // variable used to store data from potentiometer

int val2;

int minPulse = 500;   // minimum pulse width

void setup() {

  pinMode(servoPin1, OUTPUT);  // Set servo pin as an output pin

  pinMode(servoPin2, OUTPUT);

  pulseWidth1 = minPulse;      // Set the motor position to the minimum

  pulseWidth2 = minPulse;

  Serial.begin(9600);         // connect to the serial port

  Serial.println("servo_serial_better ready");

}

void loop() {

  val1 = analogRead(potPin1);    // read the value from the sensor, between 0 - 1024

  if (val1 > 0 && val1 <= 999 ) {
    pulseWidth1 = val1*2 + minPulse;  // convert angle to microseconds

    Serial.print("moving servo to ");
    Serial.println(pulseWidth1,DEC);

  }
  updateServo1();   // update servo position

  val2 = analogRead(potPin2);
  if (val2 > 0 && val2 <= 999 ) {
    pulseWidth2 = val2*2 + minPulse;  // convert angle to microseconds

    Serial.print("moving servo to ");
    Serial.println(pulseWidth2,DEC);

  }
  updateServo2();   // update servo position

}
// called every loop().
void updateServo1() {
  // pulse the servo again if the refresh time (20 ms) has passed:
  if (millis() - lastPulse >= refreshTime) {

    digitalWrite(servoPin1, HIGH);   // Turn the motor on

    delayMicroseconds(pulseWidth1);  // Length of the pulse sets the motor position

    digitalWrite(servoPin1, LOW);    // Turn the motor off

   lastPulse = millis();           // save the time of the last pulse

  }

}

void updateServo2() {

  // pulse the servo again if the refresh time (20 ms) has passed:

  if (millis() - lastPulse >= refreshTime) {

    digitalWrite(servoPin2, HIGH);

    delayMicroseconds(pulseWidth2);

    digitalWrite(servoPin2, LOW);

    lastPulse = millis();           // save the time of the last pulse

  }

}
Code for DC motor controlled by Pot
/*

 * one pot fades one motor

 * modified version of AnalogInput

 * by DojoDave

 * http://www.arduino.cc/en/Tutorial/AnalogInput

 * Modified again by dave

 */
int potPin = 0; // select the input pin for the potentiometer
int motorPin = 9; // select the pin for the Motor
int val = 0; // variable to store the value coming from the sensor
void setup() {
Serial.begin(9600);
}
void loop() {
val = analogRead(potPin); // read the value from the sensor, between 0 - 1024
Serial.println(val);
analogWrite(motorPin, val/4); // analogWrite can be between 0-255
}
